30 May 2007

The Skinny


Asparagus and Spring Onion Tart

Growing up, the prevailing wisdom was that the best asparagus was defined by uniformly thin stalks. I was taught to pick the skinny bunch from an early age; we avoided the larger asparagus for fear they could be tough or (worse) mushy. Then, somewhere along the way, we wised up and realized fat asparagus could be good too. I particularly like to peel the bottom half of fat asparagus stalks, making them velvety smooth and thus increasing your asparagus pleasure (like in this recipe).

This year, the asparagus crop has been particularly delectable, I think the long cool spring has something to do with it. The wonderful man at the market has fat and thin varieties, and I've been buying both and alternating them, unable decide which I like better, they're both so good. This past weekend, we stopped on the way home from the beach and picked up some locally grown asparagus, and while it was delicious, it can't compare to my market man. Most of the time, we enjoy our asparagus simply boiled or roasted, but faced with produce this good, I wanted to show it off a bit. You know, put it in a fancy dress and send it down the runway.

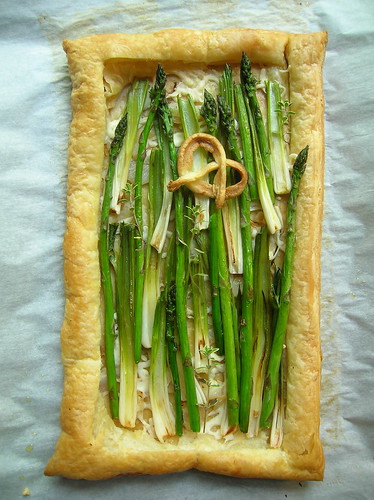
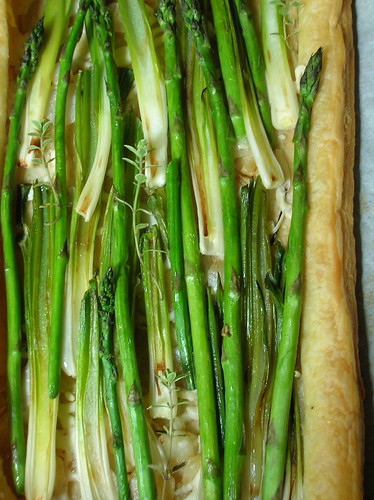
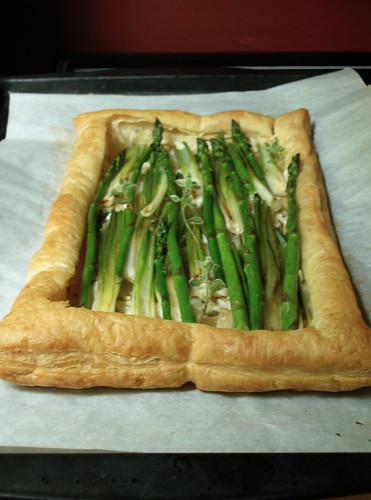
In this case, the dress was a bit of puff pastry to shelter it in a tart. I matched the asparagus with some sweet spring onions- you'll want to use either baby leeks or very fresh onions, to ensure they have their fresh sweet flavor, and haven't gotten too strong with age. A bit of cheese and a sprinkling of thyme from the garden, and not only was this asparagus showed off, but the tart was quickly devoured. While it may seem to have multiple steps, the recipe is simple and comes together easily, so I recommend you get to it quickly, while those good skinny little asparagus spears are still around.


Asparagus and Spring Onion Tart
Puff pastry makes a quick and easy base for this tart, I recommend you look for Dufour brand in the frozen section of the grocery (it's made with all butter, as opposed to shortening). This tart is meant to show off those skinny first shoots of spring, you could add ramps, green garlic, sorrel, or other sweet onions.

1 sheet puff pastry, thawed if frozen
2 bunches baby leeks, spring onions, or very fresh scallions
1 bunch skinny asparagus
1/2 cup grated Gruyere cheese
a few sprigs of fresh thyme

1. Roll out and trim the puff pastry to a 12 by 8 inch rectangle. Place on a greased baking sheet and place in the fridge to chill.
2. Preheat the oven to 375 F. Trim away the tops and tough outer leaves from the onions/leeks. Take one bunch of the onions and carefully slice them in half lengthwise. Take the remaining bunch of onions and chop the bottom white parts finely. Melt one tablespoon of butter or oil in a skillet. Add all of the onions and cook over medium heat, being careful not to push the onion halves around too much, or they may come apart. Cook gently for about 10 minutes, until well-softened, then set aside.
3. In the same pan, add 1 to 2 inches of water and bring to a boil. Add the asparagus and boil until just tender, about 5 minutes. Drain, rinse under cold water, and set aside.
4. Take the chilled puff pastry from the fridge and use a knife to trace a rectangle marking a one-inch border. Score the interior area in a light cross-hatch pattern. Place in the oven and bake for 10-15 minutes, until golden.
5. Remove the pastry and use the back of a spatula to press down on the center of the pastry. Sprinkle the cheese over top and the chopped onions. Arrange the onion halves decoratively over the tart, return to the oven and bake for 10 minutes. Scatter the asparagus and thyme over the top and bake for a final 3-5 more minutes.
___

28 May 2007

Homework


Gâteau Saint-Honoré

Homework is one of those things that you are supposed to be freed from upon leaving school. One of the perks of ‘adult’ life, like going out on a weeknight, or the realization that calculus really was useless. Liberated from homework, people get to move forward in their lives and do fun things like fix the broken washing machine, fertilize the lawn, pay the bills, and have those little things called kids and tend to raising them. But we never really get away from homework, even if it no longer involves trigonometry. I sometimes bring work home with me, especially if I’m working on a piece of writing, I like to be able to mull over word choice and sentence structure at my own leisure. However, this week I was cursing myself for some self-assigned homework.

You may have read about a certain crepe cake I made way back when, part of a baking group I joined (the Daring Bakers), in which we have a ‘monthly challenge.’ So, along came this month’s challenge, and I’ll admit it, I balked. As the deadline approached, I grumbled sourly about “that thing I have to bake, as if I don’t have other things to do.” The assignment, a Gâteau Saint-Honoré, was indeed a challenge, with multiple components and steps. I could be heard muttering things about ‘stupid French pastries’ under my breath like a kid with a book report to do. In France, fancy pastries and cakes are almost always purchased from professional bakers, while home cooks rely on a repertory of simple baked goods and custards for everyday. I am very-much a home cook, but I hope I am also daring, so I gave it a go.


A Gâteau Saint-Honoré is a classic pastry comprised of a puff pastry base with rings of cream puff dough, then topped with a lightened pastry cream (rapid Chiboust), and decorated with cream puffs, whipped cream, and caramelized sugar. May 16 was Saint Honore (pronounced o-no-ray) Day the patron saint of bakers after whom the cake is named.

I finally buckled down and made the thing, and you know what, I’m so glad I did. Like the best homework assignment, it actually taught me some things. I’d never made cream puffs (choux paste dough) before, it’s an interesting technique, and one I look forward to experimenting with some more. I stirred the dough by hand, and nearly lost an arm to it, so if you have a stand mixer, I recommend using it. The puff pastry and Chiboust ( a pastry cream stabilized with gelatin and lightened with both whipped cream and beaten egg whites), are classic techniques worth knowing. If you wanted to simplify this, you could use a purchased puff pastry (I recommend Dufour brand), and a simple pastry cream lightened with whipped cream.

Most importantly, the cake was delicious. I had been contemplating giving half of it away to a friend, but after the two of us went back for seconds, I was told: “you better not give any of this away, it’s like a real French pastry.” I agreed, nibbling a delectable cream puff with a crunch of caramelized sugar, and feeling rather proud of my bit of edible homework. A+

Since it is quite lengthy, I recommend you head over here for the full Gâteau Saint-Honoré recipe. Also, much of my own success is due to Helen, who wrote out the recipe and offered great support and advice along the way. Many thanks!

__

24 May 2007

What Was Always There, Newly Admired


Radish-Poppy Seed, Cucumber-Coriander Chutney, and Carrot-Ginger Tea Sandwiches

Back when I was in high school, my mom and I were out for our usual dose of Sunday museum visits, something know in our house as "museum therapy," and perusing an exhibit at the National Portrait Gallery. Without warning, I saw my mom approach a man wearing tortoiseshell glasses and who stood with his nose inches from a painting, scribbling notes on a legal pad clutched to his chest. "Dink, is that you?" she asked. To my surprise, he turned and said in a dead-serious whisper, "you used my real name." Actually, I was soon to learn that his real name is Don, and Dink was a name used only by his childhood friends. He and my mother had been best friends through high school, he often picked her up in his mother's pink convertible, and gave her a statue of Hamlet when they graduated.

However, after high school they lost touch, and until that meeting in the hushed gallery halls, hadn't seen each other in nearly thirty years. In a subsequent lunch, my mother learned Dink (as we still call him), was a lawyer who lived nearby with his partner John in a great apartment building, and a friendship was resumed as if there had never been a gap. These days, Dink and John are some of the most creative, intelligent, well-traveled people we know, and I always look forward to when they come to visit. They often talk about memories of growing up in Tennessee, stories looked on with the fresh eyes of time and experience.


Knowing they were coming for a picnic last weekend, my mind set on what to fix: simple things, like a little chopped tomato salad, and some slices of teriyaki chicken, a big bowl of grapes and a nice smoked cheddar. But I was also thinking about those foods of the old South, and looking on them with new eyes. Take, for example, the tea sandwich. I picture it as part of the luncheon spread at the Country Club, piled on platters next to a gelatin salad and ham biscuits, probably coated in mayonnaise and insipidly soggy. I've always associated tea sandwiches that way, never giving a thought to where they came from. It took my British-born companion to point out the obvious, that tea sandwiches are one example of the Old English roots of the South.

That got me to thinking about the linneage of tea sandwiches, and the other behemoth of British colonization, India. Spying a jar of coriander chutney, a thick green paste made with coriander and coconut, I immediately knew it would be a perfect twist on the classic cucmber-watercress sandwich. But why stop at one type of tea sandwich when you can have many? Sometimes my culinary imagination gets the best of me, so those French breakfast radishes I picked up at the market got paired with a delectable cream cheese- poppy seed spread. And finally, sweet grated carrots paired with ginger and a deliciously nutty bread.

I'll admit tea sandwiches are a bit fiddly, you can't really do them ahead or they'll get soggy. But I had a ball putting this together, and best of all, the sandwiches were delicious, each person had a different favorite. Sometimes it takes an old friend and a new perspective to discover something that was right there all along.


Tea Sandwich Tips
Use very thinly sliced good quality bread. To prevent sogginess, spread the bread with a thin layer of unsalted butter, and don't assemble more than 3-4 hours ahead of time. Remove all crusts and slice the sandwiches into small shapes about the size of two bites. For fun, you can decorate the edge of the sandwiches with chopped herbs, seeds, or finely grated vegetables.

Radish-Poppy Seed Tea Sandwiches
slivered radishes, chopped chives, 1/2 cup cream cheese, 3 tbl mayonnaise, 2 tbl poppy seeds, 1 tsp lemon zest, white bread

Combine cream cheese, mayonnaise, poppy seeds, and lemon zest. Spread bread with cream cheese mixture, cover with a layer of slivered radishes and a sprinkling of chives, then top with a slice of cream cheese-spread bread. Trim crusts from sandwiches and cut into small shapes. If desired, spread one edge of sandwiches with a small amount of the cream cheese mixture and dip in poppy seeds to decorate.

Carrot-Ginger Tea Sandwiches
3 large carrots, grated, 1/2 cup marmalade, 1 tsp ginger, whole-grain bread

Combine the grated carrots, marmalade, and ginger (if you have a ginger marmalade, you can use it and omit the powdered ginger). Make sandwiches with whole grain bread and cut into small squares or triangles.

Cucumber-Coriander Chutney Tea Sandwiches
1-2 cucumbers (preferably seedless), coriander-coconut chutney (available in jars in international food stores), unsalted butter, white bread, chopped chives, herbs, or dessicated coconut for decorating

1. Peel the cucumbers in a striped pattern, leaving only a little bit of green for accent. Using a mandoline or a sharp knife, thinly slice the cucmber, pat the slices dry with paper towels.
2.Spread one side of the bread slices with a small amount of unsalted butter to prevent sogginess. Spread the bread with coriander chutney, top with cucumber slices, assemble sandwiches, and trim crusts. If desired, spread one side of the sandwiches with coriander chutney and dip in chopped chives or dessicated coconut to decorate.

23 May 2007

First of Many


In my house, I am designated pie maker. It is a duty I accept readily, having been bred for it starting at the tender age of about ten. Somehow, pies were deemed a simple thing for a young child to help make, and I learned quickly, eventually taking over pie duty in the stretches of summer months. One summer, we went to a pick your own berry farm, and after laboring all afternoon in the sun, we bought some extra berries to supplement our harvest and ended up coming home with enough blueberries, blackberries, and raspberries to fill a bathtub. As the berries threatened to take over the kitchen, I had to go to all the neighbor’s houses to collect enough pie pans, and then I went to work. The neighbors who were kind enough to donate a pan got a pie baked in it in return.

I came to rhubarb pie relatively late, having grown up in an area devoid of any Swedish immigrants (click here to find out why “Linnaeus said that the introduction of rhubarb to Sweden was his proudest achievement”). However, these days we look forward to rhubarb-strawberry pie as the first sign of spring and a happy harbinger of many pies to come. In fact, it's become one of my favorite fruit pies, second only to blueberry. The strawberries at the market have been particularly glorious this year, and provide the perfect compliment to the tart rhubarb.

I will say the one secret to my pies is a good homemade crust. Unfortunately, many people are intimidated by pie crust, or choose to rely on pre-made ones, which is sad. Homemade crusts are very easy to make and are deliciously flakey and buttery. Just make sure you follow the directions and chill the crust as directed. These days, pies are so familiar, I barely measure anything, relying more on taste, eye, and instinct. It’s an instinct I suspect will be further honed, as this is only the beginning of the season.


Strawberry-Rhubarb Pie

2 1/2 cups rhubarb stalks cut into 1/2 inch pieces
1 1/2 cups strawberries, stemmed and sliced
1 cup sugar
3 tablespoons cornstarch or tapioca
1/4 teaspoon of salt
1 teaspoon of grated orange peel
Unbaked pastry for two-crust 9 inch pie (see below)

1. Preheat oven to 375 F. Have your pie crust fitted into the pie pan and chilling the fridge (see below). Combine the filling ingredients in a large bowl, stirring to combine. Let sit for 10-15 minutes.
2. Pour filling into prepared pie crust. Top with a lattice crust, crimp edges as desired.
3. Place in the oven, check the pie after 30 minutes to make sure the edges aren’t browning too much, cover them with foil or a pie shield if necessary. Bake for 50-60 minutes total. The juices should be thickened and bubbling when the pie is done. Cool on a rack.

Pie Crust
I still make my crust by hand, but you can use a food processor if you prefer. Yields pastry for a 9 or 10 inch double crust pie.

2 1/2 cups flour
1 pinch salt
2 tbl sugar (optional)
1/2 cup (1 stick) butter, cold
1/2 cup shortening
4-6 tablespoons ice water

1. Combine the flour, salt, and sugar in a large bowl. Slice the butter into little bits and add to the bowl, add the shortening to the bowl in little spoonfuls. Using two knives or your fingers, rub the butter into the flour until the mixture resembles coarse meal. You don’t have to over do it, you want a few pea-sized bits of butter.(You can also do this in the food processor). Sprinkle about 4 tablespoons of ice water over the mixture and use a spatula to gently push the dough together. You can add a little more water if necessary, you just want the dough to come together, don’t knead it too much.
2. Divide the dough into two balls, flatten them slightly into disks, dust them lightly with flour and wrap in plastic wrap. Refrigerate the dough until chilled, at least half an hour or up to two days.
3. Roll out the dough: If the dough is very cold you may want to let it sit for about 5 minutes on the counter before you roll it. Roll the dough out with a rolling pin, only adding a little flour to the work surface if necessary to keep from sticking. Roll to about a ten inch circle. Fit the dough into a pie pan, trim and crimp the edges, then refrigerate or freeze until ready to use. Roll out the second round of dough, refrigerate until ready to top your pie, or use as desired.

__

22 May 2007

Sumac Crusted Cod, Black Olive Sauce


Let's cut straight to the chase today: this dish was delicious. The only sad part was the next day, when we realized there wasn't any more of it left, at which point I just went and put it together again. Luckily, it comes together in mere minutes, so we kept the hungry-grumpy me at bay (and that is always a good thing).

It all started with a little recipe for 'black olive oil' I spied in Samuelsson's The Soul of a New Cuisine. With such an evocative name, I had visions of a dark-as-night sauce, thick and rich as an oil well. Obviously, I didn't think that one through, because the name comes from the fact that the oil is made with black olives, not that it is really black-colored. As I soon realized, black olives are sort of grey on the inside, so there I was with a big batch of tasty but slightly grey-green sauce. All dressed up and nowhere to go.

I had picked up some cod fillets, and when I saw the little sack of sumac on my counter, inspiration struck. Why not roll the cod in the sumac, then serve it with the olive oil? I had no idea if it would work, since I'd never heard of such a dish. As we sat down to dinner I waited nervously as the first mouthfuls were chewed; there was a pause, and then a murmur of approval. And it was good, as I dug in my own fork. Sumac, made from dried berries, has a very mild taste, so it doesn't overpower the fish, but just adds a tart compliment to it. It is available in the spice section of most groceries and in Middle Eastern markets, and don't worry, it shares no relation with the North American poison sumac. Any leftover black-olive oil can be used for dipping bread and rubbing on meats and even as a salad dressing. All in all, a dish worth repeating.


Sumac Crusted Cod with Black Olive Sauce
The tart but mild sumac is a perfect foil for meaty fish such as cod.

2 lb cod fillets
1/4 cup sumac
black olive oil, recipe follows
2 tbl olive oil

1. Cut the cod fillets into serving-sized pieces, rub about 1/2 cup of the black olive oil all over the fillets and set aside to marinate for half an hour, or up to two hours.
2. Preheat the oven to 400 F. Wipe off any excess marinade from the fish. Roll each piece of cod in the sumac to coat. Heat the olive oil in a wide skillet over medium heat. Add the cod fillets to the skillet and cook for about 3 minutes on each side, using tongs to gently turn the fish. Once the cod is sauteed on both sides, remove from the skillet, and transfer to a baking sheet. Place the cod in the oven for another five minutes to finish cooking, the fish should be plump, opaque, and just begining to flake easily. Depending on how thick your fillets are, you may not need to use the oven at all, or you may want a longer time in the oven. Serve immediately, with black olive oil drizzled on top.

Black Olive Oil
This gets it's name from the fact that it is made with black olives, not from it's color. It's a delicious sauce with flavors evocative of tapenade and has a myriad of uses, from marinating fish, drizzling on bread, or tossing with salad. Adapted from Marcus Samuelsson.

1/3 cup black olives, pitted
1 anchovy, or 1 tsp anchovy paste
1 cup extra virgin olive oil
1 garlic clove
1 thyme sprig, leaves only, chopped
1 tbl lemon juice

Combine all ingredients in a blender, puree until smooth.

__

19 May 2007

Poet's Honey

honey ice cream 1honey ice cream 4

Oh what a joy good friends can be! What better pleasure than Sara, who has a habit of asking if I would bake something for her, or Alex, who’s likely to stop by with an armload of basil and tomatoes and then put them to use. But the good thing about friends is also their ability to surprise you, to reveal a new dimension just when we thought we knew them. Take, for example, a family friend who came for dinner, and brought as a favor a jar of his very own honey. You keep bees, we exclaimed in surprise, and he proceeded to tell us all about his hives at their house in Vermont.

Naturally, we talked about the epidemic of disappearing bees, and I learned all about Russian queens. And the best part? In order to extract the honey, he takes the big hunk of comb and puts it in a machine which spins it, sort of like a washing machine, so all the honey is centripitally pulled out and then strained. How cool is that?

I remembered some fresh honey I had purchased in the souq in Aleppo just before returning to the U.S. The hunk of deep-amber honeycomb had been lingering in my fridge for nearly six months: "Surely I should throw it away," I asked as I sheepishly pulled it out. In fact, he assured us the honey was fine (honey doesn't need refrigeration and never spoils), and he enthusiastically opened up it's sticky bag to taste it. It was deemed delicious, and I gave to him to take home, not quite a fair trade, but a gesture nonethless. The next day, I received this as part of an email:

"I heated the hunk of honey and strained it through cheesecloth but, unfortunately, a good deal of wax melted and contaminated the honey... I'm pretty sure that there were bee abdomens in the darkest part of the comb or they were unhatched brood.  Not sure, but I found it interesting."

Faced with a jar of honey from such a precious source, surely I had to put it to use. And with my recent ice cream success, I had my eye on some more recipes. However, while my first batch was good straight out of the machine, it froze too hard and got a bit icy on the second day. I turned to a custard-based recipe, and with a couple tweaks, came up with an ice cream that's truly delicious and worth the effort. The sweetness of the cream and honey is balanced by a touch of yogurt and the scent of cardamom. Cardamom works remarkably well in sweet applications, so I recommend you give it a try, though you could also substitute vanilla. I had read many recipes that specified the type of honey to be used; I don't know what my friend's bees were feeding on, but since he is a poet, I thought poet's honey was a fitting name.

To make a prarie it takes a clover and one bee,
One clover, and a bee, and revery.
The revery alone will do, if bees are few.


honey ice cream 3honey ice cream 2

Poet’s Honey Ice Cream
This is a delicious, dare I say luxurious, ice cream. The sweetness of cream and honey play off the tang of yogurt and the scent of cardamom for a complex, rich, and smooth experience.

2 cups cream
1 cup milk
1/3 to 1/2 cup sugar
2/3 cup honey, preferably strongly flavored like heather or wildflower honey
4 cardamom pods, smashed, or 1 tsp cardamom
4 egg yolks
1/3 cup Greek-style yogurt

1. Place the cream, milk, 1/3 cup sugar, honey, and cardamom in a saucepan. Bring the mixture to a simmer, stirring to dissolve the sugar.
2. Beat the egg yolks together in a small bowl. Add a small amount of the warm milk to the egg yolks, stirring to mix, then pour the eggs into the saucepan. Cook the mixture over low heat, stirring constantly, until it thickens enough to coat the back of a spoon (be careful not to curdle it).
3. Set aside the mixture to cool completely, then strain the mixture and discard the cardamom pods. Stir in the yogurt and taste for sweetness, depending on your honey and the tartness of the yogurt, you may want more sugar. Refrigerate until completely cold, at least 6 hours or overnight.
4. Churn in your ice cream maker, then pack into containers and freeze, let soften slightly before scooping.
___

16 May 2007

56 Blues


Blue Velvet Cake with Blue Suede Shoes

Like all good ideas, it emerged out of nowhere. Every year, my uncle has a big blow-out birthday celebration with a theme: the kind of party with specially crafted invitations and funky decorations and re-landscaping part of your lawn. No one remembers how they decided that this year's theme would be blue, but there it was. Last time, we talked about the reason for this annual celebration, now let’s get to the party. I promised blue, and boy, are you all going to get it.


Making blue suede shoes out of marzipan, blue margarita, blue jeans.

First came a little blue booklet in the mail, inviting us to celebrate, “because he’s been blue before.” A cake was planned, inspired by the classic red velvet, only in blue (fyi- omit the cocoa in the red velvet cake recipe, or you’ll have a black cake, as we learned in a test run). A tent was erected, and because things aren’t done the easy way around here, that involved removing part of the fence and digging up part of the garden. I sculpted tiny blue suede shoes out of marzipan to decorate the cake, managing to dye my hands, fingernails, and mouth blue in the process. I made them ahead of time and carted them oh-so-carefully on the airplane (hello airport security), and after all that, my uncle peered into their box, and asked, are they electrical outlets? Ok, they’re a little funny looking, but outlets, I even put heels on the buggers!

A cd of ‘blue’ songs was made, blue light bulbs, blue cheese, and blue-corn chips were procured. A bluegrass band was hired, and to our delight, they turned out to be fantastic. The weather was perfect, and many guests arrived in blue jeans and blue shirts, and it being Texas, there was a presence of cowboy boots. Bartenders served up blue margaritas lipped in blue salt, which towards the end of the evening my uncle declared, “these aren’t bad, but they’re sort of nasty, I”ve had about five.”


I could say that the key to a successful party is planning, and hiring someone to manage the details, and spending hours making sure the wicks on the oil lamps are just right and blistering your hands in the process. Or maybe it’s those delicious crawfish tamales in banana leaves, or the ones wrapped in cornhusks with spinach and goat cheese filling. But really, a good party is all about having a great balance of friends, and the success of this one is a testament to the hosts who gather such an intelligent, creative, and diverse group of people around them. Because he’s not blue anymore, and that’s worth celebrating.

No recipe today, though you can check out the original red velvet cake recipe. And if you're in the mood for blue food, I highly recommend this Blueberry Blue Cheese Salad, I've made it many times using fresh blueberries in the vinagrette.

__

15 May 2007

A Taste of Yellow

By all logic, I should be asleep by now. It’s past 1 a.m. and I’ve just got in from a long flight and while I should have collapsed into bed, here I am, typing. Typing about yellow food (could it be this desert-candy thing is taking over my life?). You see, there’s an event going around in support of the Livestrong Foundation, whose signature color is yellow (remember all those bracelets?) to benefit the fight against cancer. Livestrong Day is Wednesday May 16th, and I’ll be damned if I don’t get this post up in time.

I’ve just returned from my uncle’s annual birthday bash, and if you remember the last time I went to Texas, you’ll know we had a blast. We were never big on birthdays in my family, a card and cake would suffice, so why exactly am I hauling myself halfway across the country for a party? Well, a few years ago, my uncle was suddenly diagnosed with a dangerous brain tumor. In one week, everything changed. There were doctors and procedures, days spent sleeping the waiting room of the ICU, a 6 hour surgery, and months of radiation. But then, my uncle recovered. We like to say he’s not just the same as he was before, he’s better. He runs everyday, has a fulfilling career, plays with the dogs, and has taken to powder-coating vintage chairs.

And every year we celebrate his birthday in a big way. This year the party’s theme was blue, and you’ll be hearing a lot more about that soon, but right now we’re still on yellow, ok ? (I hope you’re not as color-cross-eyed, tongue-tied as I am) Yellow is Lance Armstrong’s color, and since he’s also a Texan and my uncle and I saw him finish the Tour in Paris one summer, this is tying in rather nicely. Yellow is also the color of this saffron cod chowder. Now, I don’t really like chowders, all too often they’re heavy with cream or awful tinned milk and never seem to have enough seafood in them. This one, however, is completely different. It has a base thickened by potatoes, accented with a touch of cream, and flavored with saffron. Best of all, it has whole chunks of cod fillet and lots of flavor from the clam juice.

I wish I had a better photo for you all, but, people I am tired. But it’s a good tired, the kind where you fall right into a nice deep sleep. You all go off and check out the Livestrong Foundation, make some chowder, celebrate a birthday in a big way. I’ll see you in the morning.

Saffron Cod Chowder
Adapted from Bon Appetit. Serves 4-6.

2 thick-cut slices bacon, cut into 2-inch pieces
1 1/2 cups chopped leeks (white and pale green parts only; about 2 leeks)
16 ounces bottled clam juice
1 pound fingerling or baby Dutch yellow potatoes, diced
1 cup water
1 teaspoon chopped fresh thyme
1/2 teaspoon crumbled saffron threads
1/2 cup cream or milk
1 1/2 lb of cod fillets

- Cook bacon in heavy large pot over medium heat until crisp. Use a slotted spoon to transfer to paper towels to drain. Add leeks to same pot. Cook until leeks are very tender, stirring frequently, about 5 minutes. Add clam juice, potatoes, 1/2 cup water, thyme, and saffron. Bring to boil; reduce heat to medium and cover. Simmer until potatoes are just tender, stirring occasionally, about 7 minutes. Stir in cream. Season chowder to taste with salt and pepper. Use an immersion blender to puree the chowder until thick but still has some chunks in it. Stir in the bacon.
- Sprinkle cod with salt and pepper; place atop chowder. Cover and cook until cod is opaque in center, about 10 minutes. Use a spoon to break the cod fillets into large chunks. Ladle into bowls and serve.

12 May 2007

Mom's Best

choc chip cookies 2
Every woman has an intimate relationship with the cooking of their mother. Perhaps she stands at the chopping block cutting tomatoes just like her mother taught her when she still had to pull up a stool to reach the countertop. Or she puzzles over a family recipe scribbled by butter-stained fingers on a wrinkled index card, trying to remember how mom did this all those years when she should have been paying closer attention. If her mother was a bad cook, then the perfect roast chicken is a rebuttal, because cooking for others is a primary act of nourishment, and thereby motherhood. No matter what, a woman standing fussing over a boiling pot is also, in a way, having a conversation with their mother.

My mother is a very good cook in her own right, my go-to source for chicken-pot-pie, a Sunday roast, or anything involving yeast. Over the years, my cooking interests have grown and expanded beyond my mother’s, and I long-ago took over being the primary chef when we’re together. I’ve added za’atar and soba noodles to our family repertoire, I recently christened my mother’s spiffy new grill which had been sitting unused for over a year on her back deck (“what do you mean you don’t know how to use it!”). So, sometimes I forget that my mother has a wealth of culinary knowledge that far exceeds my own, after all, much of cooking is about experience, and she certainly has some years on me there. I’m often surprised when she’ll say, “oh yes, I made that once,” in reference to items like bagels, yogurt, complex Indian curries or French stews. And though she doesn’t cook much anymore (she claims she’s waiting for retirement), she’s still a wonderful resource.

Naturally, I’ve inherited some of mom’s recipes, her seafood crepes that are worth the days of preparation, a rich moussaka. But one of the standouts are her chocolate chip cookies, which is exactly where a good cookie recipe should come from. My mom’s recipe (originally titled ‘Not Mrs. Tollhouse’ cookies) makes the best chocolate chip cookies, they’ve swayed many a cookie connoisseur. There are a few keys here: ground oats add some texture to the dough, grated chocolate adds extra chocolateyness, and brown sugar brings a deeper flavor.

At the beginning of all this, I said a woman cooking is like having a conversation with her mother. I don’t know if that’s really true, most of the time, I’m just looking to see if the onions have caramelized yet or if the water’s boiling. But if I were to subject myself to my own analysis, my cooking, my search for quality ingredients, my worry over the roast turkey, is in tribute to the nourishment of my mother’s own kitchen, an appreciation of her unflagging encouragement. Simply put, I am saying thank you.


Mom’s Chocolate Chip Cookies
This is my quintessential chocolate chip cookie. The ground oats are key to the taste and texture of them- oats behave differently than flours, so the cookies have just the right chew. We like them small in size and always without nuts, but you can make them larger if you like.

1 stick butter
1/2 cup sugar
1/2 cup brown sugar
1 egg
1/2 tsp vanilla extract
1 cup flour
1 1/4 cups oats, blended to a powder
1/2 tsp baking powder
1/2 tsp baking soda
1/4 tsp salt
6 oz chocolate chips
2 oz milk chocolate, grated
optional: 1/2 cup chopped walnuts or pecans

1. Preheat the oven to 375 F.
2. Blend the oats to a powder in a food processor or blender. Combine the oat-flour with the regular flour, baking soda, baking powder, and salt in a bowl, set aside.
3. Cream the butter with the sugars until light and fluffy. Beat in the egg and the vanilla. Stir in the dry ingredients until just combined. Fold in the chocolates and nuts, if desired.
4. Place golf ball sized cookies two inches apart on a greased or lined baking sheet. Bake the cookies 6-10 minutes, until just golden.
________________________

09 May 2007

The Benefits of Shelling

My grandmother was not the cuddly type. I was born late in my mother’s life and by the time I arrived my grandmother had given up all hope of any more grandchildren and given away all the baby things. Unlike my friend’s grandparents, my grandmother was a generation older, she did not have cute nicknames like “gamma” or “mee-maw,” she wore hats and gloves not tennis skirts, she did not take us kids to the water-park. Not that Grandmother (as her full appellation was always used), loved me any less, but her affections came mainly in the form of exquisite handmade dresses and little knit sweaters. Most of my childhood was outfitted exclusively in her creations, I owned nary a store-bought item of clothing in favor of her beautifully smocked pinafores, which is probably the reason I don’t much like wearing pants to this day.

I was fairly intimidated by the matriarch of our family, a feeling apparently shared by many adults. There was the time she (quite an expert on plants) marched out of the landscaping committee, saying she didn’t care if they “planted the place in tall corn.” Or the disparaging quotation that landed on the front page of USA Today.

Late in my grandmother’s life, weakened by lymphoma, she resided in an armchair in the sunroom, the television turned to the “Today” show and little caged canaries nearby. I was about eight, my mother had gone off somewhere, and Grandmother sent me into the backyard where she still kept a little vegetable plot behind her stone house. As I gathered pea pods from under the shady leaves, Grandmother yelled directions at me, forcing me to trot back and forth between the garden and the back door every few minutes to hear her more clearly. “Don’t pick those, they’re not ready yet,” and “how are the carrots doing?” Lord knows, I had no clue what a carrot plant looked like, but I did manage to gather a big bowl of satisfactory peas. We sat amid the haze of her Kool’s menthol cigarettes and shelled what seemed like thousands of peas. She told me about how once, when she was in the hospital for a minor procedure, she asked my grandfather to bring her a big bag of peas to shell. To the shock of the nurses, she sat propped up in the recovery room, shelling away. Considering I can barely picture my grandmother without a knitting needle or crochet hook in hand, this made perfect sense.

Spring peas, particularly English peas, are in season for about 2 days each year, and have a shelf life of about .3 seconds. However, there isn’t a spring that goes by that I don’t think of Grandmother’s peas, she died not long afterwards, and that is one of the strongest memories I have of her. Plus, fresh-shelled peas have a taste unlike any other, and this year they went into a delicious little pea and radish salad. The sweet peas, sharp radishes, and creamy feta were made for each other. The surprise was the sprouts, my store didn’t have pea sprouts, so I grudgingly grabbed some brocco-flower sprouts. I’d given up on sprouts long ago, as they are often bitter, go rancid quickly, and bring to mind all sorts of terrible attempts at “health food.” However, paired with a lightly sweet dressing, these were delicious, call me converted. This salad was good enough to grace my lunch box about everyday for the past week, and since I’m not superhuman, I’m pleased to report it’s very good made with frozen peas. Just don’t tell Grandmother.


Shortly after posting, I received this email from a relative: "I do remember one year when Mother was not at home and asked me to pick the peas. It was late in the summer, I think, and I was hot and tired of bending over. Sooo, I just pulled the plants up and picked the peas off of them. . . and that was the end of the peas for that year, anyway!"

Pea, Radish, and Feta Salad

2 tablespoons fresh lemon juice
2 teaspoons honey
3 tablespoons extra-virgin olive oil
3 tablespoons chopped fresh dill
4 cups fresh-shelled English peas or 1 pound frozen peas
1 bunch radishes, trimmed, halved, thinly sliced
1 cup crumbled feta cheese (about 4 ounces)
3 cups fresh pea tendrils, pea sprouts, or other sprouts (optional)

1. In the bottom of your serving bowl, whisk together the lemon, honey, oil, and dill. Add the sprouts, if using, and toss to coat.
2. Cook the peas in a pot of boiling salted water, about 5 minutes for fresh, slightly less for frozen. Drain the peas and rinse under cold water to cool.
3. Add the peas to the bowl with the radishes and feta cheese. Season with salt and pepper. Toss everything together. Serve.

*Pea sprouts are available at natural foods stores and Asian markets.
__

06 May 2007

Rhubarb-Cornmeal Tart

rhubarb tart 1
The great thing about the proliferation of food websites and blogs is the ease of sharing ideas and recipes, so many beautiful things to make! These days, I'm just as likely to open up a website rather than the cookbooks that line my shelves when I have a culinary query, and the folded corners of favorite recipes are being challenged by the bookmark tab on my internet browser. Though nothing will supplant the tomes I treasure, I love the immediacy of blogs, and the intimate view into indivual kitchens. With great sites from all corners of the globe, I've learned about exotic fruits, unusual pestos, and French home baking, straight from the source. Reading some of the great sites out of Australia, I'm often reminded how our seasons are flipped, as I huddled at the screen in my cold apartment they wrote about barbeques and ice cream. When I saw this rhubarb tart back in September, I knew I wanted to make it, but it would be six months before rhubarb would be in season!


However, the rhubarb tart (the original version much more visually stunning than mine), stuck in my head, so much so that I even picked up the proper pan for it at an after-Christmas sale. In March, I trawled markets in hopes of early rhubarb, but it was still woefully cold and dreary. Finally, rhubarb has arrived and I got right to the tart. Another thing I've learned from reading blogs is to be comfortable in the metric system, converting grams, ounces, and cups. This tart was worth the wait, and the effort, as it was really delicious. My only regret was that it didn't have more rhubarb- I'll place the stalks more closely together next time. It's not too sweet, so I didn't feel too guilty nibbling on a piece for breakfast one morning. Thanks to Haalo for the recipe, and with apologies to those in the southern hemisphere, expect more rhubarb to be featured here soon!

rhubarb tart 2

Rhubarb-Cornmeal Tart
With a buttery crunchy crust, a creamy filling, and tangy rhubarb topping, this tart's a winner any time of day.

for the pastry:
1 1/2 cups flour
3/4 cup powdered sugar
1 stick (1/4 lb) butter
1 egg
for the cornmeal cream:
1 1/2 cups milk
1 tsp cinnamon
1/3 cup sugar
1/3 cup white cornmeal or semolina
2 egg yolks (or 1 egg)
for the rhubarb:
rhubarb stalks
1/2 cup sugar plus 2 tablspoons

1. For the pastry crust: Combine the flour and powdered sugar in a large bowl. Cut the butter into small pieces and add to the bowl, crumble the mixture together with your fingertips until it resembles coarse meal. Stir in the egg until the mixture just comes together (you could also make the dough in a food processor). Turn the dough out and knead just to make a ball. Flatten it into an ovular disk, wrap it in plastic wrap and chill briefly, half an hour to an hour. Roll the dough out and fit it into a rectangular tart pan (or a round 8" pan). Cover and place in the fridge or freezer to chill thoroughly.
2. For the cornmeal cream: Combine the milk, cinnamon, sugar, and cornmeal in a saucepan and bring to a boil, whisking constantly to prevent lumps. Lower the heat and simmer the mixture, stirring, for 3-4 minutes, until thickened and no longer gritty. Remove the saucepan from the heat and let cool slightly. Stir in the egg yolks until well combined. Press a piece of plastic wrap directly onto the surface of the mixture and set aside or refrigerate until ready to use.
3. Blind bake the tart shell: Preheat the oven to 350. Place baking paper and pastry weights inside the chilled tart shell. Bake the pastry for 15 minutes, then remove the weights and paper and bake another 5-10 minutes, until the pastry is dry and just golden on the edges. Remove and allow to cool slightly.
4. Bake the tart: Spread the cornmeal cream inside the blind-baked tart shell. Slice the rhubarb and layer it over the cornmeal cream, placing the pieces close together. Sprinkle the 1/2 cup sugar over the rhubarb. Cover the tart with foil and bake in a 350 degree oven for 20 minutes, then remove the foil and bake another 15-20 minutes, until the rhubarb is tender. Sprinkle the remaining 2 tablesppons of sugar over the tart and, using the broiler or a blowtorch, briefly caramelize the sugar. Serve warm or at room temperature.

__