31 July 2013

Algerian Peel-and-Eat Shrimp

DSC_1070

I have spent a lots of Ramadan's in a lot of Muslim countries by now, and I've had all variety of experiences. I've had the Ramadan where you're surrounded by your local friends and colleagues, attending everyone's iftar dinners and sampling so much delicious food that you end up fasting during the day because you're still so full. I've had Ramadan's in unfamiliar countries where you don't know anyone and desperately wish there was a place you could just get a sandwich for lunch. I've had Ramadan's in the winter, when everyone tucks cozily into dinner at 5 pm, and now in the interminable miserable heat of summer. There are the Ramadan's where a young child came every night beating the drum and chanting to remind people of the suhour, or where there's public dissent over how long the tarawih prayer can be.

DSC_1061

This year, I've really come to enjoy Ramadan in Algiers. It is miserably hot and the fasting time is terribly long, but the city just explodes at night. There are great night time concerts starting at midnight, with guys like Tinariwen and Nadir L'Eghrib. There are special pastries and endless amounts of kesra bread, and after your concert the gelato place is open at 3 am. Sadly, I can't sleep at my desk at work during the day like apparently the rest of Algiers, but nonetheless.

DSC_1063DSC_1064

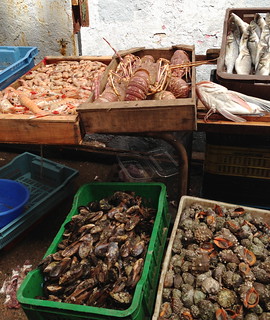
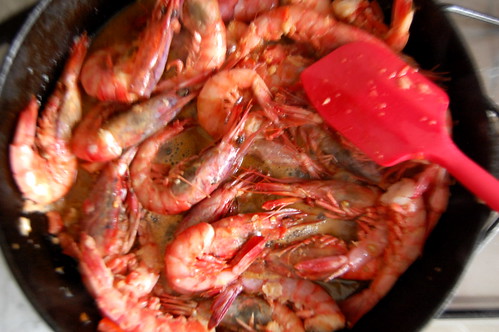
The high temperatures (40C last weekend!) have meant there's not a ton of seafood available from our usual guy. But last weekend there were some good looking head-on red shrimp to be snatched up, and asked the vendor how he likes to prepare them. After explaining that he didn't know spices in French (no problem, I said), he gave me the following recipe. We made it that night, in the midst of a blackout, and ate it by candlelight with bread and a tabboule salad. I tend to think anything you eat during a power outage is always going to be memorable, but these shrimp really were pretty awesome. Be sure to have plenty of bread to soak up the sauce!

DSC_1068

Algerian Peel-and-Eat Shrimp
I am pretty old school about this and really think there's no other way to do garlic justice in this recipe but in a mortar and pestle. I've seen a chopping technique where you finally mince garlic while also smushing it with the back of your knife, which gives you a similar garlic paste result, but I haven't tried that personally. Serves 2.

1 generous kilo, 2 1/2 pounds, head-on shrimp, legs trimmed
cloves from 1 whole head garlic
salt
1/4 cup olive oil
1 large tomato, diced (small dice please!!)
1 teaspoon cumin
1/2 teaspoon coriander
1/2 teaspoon sweet paprika
1 teaspoon harissa or chile paste of choice (ours is extremely strong, if yours is more mild you can increase the amount accordingly)
juice of 1/2 a lemon

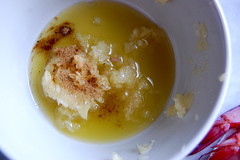
1. Place all the garlic cloves into a mortar and pestle with a pinch of salt and smash away until you get a pretty smooth paste. Transfer the garlic paste to a very large bowl and add in the olive oil, tomato, cumin, coriander, paprika, and harissa, mix to combine. Add in the head-on shrimp, sprinkle lots of salt over top, and then turn very gently to coat the shrimp in the garlic mixture. I do this with my hands because it's the gentlest way.
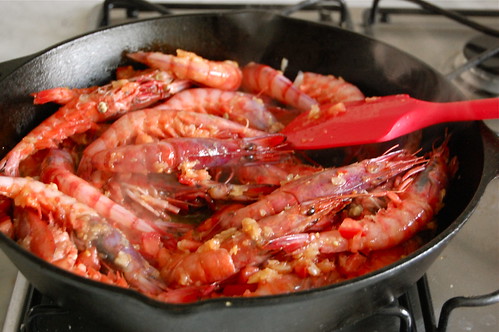
2. Heat a large cast iron skillet over the stove top on medium high heat (you can also do this in a skillet placed on a grill if you're so inclined). My skillet is pretty well seasoned so it doesn't need extra oil, but add some to the pan if you think you need it. Add in the shrimp all at once. Cook the shrimp, stirring very gently, until the juices release and the shrimp are plump and curled together. It should only take about 7 minutes. Serve the shrimp immediately, with lots of bread to dip into the juices, and plenty of napkins.

21 July 2013

Slab Pie & Homemade Ice Cream

DSC_0916

This household's affinity for pie-making has been well-documented, we've made crumble and cream pies, infinite chess pies in my family's tradition and chocolate and mango and everything in between. Our pies, however, have always been made in a pie pan, as would seem obvious. Sure, there are hand-pies, and weird people who stack pies, and then there's Martha Stewart's slab pie, but I've always sort of ignored them. However, this year when I was planning a 4th of July meal that was as traditional as you could get (burgers, from scratch baked beans made with homemade BBQ sauce, potato salad with homemade mayo - okay fine it wasn't so traditional, I put sumac in my potato salad!). Anyway, this slab pie kept popping up in my internets and just screaming 4th of July at me. Maybe it's those interminable flag cakes and colored jello but rectangular desserts just seem so American holiday to me.

DSC_0900 DSC_0903
DSC_0911DSC_0913

So slab pie it was, to be filled with the last of our local strawberries and cherries. And no pie is complete without homemade ice cream, especially on the 4th. This ice cream is a super simple mix of some common local ingredients (creme fraiche and honey), and all you have to do is whirl it in a blender, chill it, and freeze. The honey not only is a healthier sweetener but keeps the ice cream from freezing too hard in the freezer.

Making a slab pie is a breeze, you just roll out two squares of dough, pile in some fruit, and crimp the edges together. Unlike a triangular wedge of pie, you don't have to worry so much that the filling will be soupy and runny, plus you get a higher crust-to-fruit ratio, which is a definite plus. I used Martha's pate brisee recipe and honestly, it's not my favorite. I think it can be a bit too soft and difficult to work with, so feel free to use your favorite dough recipe if you prefer. The slab pie is very easy to serve and the ice cream is a snap, I think they may become a summer tradition!

DSC_0912

Strawberry Cherry Slab Pie
Adapted from Food52 and Martha Stewart. You can use any combination of berries you like but we thought the strawberry-cherry combo (about 2/3 strawberries to 1/3 cherries) was really perfect. Don't forget to sprinkle the sugar on top before baking, it gives the crust a nice crunch!

6 to 7 cups mixed cherries and berries, a mix of berries of your choice
1 cup sugar, plus more for sprinkling over crust
1/4 cup (4 tbl) cornstarch
juice of half a lemon
pinch salt
for the dough: 
4 cups all purpose flour 
1 teaspoon coarse salt
2 teaspoons sugar
24 tablespoons (.75 pounds) cold unsalted butter, cut into small cubes
1/2 to 3/4 cup ice water 
equipment: jelly roll pan or a 10x15 inch rimmed baking sheet

 1. Make the dough: In a food processor, pulse flour, salt, sugar. Add butter. Process until mixture resembles coarse meal, about 10 seconds. With machine running, add ice water in a slow, steady stream just until dough comes together. (Do not process more than 30 seconds.) Divide dough into two, pat into discs, wrap and refrigerate until ready to make pie.
2. Make the pie: Preheat oven to 375 F. Take out the dough to soften slightly. Grease a jelly roll pan.
3. Combine all the filling ingredients in a bowl, stirring to combine. Let sit for 10 minutes.
4. Meanwhile, working on a well-floured surface roll the two dough rounds out into large rectangles, slightly larger then your baking pan (about 13x18). If desired, cut out shapes from the top dough piece. Fit one dough sheet into the bottom of the jelly roll pan. Scoop the fruit into the baking dish, leaving behind any juice that has accumulated in the bowl. Lay the top dough sheet over the top and trim the dough so that it just fits inside the baking sheet. Flip the edges of the bottom crust over top the top crust and pinch together. Sprinkle a few tablespoons of sugar over the crust.
5. Place the jelly roll pan onto a flat baking sheet to catch any drips. Bake for 45-55 minutes, rotating the pan front to back about halfway through, until the top is nicely browned and the filling is bubbling. Let cool for at least 15 minutes before serving.

DSC_0908DSC_0909

Creme-Fraiche and Honey Ice Cream
16 ounces creme fraiche
1 1/2 cups whole or 2% milk
1 tablespoon vanilla bean paste or the seeds scraped form 1 vanilla bean
1 cup honey

1. Blend all ingredients in a blender. Chill the mixture until very cold, at least 2 hours in the fridge.
2. Process the mixture in an ice cream maker according to the manufacturer's directions. Transfer to a container and store in the freezer until ready to serve. Take out about 20 minutes before serving to allow to soften.

15 July 2013

Lamb Kebabs with Pistachios and Herbs

DSC_0772

"How we spend our days is, of course, how we spend our lives. What we do with this hour, and that one, is what we are doing. A schedule defends from chaos and whim. It is a net for catching days. It is a scaffolding on which a worker can stand and labor with both hands at sections of time. A schedule is a mock-up of reason and order—willed, faked, and so brought into being; it is a peace and a haven set into the wreck of time; it is a lifeboat on which you find yourself, decades later, still living. Each day is the same, so you remember the series afterward as a blurred and powerful pattern." - Annie Dillard

I bookmarked that quote to share here a few weeks ago, and have come back to it today only to realize how much it resonates with me. I am a person who likes order and schedules and routine, I'm creative too, but I function better and think more freely when life's details are a bit more regulated. Planning meals, organizing my closet, streamlining the little things of life.

DSC_0774

Admittedly, this has nothing to do with lamb pistachio kebabs. And, it doesn't really matter, because don't pistachio kebabs sounds delicious? Yes, yes they do. It has been well-documented that I have a great love for the ground meat kebabs of Syria and Turkey, one of my favorites being the classic Aleppo Kebab. This variation is new to me, and I love the unique yet totally Levantine idea of grinding pistachios and herbs in with your ground meat. There are a lot of ingredients here, but the process is super simple. I plop all the seasonings into a food processor, give it a whirl, and then knead it into the ground lamb mixture. This is certainly not the most traditional way to make these, but it works just as well.

Like all ground kebabs, presentation is important! I serve these with yogurt drizzled over top, and some more tomatoes and herbs sprinkled over.

P.S. Fun facts about Algeria, ground lamb is totally uncommon here. I usually have to get a large piece of lamb ground for me at the butcher. As a bonus, since I pay for the price of the bone-in cut of lamb, he gives me the bones in a bag. I then roast the bones and use them to make stock.

DSC_0775

Lamb Pistachio Kebabs
If you don't want to form kebabs, these also make delicious lamb burgers. A set of wide flat metal skewers are best for forming the kebabs. 

1/2 cup pistachios
2 tbl water
1/2 cup chopped parsley (set aside 1 pinch for serving)
1/2 cup chopped mint (set aside 1 pinch for serving)
1 teaspoon Aleppo pepper or crushed red pepper flakes
1 small chili pepper, seeded and stemmed
1 small pinch allspice
1 regular pinch cinnamon
3 garlic cloves chopped
2 scallions (white and gren parts), roughly chopped
1/2 an onion, roughly chopped
salt, pepper, to taste
1 lb ground lamb
1/4 cup finest grade bulgur
for serving:
1 cup plain yogurt
1 tomato, seeded and diced
herbs as reserved above
pinch of sumac, if available

1. Soak the bulgur in 1/2 cup hot water for about 10 minutes.
2. Place pistachios and water in a food processor and process to a coarse puree, there should still be some pistachios chunks. Add the next 9 ingredients to the processor (parsley through onion). Process the mixture until well combined, pausing a few times to scrape down the sides.
3. Place the ground lamb in a bowl and season very generously with salt and pepper. Add the herb-pistachio mixture to the bowl with the lamb. Drain off any excess liquid from the bulgur and add it to the bowl. Knead the lamb mixture together, working the meat with your hands until it is well combined and has a smooth sticky consistency, about 4-5 minutes.
4. Use your hands to form the meat onto the kebabs. (There is a nice tutorial here). Refrigerate the kebabs for at least one hour.
5. Preheat a grill. Grill the kebabs over a very hot grill until nicely charred and done on both sides. Transfer kebabs to a platter, drizzle yogurt over, and sprinkle tomato, herbs, and sumac over top. Serve.

12 July 2013

Pictures at Premier Mai

Happy Ramadan everyone! Last week I was finally able to do a bit of covert photo snapping with my iPhone at Algiers' large market, Premier Mai. I usually don't want to bring my fancier camera because I would definitely stand out and I didn't want to get charged higher prices!

IMG_0086IMG_0082
IMG_0083IMG_0089

Clockwise: strawberry guy with the last of the local strawberries and a garlic vendor in the background; peppers, radishes, and herbs (I love how fast these guys move selling their wares); another herb vendor; cherry tomatoes and lettuce.

IMG_0081IMG_0091
IMG_0092IMG_0090

Right now the fish vendors are piled in a muddy outdoor area but it looks like they are finally installing stalls for them at the front of the market. Clockwise: squid and octopus; langoustines, lobsters, and mollusks; more fish and shrimp. The figs are from Tizi Ouzo and have a local name which I've forgotton.

IMG_0079IMG_0077
IMG_0080IMG_0095

The meat section of the market. The lamb was clearly very fresh. The photo with the sign advertises turkey merguez and lists its ingredients.

IMG_0084

Finally, a couple administrative items. Several people have written to ask what happened to the recipe index, because it seems to have disappeared. Truth be told, I had not updated the index in at least a year (maybe more!), and so it's time for a refresh. I'm also hoping to do a little editing of the blog format, so please excuse our dust as I work on getting those things fixed. 

02 July 2013

Asian Peanut-Carrot Slaw with Grilled Chicken

DSC_0741

July, already! As my relatives in Texas complain about the sweltering heat wave, it is still wonderfully pleasant here, highs only reaching into the 80's, still nice enough to eat lunch outside with the breeze off the sea, and warm enough to spend Saturdays reading by the pool. A friend and I were talking about 4th of July recently, about childhood sack races and cornhole and seeing who can swim the farthest while holding their breath under water.

DSC_0728DSC_0744

The holiday doesn't necessarily make me homesick for the States, but more homesick for that innocence of childhood, for ice cream cakes on summer days and playing in the sun without worrying about sunscreen. No matter what you do on the holiday, no doubt some grilling is on order. I've been making this simple Asian-style salad with grilled chicken, and it's delicious - just the right amount of crunch and spice and char.

This salad came about because I wanted to figure out to shred carrots into ribbons, beautiful long thin ribbons, and not those little shards you get when you shred carrots on a box grater. (I know, these are the things I contemplate!) I discovered that shredding carrots with a zester can make those nice thin ribbons, which I combine with very thinly sliced cabbage, peanuts, cilantro, and a sweet-spicy dressing. Happy 4th everyone!

DSC_0739

Asian Peanut-Carrot Slaw with Grilled Chicken

3-4 large carrots, trimmed and peeled
a 1-inch thick wedge of green cabbage, sliced as thinly as possible
1/3 cup chopped cilantro
1/3 cup peanuts
3 tablespoons sweet and spicy sauce
1 teaspoon soy sauce
juice of 1 lime
a few cracks of black pepper
equipment: citrus zester

3 chicken breasts, cut into 1-inch cubes
1/4 cup sweet and spicy sauce
2 tablespoons soy sauce

1. Combine the cubed chicken, sweet and spicy sauce, and soy sauce in a tupperware. Let marinate for 1-3 hours.
2. Meanwhile, grate the carrots using your zester, pulling the zester down along the length of the carrot. Discard the inner core of the carrot (or save for stock). Combine carrot ribbons, sliced cabbage, and cilantro in a bowl. Stir in the sweet and spicy sauce, soy sauce, lime and pepper, toss to combine. Let stand until you're ready to grill your chicken.
3. Prepare a grill, thread chicken onto skewers, discarding any marinade. Grill the chicken skewers by first placing them on the hottest part of the grill to get deep grill marks on each side. Then, move the skewers off the direct heat until they finish cooking and are no longer pink in the middle. Transfer to a platter.
4. Toast the peanuts in a skillet until well browned. Pour the peanuts over top of the slaw. Serve chicken and slaw together.