29 April 2009

North Carolina-Style Pulled Pork

Every time I think my life is beginning to resemble normalcy again, I find that it isn't. I went to a Neko Case concert a little while ago- we had a great time but halfway through the concert I got really sad. My mom loves Neko Case and I know she would have loved to be there, but then I looked around at the noise and the crowds and I realized she wouldn't be up for it. I hope she will be one day.

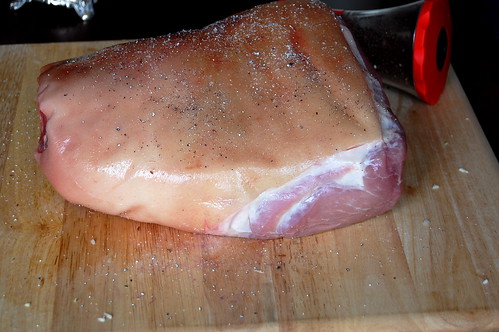
Every time I get a few normal days, every time I think I might be able to go to yoga two days in a row, there I go again- back to the hospital, to waiting rooms and scans and pain and tears. Of course, I cannot complain, not being the one actually going through the constant tests and pokes and prods. But nonetheless, I feel as if I'm caught between a sense of normalcy and complete imbalance.

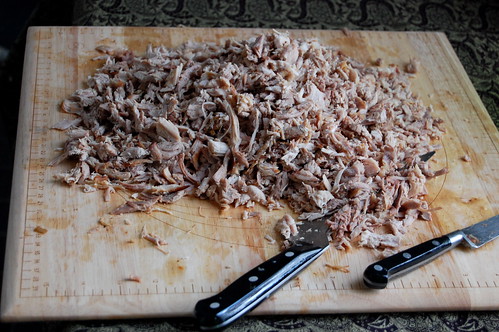
And thus, we cannot move forward here on the blog yet. I mean, last time I mentioned homemade North Carolina-style pulled pork, and who would want to move on from that?? I've always wanted to make this ever since a friend made it for a dinner once, and I finally found the occasion and procured the recipe.

To clarify, North Carolina-style is a slow-roast pork that is combined with a very vinegary-peppery sauce. It's not like those other sticky-sweet barbecues, and because this recipe is only an approximation of the real thing, it doesn't have the exact smoke and char of a pit barbecue. But none of those things detract from the recipe at all- the sharp vinegar pairs nicely with a dollop of coleslaw on a good soft (homemade!) burger bun.

I suppose I cannot just move on with my life at the drop of a hat because my life is different than what it was before. I can't just go back to what's familiar, I need to reevaluate, readjust. Maybe I need to feng shui, I don't know. Whatever it is, I hope it involves a little more me time, and a little more cooking.


PORK BARBECUE
for 8-10 gigantic sandwiches

A. 4 lb. boneless pork roast--pot shoulder blade or Boston butt
(or you could use a bone-in roast, in which case double the weight)

B. salt, pepper, cut garlic cloves

C. 1 onion, sliced
1/2 cup cider vinegar

D. 3/4 c. white vinegar
3/4 c. cider vinegar
1T. sugar
2 t. crushed red pepper flakes
1 t. fresh-ground pepper
1 T. good quality hot sauce--for instance, Crystal. (NOT the pure-heat type like Tabasco)
1 to 2 t. salt

Rub A with B. Cook in Crockpot with C. c. 10 hours. (If you don't have a Crockpot, brown meat in oil and then bake with C in covered roaster 3-3½ hours at 325º. )

Cut cooked meat into chunks and then shred by hand, discarding fat.

Put meat in a saucepan, mix D and pour ALMOST all of it over the meat. Cook, stirring occasionally, until meat has thoroughly absorbed the sauce, adding more sauce if needed. (You want the meat to be well soaked but not soupy.)

Serve with soft white buns that will soak up the juices. You can add cole slaw right into the sandwich or have it on the side.

28 April 2009

Homemade Burger/Sandwich Buns

I know, homemade burger buns sound awfully pretentious, don't they? But you know what, they're way better than store bought, and if you're not intimidated by yeast, they're very easy to make too. They have the rich yeasty-ness of a good bread and soak up the juices of a grilled burger or a batch of barbeque just right. They're good enough that I've eaten them toasted, with butter, for breakfast.

If you don't have a stand mixer, I've made these by hand without a problem, just a little more of a bicep workout. Adapted from Gourmet.


ingredients:
2 cups whole milk, scalded and cooled (105–115°F)
1/4 cup warm water (105–115°F)
2 (1/4-oz) packages active dry yeast
1/4 cup plus 1/2 teaspoon sugar, divided
1/2 stick unsalted butter, cut into Tbsp pieces and softened
2 large eggs, lightly beaten
1 tablespoon salt
6 cups all-purpose flour, divided
1 large egg mixed with 1 Tbsp water for egg wash
sesame seeds for dusting (about 1/4 cup)
Equipment: a stand mixer with paddle and dough-hook attachments; a 3-inch round cookie cutter (an overturned small bowl or large cup also works)

1. Stir together warm water, yeast, and 1/2 tsp sugar in mixer bowl until yeast has dissolved. Let stand until foamy, about 5 minutes. (If mixture doesn’t foam, start over with new yeast.)
2. Add butter, warm milk, and remaining 1/4 cup sugar to yeast mixture and mix with paddle attachment at low speed until butter has melted, then mix in eggs until combined well. Add salt and 4 cups flour and mix, scraping down side of bowl as necessary, until flour is incorporated. Beat at medium speed 1 minute.
Switch to dough hook and beat in remaining 2 cups flour at medium speed until dough pulls away from side of bowl, about 2 minutes; if necessary, add more flour, 1 Tbsp at a time. Beat 5 minutes more. (Dough will be sticky.)
3. Transfer dough to a lightly oiled large bowl and turn to coat. Cover tightly with plastic wrap and let rise in a warm draft-free place until doubled, about 2 1/2 hours. (If you run out of time here, you can let the dough rise in the refrigerator overnight, or let it rise partially on the counter and then refrigerate it until you are ready to continue. Allow to come fully to room temperature before continuing.)
4. Butter 2 large baking sheets. Punch down dough, then roll out on a lightly floured surface with a floured rolling pin into a 14-inch round (about 1/2 inch thick). Cut out as many rounds as possible with floured cutter and arrange 3 inches apart on baking sheets. Gather and reroll scraps, then cut out more rounds. Loosely cover buns with oiled plastic wrap and let rise in a draft-free place at warm room temperature until they hold a finger mark when gently poked, 1 1/2 to 2 hours.
5. Preheat oven to 375°F with racks in upper and lower thirds.
Brush buns with egg wash and sesame seeds and bake, switching position of sheets halfway through baking, until tops are golden and undersides are golden brown and sound hollow when tapped, 14 to 20 minutes. Transfer to racks to cool completely.

Cooks’ notes: If you don’t have a stand mixer, stir ingredients together in same sequence with a wooden spoon until a dough forms. Knead dough on a floured surface, incorporating just enough flour to keep dough from sticking, until smooth and elastic, 7 to 8 minutes. Buns can be frozen, wrapped well, up to 1 month.

18 April 2009

Mississippi Mud Pie

If you could combine the richness of a brownie with the crunch of cookie, the homeliness of a slice of pie, the lightness of whipped cream all laced with a splash of rum, than this would be it. I had a Southern-themed dinner the other day: North Carolina-style pulled pork, coleslaw, and I decided on Mississippi mud pie for the chocolate-loving guest. But then, what is Mississippi mud pie? It seems everyone has a different definition. It should have chocolate and probably pecans, but from there it's anyone's guess. Some make it with a pudding filling, some with a baked custard, some insist it should be all filled with ice cream, while others say it must be served with ice cream. It should have a cookie crust, but should it be made with graham cracker, chocolate cookies, or pecan sandies? Should it have whipped cream? Should there be pecans on top or on the bottom, or none at all.

I found no consensus when searching online for recipes, where most of them called for things like instant pudding and cream cheese and store-bought crusts. My Southern cookbooks were devoid of Mississippi mud pie recipes, perhaps fearing the controversy. So I simply gave up and just made up a recipe of my own, collected from some of the recipes I had read. Also, I was tired of typing "Mississippi" into search engines.

I'm not much of a chocolate fan, but I don't care, this pie rocks. It's rich and sweet and crunchy and creamy all at once. There hasn't been anyone around to help with leftovers, and I don't mind working away at them, all by myself. Which is what I think I'll do right now, if you'll just excuse me for a moment.


Mississippi Mud Pie

for the chocolate cookie crust:
8 tbl butter, 9 ounces chocolate cookies or 1 1/2 cups cookie crumbs, 1/2 teaspoon salt

6 tablespoons butter
3 ounces bittersweet chocolate
3 eggs
1 cup sugar
3 tablespoon corn syrup
1 teaspoon vanilla

1 quart heavy cream
1/4 cup powdered sugar
2-3 tablespoons good dark rum
16-20 whole pecans, toasted

1. Preheat oven to 350 F. Make crust: combine chocolate cookies and salt in food processor and grind to crumbs. Melt the butter and then drizzle it into the food processor, pulsing occasionally until clumpy and combined. Press crumbs into pie pan. Bake 7-10 minutes until just firm but not darkened in color.

2. Combine butter and chocolate in a saucepan and melt over moderate heat until combined, stirring occasionally alternately, you can do this in a large bowl in the microwave). Remove from heat and let the mixture cool slightly (about a minute), then beat in the eggs until combined. Beat in the sugar, then the corn syrup and vanilla. Pour into pie crust and place in the oven. Bake 35-40 minutes, until the filling is set and cackled on the top. Watch that the pie crust edges don't burn.

3. Let the pie cool completely to room temperature. In the meantime, chill the cream, and if you'd like chill the bowl and the beaters (this will help the cream whip-up faster). Whip the cream to stuff peaks, then beat in the sugar and the rum, taste to see if it needs more sugar or more rum.

4. Spread whipped cream over pie, decorate with pecans. Serve at room temperature (leftovers straight from the fridge are good too).

12 April 2009

Maqloube (Upside-Down Lamb and Eggplant Casserole)

We marked the end of my mom's 6 week radiation and chemo treatment last week, which is certainly cause for celebration. We had invited a few people and I had intended to just order some platters from our local Lebanese Taverna, just to make my life easier. But then the cook in me, seeing the price for a simple platter of fattoush, kicked in and I thought I could just put everything together myself. Somehow, between going to radiation treatments, work and meetings, and driving the joys of every beltway and interstate in Maryland, I managed to convince myself it would be easier to also cook for 20. Yes, easier, of course.

Lebanese food was on order from mom, so I chopped miles of tabboule and poured pounds of butter into baklava, cursing the whole time and regretting my decision. Part of my impetus to coking everything myself was that I wanted to make a lamb and eggplant casserole called maqloube. It was something my family in Syria always made for special occasions, it's big and showy, and what better chance than this to cook it for my mom.

Maqloube means "over-turned" because the dish is cooked in a pot and then flipped over onto a platter. This of course, is where the danger is, as part of the dish usually sticks to the pot and it takes skill to get it to come out in one presentable piece. I do not yet possess this skill. Anyway, many people say maqloube is a dish of Palestinian origin, but my family, who hailed from northern Iraq and Syria, claimed they had also been making it for generations.

Basically, a decorative layer of eggplant and tomatoes is arrange in a dish, topped with chunks of lamb, a good amount of spiced rice, and then the whole thing is cooked in lamb stock. Some people place the chunks of lamb (or beef) on top, since in the Middle East they like to show off their meat, and there are variations that include chickpeas and other vegetables.

Unfortunately, the maqloube I made for the party was particularly un-pretty, I tried to fix it up with a drizzle of yogurt and pine-nuts, but nothing much could be done. The maqloube was so good it disappeared in minutes at the party, and my craving went unsatisfied. So, I made it again later that week, to test the recipe for you all, and to see if I could get a nicer picture. And then I forgot to take a picture, and that one was gobbled up too. So, maybe you will have better success at a prettier maqloube, but I'm sure it will be just as delicious.

Maqloube (Upside-Down Lamb and Eggplant Casserole)
Try to look for eggplants and tomatoes the same diameter. Good thick yogurt with a touch of lemon juice is an excellent, and I would say almost essential, accompaniment to this dish.

4 medium-size Japanese eggplants (the long skinny kind)
6 plum tomatoes
oil for frying, such as grapeseed or canola oil
1.5 lbs lamb, cubed (I used part of a top round)
1/2 a beef bouillon cube or beef broth
2 cups Jasmine rice
boiling water
1/4 tsp cardamom
1/2 tsp cinnamon
salt, pepper
butter, for greasing the pan

1. Slice the eggplants. If you are one of those people who are adamant about salting eggplant, do so. I don't. Pour oil about 1/4" deep into a wide frying pan and heat. Fry the eggplants in batches in the hot oil until golden on both sides. Drain on paper towels. The eggplant absorbs quite a bit of oil so you will need to add more oil to the pan as you go. Pat eggplants with paper towels and set aside.

2. In the same fry pan, heat a little more oil if the pan is dry. Saute the lamb cubes in the pan until opaque and browned in spots. Add water to the pan to cover the lamb and add the bouillon cube (alternately, add beef stock to the pan). Bring to simmer and let cook gently for 35-40 minutes. You will have to top up the water in the pan occasionally.

3. Meanwhile, bring a large kettle of water to boil. Place the rice in a bowl, and pour boiling rice over the water to cover. Let the rice soak for 30 minutes. Drain the rice, mix in the cardamom, cinnamon, salt, and pepper.

4. Choose a medium-size heavy-bottomed pot and grease heavily with butter. Layer the eggplant and tomato slices in concentric circle in the bottom of the pan. Line the edge of the pan with a circle of overlapping tomato slices. sing a slotted spoon, ladle the lamb cubes over the bottom of the pan. Spoon a thin layer of rice over the lamb. If you have leftover eggplant or tomato slices, layer them in the pan here. Spoon in the remaining rice and pt down gently, do not pack. Pour the reserved lamb stock over the rice. Cover the pan and bring the mixture to a simmer, then immediately turn the heat down to the lowest setting and cook, covered, for 45 minutes. Check the pot occasionally towards the end of cooking to make sure it still looks moist (I usually poke around with the end of a spoon). Add more water if it seems dry. Be careful the bottom doesn't burn.

5. Remove from heat and let stand 5 minutes. Uncover the pot and place a large plate or platter on top of the pot, then carefully but swiftly invert the rice pot onto the plate. Let the pot sit over the plate for a moment so all the rice can shift downward, then remove the pot. Inevitably, some of the rice/eggplant will have stuck to the pot, simply arrange it on the platter as best you can.