27 October 2014

Pumpkin Hummus with Mushroom, Date, and Chile Topping

DSC_0053
If you are like me, you make dinner most nights. Some nights it's good, some nights you are lucky to hit the mediocre mark and comfort yourself with the thought that at least dinner was homemade and relatively healthy. Other nights dinner might be very simple but very good -- recently we made a pureed soup with leeks, butternut squash, celeriac, broth, cream, and apple cider, which definitely fell into this category.

And then, every once in a while, you make something and go WOAH, let's definitely make that again! Which was the case, for me at least, with this version of pumpkin hummus. First of all, we talked about pumpkin dip , or mouttabal bi yaqteen (متبل يقطين) many moons ago on this blog, and it continues to be a favorite of mine. Syrians love pumpkin and tahini together, whether in a dip, in a stew, or in a salad, though admittedly the latter is not traditional. The traditional dip does not involve chickpeas, but at some point I seem to have forgotten this and instead of making mouttabal bi yaqteen I started making hummus bi yakteen and I never looked back.

DSC_0040

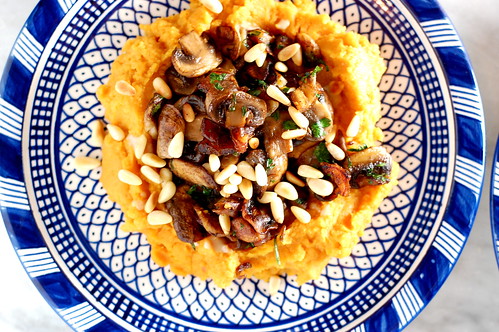
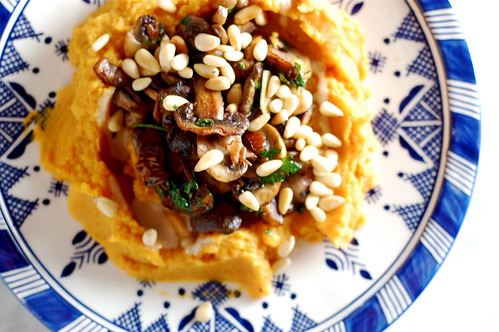
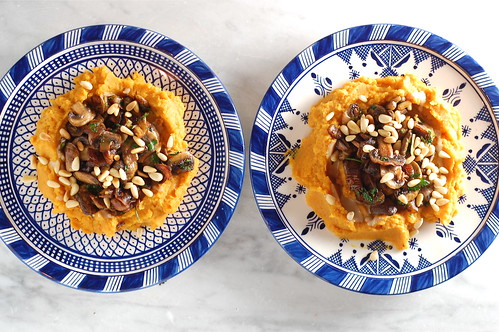
If you are currently in the midst of lovely North American fall, full of crisp leaves and pretty squashes, then you know that pumpkin hummus is a phenomenal idea. It is also a delicious idea. For dinner, I wanted something heartier, so I topped it with a topping of sauteed mushrooms, dates, and pine nuts. The topping adds just the right amount of meaty-ness, with sweet and spicy notes. The following day we ate the pumpkin hummus topped with a topping of ground beef, jalepenos, and tomatoes, which was also great.

DSC_0048

Pumpkin Hummus with Mushroom, Date, and Chile Topping
This would be a great dish for a vegetarian dinner party or as an offering for a vegetarian at Thanksgiving.

1 recipe pumpkin hummus, follows

topping:
1 box (8 oz) button mushrooms, sliced
5 large medjool dates, pitted and cut into small cubes
1 clove garlic, minced
1 handful flat leaf parsley leaves, sliced
salt, olive oil

for serving:
chile flakes (Aleppo pepper, Urfa biber, or your preferred mild red pepper flakes)
extra tahini
1/4 cup pine nuts

1. Prepare hummus, scoop into serving bowl. Set aside.
2. Heat a generous splashing of olive oil in a medium sized heavy bottomed pot. Add the mushrooms to the pot and sprinkle with salt. Allow the mushrooms to saute, stirring occasionally, until the mushrooms have expelled their juices and deep brown and soft. Add the dates and garlic, stir, and let cook for another 3-5 minutes, stirring periodically, until the garlic is cooked through and the dates are soft and there are charred spots on the mushrooms. Season again with salt. Stir in the parsley, remove the pot from the heat, and set aside.
3. Drizzle extra tahini and chile flakes over the hummus. Pile the warm mushroom over top and sprinkle with more chile flakes if desired.
4. Wipe out the pot, toast the pine nuts in the pan over high heat, being careful they don't burn. Pour pine nuts over the dish and serve.

Pumpkin Hummus

1 mediumish butternut squash, about 1 1/2 lbs
2 cups cooked chickpeas, plus a little of their cooking liquid or water
juice from half a lemon
1 teaspoon salt
1/4 teaspoon each cinnamon, allspice 
1/2 cup tahini

1. Preheat oven to 425F. Cut the squash in half lengthwise, scoop out the seeds, and place on a baking sheet. (I don't bother rubbing the squash with olive oil, but feel free to if this suits you.) Place the squash in the oven and roast for 45 minutes, or until browned on the outside and completely tender when pierced with a knife. Set aside.
2. Scoop the squash flesh into the bowl of a food processor. Add all remaining ingredients. If it is very thick add a bit of the liquid or water, no more than 3-4 tablespoons though. Blend the mixture thoroughly in the food processor, letting it run for several minutes to mix thoroughly. Taste for seasoning and set aside.

DSC_0051

19 October 2014

Diners and Chocolate Crispy Treats

DSC_0630
Right before we closed on our apartment, I watched a sweet little video about the dying (extinct?) art of neon sign making in New York City. Which is why, shortly after moving into our new Chicago apartment, I couldn't help but noticing the classic neon signs that seemed to be everywhere in this town. There are at least five within a short radius of our home, and one of my favorites is the neon flower sign on LaSalle Flowers, which sticks out at a funny catty-corner angle to the street. The flower shop sits not far from an original Howard Johnsons, the kind with the sweet peaked roofs, which is itself home to the Cafe Luna. The Cafe Luna is exactly what I want a diner to be: a no frills place with endless coffee refills, eggs prepared a thousand ways, pancake combo platters, and a great grilled cheese.

Given its proximity to our home, Paul and I spend many Sunday mornings at the Cafe Luna, where our conversation often circles back to the things we love about Chicago. You see, those things like the neon signs and the diners symbolize something that cities like New York and Washington DC have managed to price themselves out of. In Manhattan or D.C. you would be hard-pressed to find a diner that doesn't charge $15 for pancakes and offer an array of cocktails, an ironic theme, and expect you to vacate your table as soon as you have finished eating. And, in those cities, the neon signs are gone because corporations and businesses have bought up the majority of the real estate, and no one bothers to fix neon anymore. Which is why the LaSalle flower sign always makes me smile.

Thus, we were very sad to hear a few months ago that the Howard Johnsons has been sold to a real estate developer to be demolished. The Cafe Luna can stay open for another year, until the demolition happens, though the owner's son recently told me he wasn't sure they would have enough business now that the hotel has closed.

I want to be clear that there was nothing write-home worthy about the cafe, it's not a gastropub, nor a Shopsin's, it's just a small family-run place where I can walk in and get coffee and waffles, which is exactly as it should be. Cities need places like the Luna Cafe, where a cabbie can stop and get a omelet to go, or someone hard up for cash can come in and count out their exact change next to an (admittedly more well off) local home owner like myself.

I've been thinking a lot about why I'm drawn to places like this. Many of my friends would probably tell you, not unjustifiably, that I'm a food snob, and I've been known to be a harsh critic of restaurants on occasion. So what makes me love a place that has no issue with putting whipped cream out of can onto its pancakes? Diners and breakfast cafes are a huge part of the American experience to me, not just the food culture but the culture-culture. A diner is in many ways like the first hamsani (local hummus place) I wandered into as a twenty-year-old in Beirut, alone, where I sat and had a meal of hummus and chatted with locals and where my eyes were opened to a whole culture for the first time. I had spent three years studying Middle Eastern studies, but it wasn't until I sat in that cafe and talked to people that I really got it.

These places are also places where people of all social strata not only cross paths, but might actually sit and eat together in some tangential way. And in our society these days, I fear there aren't many places where that happens often anymore.

*** In other news, our move to Cairo is impending shortly, where I hope to find my local koshari place (and whatever the Cairene equivalent of hamsani/ful vendor there is). If you readers have suggestions please do send them this way. Also, though it would probably be most appropriate to follow this post by a recipe for pancakes, the truth is I buy all my pancakes at diners, and so instead you get this recipe which I make every once in a while for a twist on rice krispie treats. They are guaranteed to disappear from your office in under 10 minutes. ***

DSC_0634
DSC_0635

Nutty Chocolate Crispy Treats
This recipe was inspired by something I found online, deep in the internets, when I was trying to use up a bunch of things in our pantry like agave and coconut oil. You can also try topping the treats with a schmearing of melted chocolate and sea salt.

6 cups rice crisp cereal
1 cup agave syrup
1/3 cup maple syrup
1/2 cup nutella
1/2 cup almond butter, peanut butter, or soynut butter
1/3 cup chocolate chips or chopped chocolate
3 tablespoons coconut oil or butter
2 pinches (about 1/2 teaspoon) sea salt

1. Measure out your cereal and have it at the ready. Line a 9x12 inch pan with parchment paper.
2. Get out a large deep pot (a small stock pot works nicely). Place the agave and maple syrup in the pot and bring the mixture to a roiling boil. Watch the mixture so it doesn't boil over, but luckily you're using a deep pot! Let the mixture boil for one minute. Turn off the heat and immediately stir in the nutella, nut butter, chocolate, oil, and salt. Stir well to combine. Fold in the rice crisp cereal, working quickly to mix everything together.
3. Spread the mixture into the prepared pan and press down using a nonstick spatula or damp fingers. Let the treats rest for at least 3 hours before slicing. Cut into bars using a knife or sharp-edged spatula.

12 October 2014

Roast Broccoli Salad with Pomegranates, Walnuts, and Creamy Dressing

photo 2-4
Remember back a couple weeks ago when we talked about broccoli? Maybe you thought I was kidding, that only a crazy person would OD on broccoli before moving to Egypt? Ah, well! Clearly you would be wrong, because for several nights last week I ate multiple whole heads of broccoli in one sitting. What? Is that weird? It really shrinks down when you roast it.

photo 2-5photo 3-4
photo 3-3

Have we ever talked about how one of my favorite childhood snacks was raw cauliflower, followed closely by raw broccoli? Also known as "trees," in classic childhood parlance. It is unclear to me as an adult what exactly about raw broccoli would have been appealing to me, but it was a great source of frustration to my mother, who had difficulty getting her underweight to child to eat anything more substantial.

Broccoli, now preferably in cooked form, continues to be a favorite of mine, which is why I was surprised to realize that there are almost no broccoli recipes on this blog. Perhaps it's because broccoli is not available in the Middle East, where I spend most of my time living and writing about food cultures therein. However, there are plenty of Middle Eastern cauliflower recipes, for which you can try swapping broccoli (though I'm sure someone would call this heretical, frankly I'm not that much of a traditionalist). This broccoli salad is basically a play on my favorite roast cauliflower salad. Instead of my usual tahini-yogurt dressing, I reached for some leftover sour cream which goes very nicely with the broccoli. Pomegranates and walnuts make this perfect for the fall dinner table. Or, so that you can eat multiple heads of broccoli all by yourself.

photo 1-4

Roast Broccoli Salad with Pomegranates, Walnuts, and Creamy Dressing
Broccoli really shrinks down a lot when you roast it, so though four heads seems like a lot, this dish really only serves 2-4 as a side. This would also be good with a few dried currants or using pine nuts instead of walnuts. I save my broccoli stems and use them to make a potage-type soup, pureed with some turnips, onions, stock, and cream.

4 medium-smallish sized heads of broccoli
1/2 a red onion
pomegranate seeds from about 1/3 of a pomegranate
1/2 cup sour cream (or thick yogurt)
a squeeze of lemon juice
1/2 cup walnuts
Urfa Biber or Aleppo pepper chile flakes, for sprinkling
salt, olive oil

1. Preheat oven to 425F.  Line a large baking sheet with foil or silpat. Stir the sour cream together with the lemon and a pinch of salt and set aside.
2. Place the first head of broccoli on your cutting board parallel to you, so that the stem end is at your left hand and the floret end at your right hand. Slice the broccoli heads cross wise, as seen in this diagram: YouDoodleDrawing
You'll get some teeny tiny florets and some larger florets, which gives a nice texture variety to the roasted broccoli. Take any particularly large florets and cut them down to smaller pieces. Repeat with all broccoli heads. Discard or set aside the broccoli stems.
3. Place all the broccoli on your baking sheet and toss with a generous amount of olive oil so that the broccoli is nicely coated with oil. Spread the broccoli out on the baking sheet, and sprinkle all the broccoli with salt and two pinches of the chile flakes. Place the broccoli in the oven and allow to roast for 20-25 minutes. Keep a close eye on the broccoli, if it seems to be cooking unevenly then stir it around and redistribute it. When the broccoli is cooked through and the ends of the broccoli are dark and crispy, remove the broccoli and set aside.
4. Meanwhile, slice the red onion into thin slices. Heat some olive oil in a pan over medium heat. Saute the onions slowly, stirring occasionally, for about twenty minutes, until softened, translucent, and beginning to caramelize. After about 20 minutes, turn up the heat to high and saute the onions, stirring frequently, so that you get a nice brown crisp edge on some of the onions. Set aside.
5. Place half the broccoli and half the onions on a serving dish. Dollop half of the sour cream over the broccoli. Place the remaining broccoli and onions in the dish, and dollop with the remaining sour cream.
6. Wipe out the saute pan you used for the onions, place it over high heat, and toast the walnuts in the pan for a few minutes, watching carefully so the don't burn. Pour the toasted walnuts over the broccoli, top with the pomegranates, and sprinkle the whole dish with some more salt and chile flakes. Serve warm or at room temperature.

05 October 2014

Za'atar Cured Salmon

photo 3-2
I hate saying that we've been busy. It's one of those American things that has come to annoy me the more I live outside the country, in the same way that I try to avoid asking people what they do for a living at cocktail parties. It always results in far more interesting conversations.

So instead we've been pleasantly occupied, traveling here and there to visit family and friends, working, doing a lot of yoga, trying to organize our life so that half of it ends up in Chicago and half ends up in Cairo. I'm on a first name basis with the people at Maersk shipping. My spare moments have been filled with painting and fixing up our apartment and the bare bit of cooking I have done consists mainly of buying a nice piece of fish at the market, seasoning it, and sticking it under the broiler until it is just barely done, and then eating it with some simple vegetables. Also a lot of toast. You can never go wrong with toast.

photo 4-1
I have also been playing around with home cured salmon, which has the great benefit of taking up almost no time at all. I had no idea cured salmon was so easy, slap a sugar/salt mix on your salmon, leave it for a few days, and voila! The perfect bagel-and-schmear topper, salad addition, or light lunch.

The curing mix is a simple ratio of 2 parts salt to 1 part sugar, and then any spices you add to the mix penetrate the salmon surprisingly well. When I first made the cured salmon with za'atar, the Lebanese herb mix, I wasn't sure if the flavor would translate through to the final product, but I was pleasantly surprised that it did. The herby-ness is a bit like the Middle Eastern twist on your classic dill and salmon pairing.

photo 1-3photo 2-3
Za'atar Cured Salmon
I keep several types of za'atar in the cabinet, some higher and lesser quality, for this dish I recommend using average grocery-store quality za'atar. I imagine this would also work really well with the Egyptian spice mix dukkah.

3 cups salt
1 1/2 cups sugar
1/2 cup za'atar (available from mail order sources or Middle Eastern groceries)
zest of 1 lemon
1 tablespoon fresh black pepper
1 large fillet of salmon (1 1/2 to 2 pounds)

1. In a bowl, mix the salt, sugar, za'atar, lemon zest, and pepper.
2. Place several sheets of plastic wrap on a working surface. Pour about 1/3 of the curing mix over the plastic wrap and spread it into a rectangle. Place the salmon fillet over top the curing mix. Pack the remaining curing mix around the salmon (you may not use all of it).
3. Wrap the plastic wrap up around the fish, then wrap some more plastic wrap tightly around the fillet. Then wrap the fillet in a layer of aluminum foil and place in a rimmed baking dish. Place a smaller plate or baking sheet over top the fillet and weigh it down with heavy items cuch as a few large cans of tomatoes.
4. Place the whole thing in the fridge to cure for 3 days. About halfway through, flip the fillet over to the other side. After about a day liquid will begin to release from the salmon.
5. After 3 days, unwrap the fillet, brush off and discard the salt. Rinse the salmon under running water to remove any excess salt. Thinly slice the salmon on an angle and serve as desired.