01 June 2007

Etymology of a Tart

Pistachios, Apricots, and the Tart They Made

The Arabic word for pistachio is fustuq halabee ( فستق حلبي) or Aleppo nut, and indeed Syrian cuisine puts this local crop to good use. The bright green nuts fill gorgeous coins of baklava, are sprinkled through rice pilafs and are eaten out-of-hand at nearly every stage of their growth. My boss's eight-year-old daughter, marveling at my ignorance, had to teach me how to eat a young pistachio, first peeling the thin soft red skins, then cracking the hard shells to reach the still-tender nut inside. Pistachios, native to the mountainous region of Iran, are not easy trees to grow. The trees can take up to 12 years to come to fruition, and peak harvests may not happen for twenty years.

In an effort to combat increasing desertification and improve the livelihoods of poor farmers, the Syrian government in collaboration with the UN, has undertaken a tree planting project over the past forty years. Focusing on high value crops such as pistachios and almonds, it has not been an easy road, it takes considerable investment on the part of the farmers to clear the fields and then tend the trees for the many years before they produce any financial return. However, using loans and food aid, the program has been remarkably successful, replanting tens of thousands of acres, empowering poor farmers, and inculding complimentary programs targetting women such as bee-keeping and nursery skills. Driving through Syria's greenbelt today (the area near the Mediterranean coast and Euphrates river), you'll pass mile after mile of tree farms, a startling green landscape at the edge of the desert.


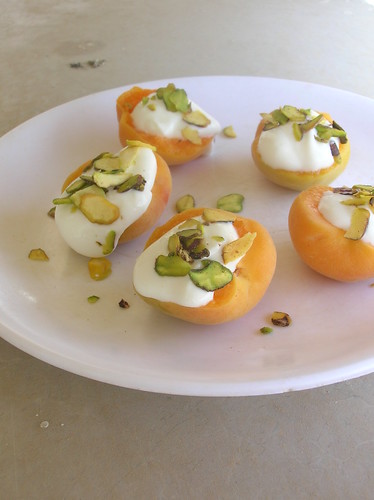
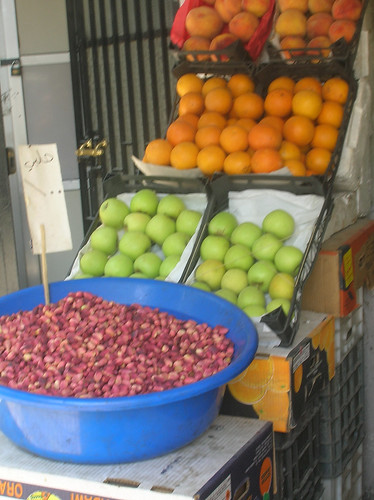
Apricots topped with thickened yogurt and pistachios; young pistachios in the market.

Apricots also grow among those green fields and are another crop you'll find all over the Damascus market. The first time I saw them in the spring, I was captivated by these tiny sweet fruits, barely 2 inches in diameter and just ripe enough to split open with your fingers. As the season progresses the apricots grow larger, but it is those tiny baby ones I covet, and which arrive by huge cratefuls in the markets. Apricots bruise easily and don't travel well, which is probably why I grew up with the more hardy nectarines or local peaches. But apricots thrive in the Mediterranean, and in Syria they are turned into fabulous apricot jam, apricot syrup, dried and made into a type of fruit leather called qamr al-deen (literally 'moon of the religion'). Indeed, the word for apricot in Argentina and Chile is damasco, probably referring to the Damscene settlers who brought the fruit. In Arabic they're known as mishmish (مشمش).


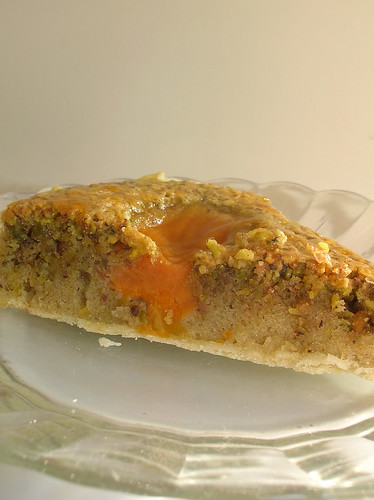
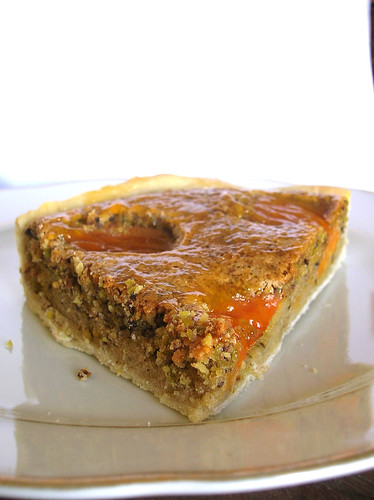
When I set out to make a tart the other day, I had in mind the wonderful French frangipane tarts, frangipane being a mixture of ground nuts, butter, and egg that forms the filling of the tart. Traditional French tarts pair hazelnuts and pears, but I thought why not use those Syrian products, pistachios and apricots. You could easily make this subsitituting almonds for some of the pistachios, or canned fruit in place of fresh. My only mistake was to brush apricot jam over the top of the tart, I was supposed to brush it only over the fruit, but I covered the whole tart with the glaze, resulting in an unfortunate green+orange=brown result. Oops. To preserve the brilliant green of the tart, I suggest brushing a clear glaze of corn syrup over the tart to give it that glistening look. And no matter what language or provenance you use, the tart is delicious.


Apricot Pistachio Frangipane Tart
This tart has a stunningly colorful appearance and comes together easily in the food processor. Shelled blanched pistachios will have a vibrant green color, look for them in well-stocked groceries or Middle Eastern markets. If you can't find blanched pistachios, blanch them yourself by immersing the shelled nuts in boiling water for one minute, then rinse them under cold water and dry thoroughly.

baked tart crust for a 9" tart pan (see below)
1 1/2 cups (about 6 oz) shelled blanched pistachios
1/2 cup sugar
1 tsp orange zest
4 tbl butter
1 large egg plus 1 egg yolk
1 tsp almond extract
2 tbl flour
pinch salt
1/2 tsp baking powder
4-6 very small apricots, halved
2 tbl corn syrup

Preheat the oven to 375 F, prepare the tart crust.
1. Grind the pistachios in a food processor with two tablespoons of the sugar until you have a fine meal (don't grind so much as to make nut butter though). You should have about 1 1/4 cups pistachio meal (if you have more than this, set it aside or discard it).
2. Add the remaining sugar and orange zest to the pistachio meal and pulse to combine. Slice the butter into small pieces and add to the processor with the nut mixture. Process until combined. Add the egg, yolk, and extract and pulse a few times just to combine. Sprinkle the flour, salt, and baking soda over the mixture and pulse a few times to combine. (If the mixture appears stiff or dry, you can add a bit more egg, if it appears too soupy or wet you can add a touch more flour.)
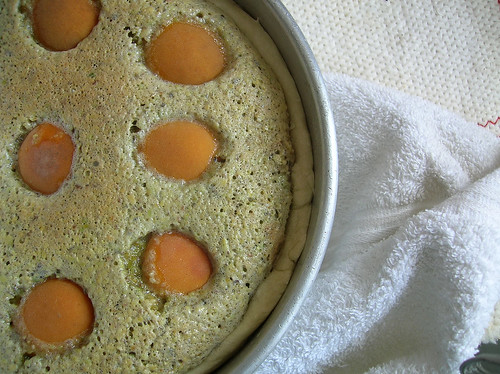
3. Pour the pistachio mixture into the tart shell. Arrange the apricots, cut side down, over the filling. Bake until the filling is puffed and beginning to brown on top, about 35-45 minutes. Cool on a rack.
4. Brush the corn syrup over the surface of the tart to give it that glistening look. Serve at room temperature.

Tart Crust
1 1/4 cups flour
1/2 tsp salt
1 stick (1/2 cup) butter, cold and cut into small pieces
2-3 tablespoons ice water

1. In the bowl of a food processor, combine flour and salt; pulse to combine. Add butter, and pulse until mixture resembles coarse crumbs with some larger pieces remaining, about 10 seconds. (To mix by hand, combine dry ingredients in a large mixing bowl, then cut in butter with a pastry blender.)
2. With machine running, add ice water through feed tube in a slow, steady stream, just until dough holds together without being wet or sticky. Do not process more than 30 seconds. Test by squeezing a small amount of dough together; if it is still too crumbly, add a bit more water, 1 tablespoon at a time.
3. Turn out dough onto a clean work surface. Shape into a flattened disk. Wrap in plastic, and refrigerate at least 1 hour or overnight, then roll out and press into tart pan and refrigerate.
4. To blind bake: Preheat the oven to 375 F. Prick the chilled tart dough all over with a fork. Bake the tart shell for 15-18 minutes, until just golden, pressing back any bubbles with a spatula.

30 May 2007

The Skinny


Asparagus and Spring Onion Tart

Growing up, the prevailing wisdom was that the best asparagus was defined by uniformly thin stalks. I was taught to pick the skinny bunch from an early age; we avoided the larger asparagus for fear they could be tough or (worse) mushy. Then, somewhere along the way, we wised up and realized fat asparagus could be good too. I particularly like to peel the bottom half of fat asparagus stalks, making them velvety smooth and thus increasing your asparagus pleasure (like in this recipe).

This year, the asparagus crop has been particularly delectable, I think the long cool spring has something to do with it. The wonderful man at the market has fat and thin varieties, and I've been buying both and alternating them, unable decide which I like better, they're both so good. This past weekend, we stopped on the way home from the beach and picked up some locally grown asparagus, and while it was delicious, it can't compare to my market man. Most of the time, we enjoy our asparagus simply boiled or roasted, but faced with produce this good, I wanted to show it off a bit. You know, put it in a fancy dress and send it down the runway.

In this case, the dress was a bit of puff pastry to shelter it in a tart. I matched the asparagus with some sweet spring onions- you'll want to use either baby leeks or very fresh onions, to ensure they have their fresh sweet flavor, and haven't gotten too strong with age. A bit of cheese and a sprinkling of thyme from the garden, and not only was this asparagus showed off, but the tart was quickly devoured. While it may seem to have multiple steps, the recipe is simple and comes together easily, so I recommend you get to it quickly, while those good skinny little asparagus spears are still around.


Asparagus and Spring Onion Tart
Puff pastry makes a quick and easy base for this tart, I recommend you look for Dufour brand in the frozen section of the grocery (it's made with all butter, as opposed to shortening). This tart is meant to show off those skinny first shoots of spring, you could add ramps, green garlic, sorrel, or other sweet onions.

1 sheet puff pastry, thawed if frozen
2 bunches baby leeks, spring onions, or very fresh scallions
1 bunch skinny asparagus
1/2 cup grated Gruyere cheese
a few sprigs of fresh thyme

1. Roll out and trim the puff pastry to a 12 by 8 inch rectangle. Place on a greased baking sheet and place in the fridge to chill.
2. Preheat the oven to 375 F. Trim away the tops and tough outer leaves from the onions/leeks. Take one bunch of the onions and carefully slice them in half lengthwise. Take the remaining bunch of onions and chop the bottom white parts finely. Melt one tablespoon of butter or oil in a skillet. Add all of the onions and cook over medium heat, being careful not to push the onion halves around too much, or they may come apart. Cook gently for about 10 minutes, until well-softened, then set aside.
3. In the same pan, add 1 to 2 inches of water and bring to a boil. Add the asparagus and boil until just tender, about 5 minutes. Drain, rinse under cold water, and set aside.
4. Take the chilled puff pastry from the fridge and use a knife to trace a rectangle marking a one-inch border. Score the interior area in a light cross-hatch pattern. Place in the oven and bake for 10-15 minutes, until golden.
5. Remove the pastry and use the back of a spatula to press down on the center of the pastry. Sprinkle the cheese over top and the chopped onions. Arrange the onion halves decoratively over the tart, return to the oven and bake for 10 minutes. Scatter the asparagus and thyme over the top and bake for a final 3-5 more minutes.
___

28 May 2007

Homework


Gâteau Saint-Honoré

Homework is one of those things that you are supposed to be freed from upon leaving school. One of the perks of ‘adult’ life, like going out on a weeknight, or the realization that calculus really was useless. Liberated from homework, people get to move forward in their lives and do fun things like fix the broken washing machine, fertilize the lawn, pay the bills, and have those little things called kids and tend to raising them. But we never really get away from homework, even if it no longer involves trigonometry. I sometimes bring work home with me, especially if I’m working on a piece of writing, I like to be able to mull over word choice and sentence structure at my own leisure. However, this week I was cursing myself for some self-assigned homework.

You may have read about a certain crepe cake I made way back when, part of a baking group I joined (the Daring Bakers), in which we have a ‘monthly challenge.’ So, along came this month’s challenge, and I’ll admit it, I balked. As the deadline approached, I grumbled sourly about “that thing I have to bake, as if I don’t have other things to do.” The assignment, a Gâteau Saint-Honoré, was indeed a challenge, with multiple components and steps. I could be heard muttering things about ‘stupid French pastries’ under my breath like a kid with a book report to do. In France, fancy pastries and cakes are almost always purchased from professional bakers, while home cooks rely on a repertory of simple baked goods and custards for everyday. I am very-much a home cook, but I hope I am also daring, so I gave it a go.


A Gâteau Saint-Honoré is a classic pastry comprised of a puff pastry base with rings of cream puff dough, then topped with a lightened pastry cream (rapid Chiboust), and decorated with cream puffs, whipped cream, and caramelized sugar. May 16 was Saint Honore (pronounced o-no-ray) Day the patron saint of bakers after whom the cake is named.

I finally buckled down and made the thing, and you know what, I’m so glad I did. Like the best homework assignment, it actually taught me some things. I’d never made cream puffs (choux paste dough) before, it’s an interesting technique, and one I look forward to experimenting with some more. I stirred the dough by hand, and nearly lost an arm to it, so if you have a stand mixer, I recommend using it. The puff pastry and Chiboust ( a pastry cream stabilized with gelatin and lightened with both whipped cream and beaten egg whites), are classic techniques worth knowing. If you wanted to simplify this, you could use a purchased puff pastry (I recommend Dufour brand), and a simple pastry cream lightened with whipped cream.

Most importantly, the cake was delicious. I had been contemplating giving half of it away to a friend, but after the two of us went back for seconds, I was told: “you better not give any of this away, it’s like a real French pastry.” I agreed, nibbling a delectable cream puff with a crunch of caramelized sugar, and feeling rather proud of my bit of edible homework. A+

Since it is quite lengthy, I recommend you head over here for the full Gâteau Saint-Honoré recipe. Also, much of my own success is due to Helen, who wrote out the recipe and offered great support and advice along the way. Many thanks!

__

24 May 2007

What Was Always There, Newly Admired


Radish-Poppy Seed, Cucumber-Coriander Chutney, and Carrot-Ginger Tea Sandwiches

Back when I was in high school, my mom and I were out for our usual dose of Sunday museum visits, something know in our house as "museum therapy," and perusing an exhibit at the National Portrait Gallery. Without warning, I saw my mom approach a man wearing tortoiseshell glasses and who stood with his nose inches from a painting, scribbling notes on a legal pad clutched to his chest. "Dink, is that you?" she asked. To my surprise, he turned and said in a dead-serious whisper, "you used my real name." Actually, I was soon to learn that his real name is Don, and Dink was a name used only by his childhood friends. He and my mother had been best friends through high school, he often picked her up in his mother's pink convertible, and gave her a statue of Hamlet when they graduated.

However, after high school they lost touch, and until that meeting in the hushed gallery halls, hadn't seen each other in nearly thirty years. In a subsequent lunch, my mother learned Dink (as we still call him), was a lawyer who lived nearby with his partner John in a great apartment building, and a friendship was resumed as if there had never been a gap. These days, Dink and John are some of the most creative, intelligent, well-traveled people we know, and I always look forward to when they come to visit. They often talk about memories of growing up in Tennessee, stories looked on with the fresh eyes of time and experience.


Knowing they were coming for a picnic last weekend, my mind set on what to fix: simple things, like a little chopped tomato salad, and some slices of teriyaki chicken, a big bowl of grapes and a nice smoked cheddar. But I was also thinking about those foods of the old South, and looking on them with new eyes. Take, for example, the tea sandwich. I picture it as part of the luncheon spread at the Country Club, piled on platters next to a gelatin salad and ham biscuits, probably coated in mayonnaise and insipidly soggy. I've always associated tea sandwiches that way, never giving a thought to where they came from. It took my British-born companion to point out the obvious, that tea sandwiches are one example of the Old English roots of the South.

That got me to thinking about the linneage of tea sandwiches, and the other behemoth of British colonization, India. Spying a jar of coriander chutney, a thick green paste made with coriander and coconut, I immediately knew it would be a perfect twist on the classic cucmber-watercress sandwich. But why stop at one type of tea sandwich when you can have many? Sometimes my culinary imagination gets the best of me, so those French breakfast radishes I picked up at the market got paired with a delectable cream cheese- poppy seed spread. And finally, sweet grated carrots paired with ginger and a deliciously nutty bread.

I'll admit tea sandwiches are a bit fiddly, you can't really do them ahead or they'll get soggy. But I had a ball putting this together, and best of all, the sandwiches were delicious, each person had a different favorite. Sometimes it takes an old friend and a new perspective to discover something that was right there all along.


Tea Sandwich Tips
Use very thinly sliced good quality bread. To prevent sogginess, spread the bread with a thin layer of unsalted butter, and don't assemble more than 3-4 hours ahead of time. Remove all crusts and slice the sandwiches into small shapes about the size of two bites. For fun, you can decorate the edge of the sandwiches with chopped herbs, seeds, or finely grated vegetables.

Radish-Poppy Seed Tea Sandwiches
slivered radishes, chopped chives, 1/2 cup cream cheese, 3 tbl mayonnaise, 2 tbl poppy seeds, 1 tsp lemon zest, white bread

Combine cream cheese, mayonnaise, poppy seeds, and lemon zest. Spread bread with cream cheese mixture, cover with a layer of slivered radishes and a sprinkling of chives, then top with a slice of cream cheese-spread bread. Trim crusts from sandwiches and cut into small shapes. If desired, spread one edge of sandwiches with a small amount of the cream cheese mixture and dip in poppy seeds to decorate.

Carrot-Ginger Tea Sandwiches
3 large carrots, grated, 1/2 cup marmalade, 1 tsp ginger, whole-grain bread

Combine the grated carrots, marmalade, and ginger (if you have a ginger marmalade, you can use it and omit the powdered ginger). Make sandwiches with whole grain bread and cut into small squares or triangles.

Cucumber-Coriander Chutney Tea Sandwiches
1-2 cucumbers (preferably seedless), coriander-coconut chutney (available in jars in international food stores), unsalted butter, white bread, chopped chives, herbs, or dessicated coconut for decorating

1. Peel the cucumbers in a striped pattern, leaving only a little bit of green for accent. Using a mandoline or a sharp knife, thinly slice the cucmber, pat the slices dry with paper towels.
2.Spread one side of the bread slices with a small amount of unsalted butter to prevent sogginess. Spread the bread with coriander chutney, top with cucumber slices, assemble sandwiches, and trim crusts. If desired, spread one side of the sandwiches with coriander chutney and dip in chopped chives or dessicated coconut to decorate.

23 May 2007

First of Many


In my house, I am designated pie maker. It is a duty I accept readily, having been bred for it starting at the tender age of about ten. Somehow, pies were deemed a simple thing for a young child to help make, and I learned quickly, eventually taking over pie duty in the stretches of summer months. One summer, we went to a pick your own berry farm, and after laboring all afternoon in the sun, we bought some extra berries to supplement our harvest and ended up coming home with enough blueberries, blackberries, and raspberries to fill a bathtub. As the berries threatened to take over the kitchen, I had to go to all the neighbor’s houses to collect enough pie pans, and then I went to work. The neighbors who were kind enough to donate a pan got a pie baked in it in return.

I came to rhubarb pie relatively late, having grown up in an area devoid of any Swedish immigrants (click here to find out why “Linnaeus said that the introduction of rhubarb to Sweden was his proudest achievement”). However, these days we look forward to rhubarb-strawberry pie as the first sign of spring and a happy harbinger of many pies to come. In fact, it's become one of my favorite fruit pies, second only to blueberry. The strawberries at the market have been particularly glorious this year, and provide the perfect compliment to the tart rhubarb.

I will say the one secret to my pies is a good homemade crust. Unfortunately, many people are intimidated by pie crust, or choose to rely on pre-made ones, which is sad. Homemade crusts are very easy to make and are deliciously flakey and buttery. Just make sure you follow the directions and chill the crust as directed. These days, pies are so familiar, I barely measure anything, relying more on taste, eye, and instinct. It’s an instinct I suspect will be further honed, as this is only the beginning of the season.


Strawberry-Rhubarb Pie

2 1/2 cups rhubarb stalks cut into 1/2 inch pieces
1 1/2 cups strawberries, stemmed and sliced
1 cup sugar
3 tablespoons cornstarch or tapioca
1/4 teaspoon of salt
1 teaspoon of grated orange peel
Unbaked pastry for two-crust 9 inch pie (see below)

1. Preheat oven to 375 F. Have your pie crust fitted into the pie pan and chilling the fridge (see below). Combine the filling ingredients in a large bowl, stirring to combine. Let sit for 10-15 minutes.
2. Pour filling into prepared pie crust. Top with a lattice crust, crimp edges as desired.
3. Place in the oven, check the pie after 30 minutes to make sure the edges aren’t browning too much, cover them with foil or a pie shield if necessary. Bake for 50-60 minutes total. The juices should be thickened and bubbling when the pie is done. Cool on a rack.

Pie Crust
I still make my crust by hand, but you can use a food processor if you prefer. Yields pastry for a 9 or 10 inch double crust pie.

2 1/2 cups flour
1 pinch salt
2 tbl sugar (optional)
1/2 cup (1 stick) butter, cold
1/2 cup shortening
4-6 tablespoons ice water

1. Combine the flour, salt, and sugar in a large bowl. Slice the butter into little bits and add to the bowl, add the shortening to the bowl in little spoonfuls. Using two knives or your fingers, rub the butter into the flour until the mixture resembles coarse meal. You don’t have to over do it, you want a few pea-sized bits of butter.(You can also do this in the food processor). Sprinkle about 4 tablespoons of ice water over the mixture and use a spatula to gently push the dough together. You can add a little more water if necessary, you just want the dough to come together, don’t knead it too much.
2. Divide the dough into two balls, flatten them slightly into disks, dust them lightly with flour and wrap in plastic wrap. Refrigerate the dough until chilled, at least half an hour or up to two days.
3. Roll out the dough: If the dough is very cold you may want to let it sit for about 5 minutes on the counter before you roll it. Roll the dough out with a rolling pin, only adding a little flour to the work surface if necessary to keep from sticking. Roll to about a ten inch circle. Fit the dough into a pie pan, trim and crimp the edges, then refrigerate or freeze until ready to use. Roll out the second round of dough, refrigerate until ready to top your pie, or use as desired.

__

22 May 2007

Sumac Crusted Cod, Black Olive Sauce


Let's cut straight to the chase today: this dish was delicious. The only sad part was the next day, when we realized there wasn't any more of it left, at which point I just went and put it together again. Luckily, it comes together in mere minutes, so we kept the hungry-grumpy me at bay (and that is always a good thing).

It all started with a little recipe for 'black olive oil' I spied in Samuelsson's The Soul of a New Cuisine. With such an evocative name, I had visions of a dark-as-night sauce, thick and rich as an oil well. Obviously, I didn't think that one through, because the name comes from the fact that the oil is made with black olives, not that it is really black-colored. As I soon realized, black olives are sort of grey on the inside, so there I was with a big batch of tasty but slightly grey-green sauce. All dressed up and nowhere to go.

I had picked up some cod fillets, and when I saw the little sack of sumac on my counter, inspiration struck. Why not roll the cod in the sumac, then serve it with the olive oil? I had no idea if it would work, since I'd never heard of such a dish. As we sat down to dinner I waited nervously as the first mouthfuls were chewed; there was a pause, and then a murmur of approval. And it was good, as I dug in my own fork. Sumac, made from dried berries, has a very mild taste, so it doesn't overpower the fish, but just adds a tart compliment to it. It is available in the spice section of most groceries and in Middle Eastern markets, and don't worry, it shares no relation with the North American poison sumac. Any leftover black-olive oil can be used for dipping bread and rubbing on meats and even as a salad dressing. All in all, a dish worth repeating.


Sumac Crusted Cod with Black Olive Sauce
The tart but mild sumac is a perfect foil for meaty fish such as cod.

2 lb cod fillets
1/4 cup sumac
black olive oil, recipe follows
2 tbl olive oil

1. Cut the cod fillets into serving-sized pieces, rub about 1/2 cup of the black olive oil all over the fillets and set aside to marinate for half an hour, or up to two hours.
2. Preheat the oven to 400 F. Wipe off any excess marinade from the fish. Roll each piece of cod in the sumac to coat. Heat the olive oil in a wide skillet over medium heat. Add the cod fillets to the skillet and cook for about 3 minutes on each side, using tongs to gently turn the fish. Once the cod is sauteed on both sides, remove from the skillet, and transfer to a baking sheet. Place the cod in the oven for another five minutes to finish cooking, the fish should be plump, opaque, and just begining to flake easily. Depending on how thick your fillets are, you may not need to use the oven at all, or you may want a longer time in the oven. Serve immediately, with black olive oil drizzled on top.

Black Olive Oil
This gets it's name from the fact that it is made with black olives, not from it's color. It's a delicious sauce with flavors evocative of tapenade and has a myriad of uses, from marinating fish, drizzling on bread, or tossing with salad. Adapted from Marcus Samuelsson.

1/3 cup black olives, pitted
1 anchovy, or 1 tsp anchovy paste
1 cup extra virgin olive oil
1 garlic clove
1 thyme sprig, leaves only, chopped
1 tbl lemon juice

Combine all ingredients in a blender, puree until smooth.

__

19 May 2007

Poet's Honey

honey ice cream 1honey ice cream 4

Oh what a joy good friends can be! What better pleasure than Sara, who has a habit of asking if I would bake something for her, or Alex, who’s likely to stop by with an armload of basil and tomatoes and then put them to use. But the good thing about friends is also their ability to surprise you, to reveal a new dimension just when we thought we knew them. Take, for example, a family friend who came for dinner, and brought as a favor a jar of his very own honey. You keep bees, we exclaimed in surprise, and he proceeded to tell us all about his hives at their house in Vermont.

Naturally, we talked about the epidemic of disappearing bees, and I learned all about Russian queens. And the best part? In order to extract the honey, he takes the big hunk of comb and puts it in a machine which spins it, sort of like a washing machine, so all the honey is centripitally pulled out and then strained. How cool is that?

I remembered some fresh honey I had purchased in the souq in Aleppo just before returning to the U.S. The hunk of deep-amber honeycomb had been lingering in my fridge for nearly six months: "Surely I should throw it away," I asked as I sheepishly pulled it out. In fact, he assured us the honey was fine (honey doesn't need refrigeration and never spoils), and he enthusiastically opened up it's sticky bag to taste it. It was deemed delicious, and I gave to him to take home, not quite a fair trade, but a gesture nonethless. The next day, I received this as part of an email:

"I heated the hunk of honey and strained it through cheesecloth but, unfortunately, a good deal of wax melted and contaminated the honey... I'm pretty sure that there were bee abdomens in the darkest part of the comb or they were unhatched brood.  Not sure, but I found it interesting."

Faced with a jar of honey from such a precious source, surely I had to put it to use. And with my recent ice cream success, I had my eye on some more recipes. However, while my first batch was good straight out of the machine, it froze too hard and got a bit icy on the second day. I turned to a custard-based recipe, and with a couple tweaks, came up with an ice cream that's truly delicious and worth the effort. The sweetness of the cream and honey is balanced by a touch of yogurt and the scent of cardamom. Cardamom works remarkably well in sweet applications, so I recommend you give it a try, though you could also substitute vanilla. I had read many recipes that specified the type of honey to be used; I don't know what my friend's bees were feeding on, but since he is a poet, I thought poet's honey was a fitting name.

To make a prarie it takes a clover and one bee,
One clover, and a bee, and revery.
The revery alone will do, if bees are few.


honey ice cream 3honey ice cream 2

Poet’s Honey Ice Cream
This is a delicious, dare I say luxurious, ice cream. The sweetness of cream and honey play off the tang of yogurt and the scent of cardamom for a complex, rich, and smooth experience.

2 cups cream
1 cup milk
1/3 to 1/2 cup sugar
2/3 cup honey, preferably strongly flavored like heather or wildflower honey
4 cardamom pods, smashed, or 1 tsp cardamom
4 egg yolks
1/3 cup Greek-style yogurt

1. Place the cream, milk, 1/3 cup sugar, honey, and cardamom in a saucepan. Bring the mixture to a simmer, stirring to dissolve the sugar.
2. Beat the egg yolks together in a small bowl. Add a small amount of the warm milk to the egg yolks, stirring to mix, then pour the eggs into the saucepan. Cook the mixture over low heat, stirring constantly, until it thickens enough to coat the back of a spoon (be careful not to curdle it).
3. Set aside the mixture to cool completely, then strain the mixture and discard the cardamom pods. Stir in the yogurt and taste for sweetness, depending on your honey and the tartness of the yogurt, you may want more sugar. Refrigerate until completely cold, at least 6 hours or overnight.
4. Churn in your ice cream maker, then pack into containers and freeze, let soften slightly before scooping.
___