28 February 2008

Freezer Burn

I feel as if nothing is quite going my way at the moment, and I'm running after life just trying to keep up. It's as if my schedule is a giant hopscotch game constantly unfurling in front of me, and I'm trying to land on each meeting, class, and train as it appears, teetering on one foot then the other. Really, it's not that bad, I'm getting along just fine, but a few moments to catch my breath, outside my office, would be nice. I've only skimmed the cartoons in the past four New Yorkers and I just picked up the copy of February's Gourmet from my nightstand. I've barely been home enough to cook, and not cooking for me, is like not exercising or not talking. It's one of life's essentials, and without it I'm awash in a sea of cafeteria options and take out menus and things I could make much cheaper and tastier in my own kitchen.

Each day, as I rush off to this or that, I think guiltily about the groceries I bought with optimism last week, slowly wilting in the fridge. It seems my own eating schedule has gone out the window as well: those cookies someone brought into the office, they'd make the perfect morning snack. That annoying boy who didn't call you back, he convinced you to have ice cream at 7 p.m. (granted I don't need much convincing to eat ice cream, ever). And when you finally get an evening at home with nothing on your agenda, you find shriveled week-old bok choy, hummus, some moldy ricotta cheese, and a jar of salsa in your fridge.


This, my friends, is what the freezer is for. I am a strong advocate that the freezer is a cook's great friend. And even when you haven't had time to cook, and you have the urge for something tasty and completely-out-of-season spring-like because, damn it, you are really sick of wearing winter coats and getting up in the dark and bundling yourself in the cold every day; and you just want something bright and vibrant, and a little healthy too, for a quick dinner. Which is why I have a bag or artichoke bottoms, frozen peas, and edamame in my freezer. Don't you?

Well, you should. I've been making this recipe for many years, originally adapted from one by Claudia Roden I believe, though it fits into that pantheon of spring dishes like vignarola that can be found around the Mediterranean. Just make sure to get artichoke bottoms (not hearts, you can also get canned as opposed to frozen ones), and I find edamame make a great substitute for hard-to-find fava beans. Dressed up with a minty-lemon sauce and topped with a few toasted almonds, all those train-chasing, rush hour traffic- grating, cookie-guilt, boy-hating thoughts will fade right from your head. At least until tomorrow.


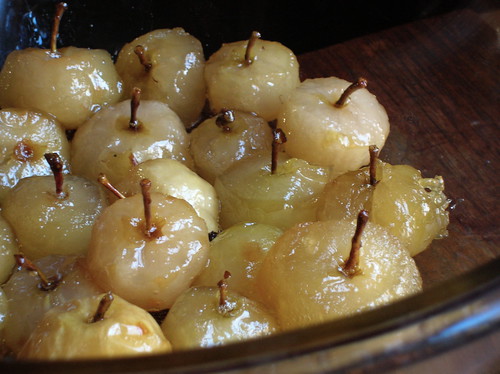
Artichokes, Peas, and Edamame
While Egyptian in origin, this is one of those bright spring dishes that can be found all over the Mediterranean. I often substitute edamame for the more expensive fava beans, and since all these ingredients are freezer-friendly it means you can have it any time of year. Which in that last stretch of winter, is a very welcome thing indeed.

6-8 artichoke bottoms, frozen, canned, or fresh
2 cups frozen baby peas
1 cup frozen shelled edamame or fava beans
3 tablespoons olive oil
juice of 1 lemon
1/2 teaspoon cornstarch dissolved in 1 tablespoon water
pinch salt
1 tablespoon slivered fresh mint
2 tablespoons slivered almonds, toasted

1. Heat a large pot of water to boil. Working in batches, cook the artichoke bottoms, peas, and edamame only until they are defrosted, do not over cook. Drain in a colander.
2. In a medium-sized pot place the olive oil, lemon and cornstarch mixture. Heat the mixture gently to warm. Add the vegetables and cook over medium heat for 3-5 minutes, until the sauce is slightly thickened and the vegetables are heated through. Stir in the mint.
3. Pile on a serving platter. For a fancier presentation, arrange each artichoke bottom on the plate and carefully spoons the pea mixture into each artichoke cup. Top with toasted almonds.

26 February 2008

Date and Almond Stuffed Fish


Middle Eastern cuisine prizes two things: tiny foods and stuffed/layered foods. Like many cuisines, the tiniest baby fruits and vegetables are coveted, from lady apples the size of your thumb to the littlest eggplants and squash. Stuffed grape leaves should be as thin as a woman’s little pinky, and the smallest meatballs are a symbol of a woman’s dexterity, commitment, and potential marriageability. Similarly, stuffed foods are representative of the time invested to make them, and the complex flavors that come from filling one ingredient with another. Little zucchinis, hollowed out and filled with a rice or meat mixture, stuffed grape leaves and cabbage rolls, intricate kibbe meatballs with an outer meat shell and an inner meat stuffing, artichoke bottoms hollowed out and filled with meat, tiny flaky turnovers with oozy cheese inside.

The emphasis on stuffed foods is so great that a needle and thread are often employed in the Arab kitchen: oh, how I loathed this practice. Once, I sewed orange peels into intricate coils, another time it was beef rolls stuffed with herbs. Teeny tiny fish were stuffed, sewed, deep-fried, then de-threaded. I like to sew, but fabric does not squirt juices at you when you pierce it. Anyway, if one thing can be stuffed, than a doubly-stuffed dish is even more special. Such is the case with this fish dish from Iraq: whole fish are stuffed with dates which are stuffed with almonds.

The practice of stuffing dates with almonds is a very common one in the Middle East, as the almond imitates the date pit but is edible. The first time I had one of these was when one of my colleagues went to Mecca on hajj, she brought back dates for the office and specifically instructed us not to discard the pits. I thought that, being from the holy city, the date pit must have some sort of mythic significance, so I carefully nibbled around it only to find it was an almond. Since almond-stuffed dates are common in the area, and since Iraqis use dates in everything, it would be obvious to stuff them inside fish.

In the most complex form of this dish, the dates are stuffed with almonds and rice, certainly an exercise in patience, but I prefer to simply put the rice inside the fish along with the dates. This way the rice balances the sweetness of the dates and the warm spices with the fish. Traditionally, this might be made with shad or trout from the Shatt al-Arab, but I’ve used small whole branzino, and you could use rainbow trout as well. Roast fish is one of our all time favorite meals, and this is a great way to serve it, the stuffing adds a new twist to the fish, and makes it practically a meal-in-one. And consider yourself lucky you don’t have to get out the needle and thread to enjoy it.

Date and Almond Stuffed Fish
At the fish market the vendor asked if I wanted the heads cut off my whole fish and I looked at him in horror. But that's where all the flavor is! Even if the idea of whole fish weirds you at, for goodness sakes at least cook the fish whole, then remove the heads before serving, trust me it makes a difference. This dish can be increased to serve as many as necessary. Serves two.

1 whole fish (a scant 1 lb), such as rainbow trout or bronzino, boned and gutted but left whole
fresh lemon juice
1/2 cup cooked basmati rice
1/2 teaspoon cinnamon, 1/4 teaspoon cardamom
6 dates, pitted
6 whole almonds

1. Preheat the oven to 400 F. Grease a baking dish with some olive oil.
2. Rinse the fish and pat dry. Open the fish and squeeze some lemon juice on the inner flesh and sprinkle with some salt. In a small bowl, toss the cooked rice with the spices, then stuff inside the fish. Slip each almond inside of a date. Place the almond-stuffed dates inside the fish.
3. Close up the fish, secure with a toothpick if necessary. Place in the prepared dish and bake 20 minutes. To serve, open up the fish and spread the stuffing equally over each side of the fish. Use a wide spatula to transfer fillets and stuffing to serving plates. Serve immediately, with a green salad.

See also: Rice-Stuffed Dates Wrapped in Sole with Sweet and Sour Sauce

20 February 2008

Anbari Rice Pilaf

muhammar
Anbar, Mosul, Bosra, Samarra. What do you think of when you hear these names? Chances are, you think of violence, of roadside bombs and IEDs, of suicide bombers and gun fights. How sad it is that these cities, once famous for their history and traditions, are now thought of in the context of war and conflict. Samarra, that ancient city, once most famous for the fabulous spiral minaret that every art history student studies.

I’ve been doing research recently about the culinary traditions of different Middle Eastern cities: Aleppo’s unique use of spices, Anataklia and its eggplants, the biscuits of Saida. Mosul is famous for its kibbe mosul, a casserole of ground lamb and rice, and the cuisine of Bosra is characterized by its use of dried limes. It got me thinking about those city names, that those cities can have more than one meaning, that in the past when someone said Iraq one thought of Babylonian gardens, the cradle of civilization, an old and rich culinary tradition, and not of war.

My goal here is not political, in fact, by writing about Iraqi foods my aim is to depoliticize. When you understand what someone eats everyday, how they shop, how they prepare their foods, you begin to understand how they live and what their values are.

That region often in the headlines, el Anbar, was once known for producing some of the best rice in the world. Iraq’s most esteemed anbari rice is slender and highly aromatic. Unfortunately, Anbari rice is no longer available, but you can make a truly witching pilaf using the similar basmati rice. You’ll find this rice dish from Iraq to Oman and it is particularly popular in the Gulf, but it uses those most beloved Iraqi ingredients: dates, cardamom, and rose water. The dish also reflects the Iranian influence on Iraqi cuisine: the technique of cooking the rice to yield a crispy crust and the spice mix similar to the Iranian mix advieh.

Quite frankly, this is one of my favorite recipes, it always shows up whenever I’m cooking for a crowd and sometimes I make the whole recipe just for the two of us so we can eat it all week long. It has the wonderful scent of rose water, cardamom, and saffron, with a hint of sweetness from the dates. (Or, if you’re feeling cheap, a bit of safflower in place of saffron) The rice is par-boiled, then mixed with the seasonings and cooked over very low heat so that the bottom of the rice forms a delectable crispy crust (tah dig in Persian). Making the crust is part experience and part sheer luck: turn the heat too high and the crust will burn, too low and the crust will be pale and not crisp. The real talent is to be able to turn out the dish in one piece so that the crust makes a beautiful crown on the serving platter. Despite practice, I am never this lucky, and usually half my crust sticks to the pan, in which case you can just crumble the crusty bits over the top, which tastes equally as good. I actually don’t mind if it gets a touch burnt, it adds a nice toasty crunch.

I’ve called this dish Anbari rice pilaf, not because it is specific to el Anbar, but rather in remembrance of that legendary rice. I hope you’ll make it mainly because it’s amazingly good, but also so that next time Anbar comes on the news maybe your senses will be flooded with the scents and tastes of rice pilaf, and not just images of war.

Anbari Rice Pilaf

2 cups basmati rice, rinsed in cold water
1/2 cup date molasses*
1/2 tsp ground saffron
1/2 tablespoon cardamom
2 teaspoons rose water
1 teaspoon salt
3 tablespoons ghee or butter

1. Combine, saffron, cardamom and rose water in a small cup.
2. Bring a large pot of water to boil with the salt. Add the rice and boil uncovered for precisely 8 minutes, then drain.
3. Mix the date molasses with the rice, then mix in the rose water mixture.
4. Choose a medium sized heavy bottomed pot. Melt the butter in it over medium heat. Add 2 spatula-fulls of rice and mix with the butter, patting down to cover the bottom of the dish. Pile the reminder of the rice in a loose cone shape and poke a few holes in the rice with the spoon handle. Sprinkle a few tablespoons of water over the rice, then wrap the pots lid with a towel and cover the dish. Place over very low heat and let cook for 20-25 minutes. Keep a close eye at the end as the rice can burn (use your nose to see if it begins to smell burned).
5. The easiest way to unmold the rice is to prepare a sinkful of cold water, dip the bottom of the pot in cold water for about 30 seconds, then invert the pot onto a serving platter. If the rice crust does not release fully, simply break up the crunchy pieces that stuck to the pot and scatter over top.

*Date molasses is available in Middle Eastern groceries. You can make a quick substitute by placing 1/3 cup minced Medjool dates in a small saucepan with 3 tablespoons water. Bring the mixture to a simmer and mash with a fork so that the dates melt into a paste.

Serving Suggestion: this rice is delectable alongside any saucy dish (I often serve it with Sweet and Sour Fish), but our favorite serving is the following. Mound the rice on a platter, or on individual plates. Take shredded cooked chicken meat (from a roast chicken or poached chicken breasts, whatever you’d like), scatter the chicken meat over the rice. Get some good plain yogurt, add a pinch of salt, and thin it with a bit of water so that the yogurt is thick but pourable. Pour the yogurt all over the chicken to cover. Sprinkle cinnamon over the top. Serve immediately.

Note: In parts of the Gulf this dish is called Muhammara- which just means red. The name muhammara is often used to refer to any reddish colored dish, do not confuse it with the red pepper dip from Syria or the Iraqi dish of rice with tomatoes, both of which bear the same name.

17 February 2008

Taking Stock

The pictures always come first. While the furniture is still askew, the lamps still in their bubble wrap, I pull their frames out and hold them against the walls, trading one for the other until they settle into alignment, as if nodding to each other like neighbors. I hate blank walls; pictures say I live here, they say this is me, this is the photo I took of the Paris eclipse, this is the exhibit I liked enough to buy the poster, this is a place I love. Bang, bang, the nails go into the walls. Welcome home.

After the pictures it's probably the kitchen things, installing hooks for pans, arranging spices on shelves. The essentials in the pantry and refrigerator, though my concept of essential might be slightly different than others. The kitchen is the center of the house and it won't feel like home until it's cooked in. The books in the library might sit in boxes for a while, and goodness knows my clothes could live out of a suitcase for months (don't worry- I have put them away now), but the kitchen has a certain immediacy.


I hope you'll excuse me as I'm still taking stock of all the newness around here. What to cook in a new kitchen is another question, a yeast bread perhaps, or a roast. Something fragrant, something inaugural. And if I'm still taking stock of new things, I'm making stock too, literally as well as figuratively. There are all sorts of types and ways to make stock, but I like to make mine from a leftover roast chicken carcass out of convenience. As with most stocks, the vegetables are quite flexible, but I do insist on adding a few leeks: I read recently that leeks add body to a stock, I don't know if that's true, but I do know that pretty much everything tastes better with leeks, so the same must go for stock. I also like to add a few giblets for richness, most chickens don't come with giblets these days (tragedy!) so I usually ask for them at the butcher's counter when I'm buying the chicken, then set them aside until I'm making the stock. A soup bone, easily attainable and very cheap, is another good alternative.

A good stock is a kitchen back bone, its smell another kind of welcome home, its presence in the freezer a sort of security. So now I've got pictures, and stock, a few new housewares, houseplants and groceries; some good old friends and some new ones, some favorite postcards to stick on the refrigerator and some familiar faces to smile back at me from their frames. If I'm taking stock, that looks like a pretty good place to start.

Chicken Stock
I like to make my stock with a leftover chicken carcass, and I usually scrape up the chicken fat and other yummy bits from the bottom of the roasting pan and add that as well. Play around with whatever vegetables and herbs you have on hand but make sure to include the leeks. Someone gave me a set of mesh reusable tea bags for loose-leaf tea, but I find they make the perfect holders for sachets of spices and herbs. Yields about 4 cups, can easily be doubled.

leftover bones and skin from a large roast chicken
1 set of chicken giblets (can also use neck or a soup bone)
1 onion, coarsely chopped
2 leeks, sliced
2-3 carrots, roughly chopped
a few parsley and thyme stalks, 2 bay leaves, a few peppercorns
1 teaspoon salt

1. Place chicken carcass and giblets in a large pot. Add water to cover by one inch and bring to a boil. Lower the heat to the lowest setting, so the water is quivering but not bubbling (it should be around 180 F is you're really obsessive). Skim the surface and leave to simmer for approximately four hours.
2. In the last hour, add the vegetables, salt, and herbs wrapped in a cheese cloth or mesh bag. When the stock is done, strain it through a cheesecloth or paper-towel lined mesh colander.
3. Return the strained stock to the pot and bring to a boil, let simmer (a little more actively this time), until the the stock is reduced a bit, about half an hour. This step is optional, but I find it produces a richer more flavorful stock. Store stock for up to 4 days in the refrigerator or in the freezer. I like the portion mine into 1 cup ziplock baggies in the freezer for easy access and quick defrosting.

13 February 2008

Seeing Red

red velvet cupcakes
Red Velvet Cupcakes. Wishing you all a Happy Valentine's Day!

10 February 2008

An Apple By Any Other Name

This recipe has been knocking around in my files for about thirty-eight days, waiting for me to tell you about it. It has not been forgotten because it's not delicious (it is) or difficult (it isn't), and it's not that I don't have anything to say about it, I do. Problem is I don't know what to call this recipe. Candied baby apples? Glazed apples? Glaceed apples? None of those quite work. Lady Apples in Syrup, maybe...

Instead, let's talk about these lovely sweets. There is a tradition in the Middle East, and in fact across the Mediterranean, of preserving tiny fruits in syrup. It is quite similar to jam, but the fruits are usually kept whole and cooked in a syrup, in Greece this is called "spoon sweets." Unlike jam, where less-than perfect fruits are cooked down, the tiniest prettiest fruits are chosen for cooking in syrup, thereby preserving their beauty. They are often offered to guests, on a small plate topped with a bit of yogurt or thick cream. Standard are tiny lady apples, little pears no bigger than your thumb, teensy apricots, and figs. Dates, watermelon rinds, nuts and kumquats are other options. I've written before about the beautifully spiraled rolls of Seville orange and grapefruit peels which are cooked in the same process. And most fascinating, this technique isn't just limited to fruits, but used for vegetables too: chunks of pumpkin, tomatoes, and even the elegant baby eggplants are candied in syrup (there's a recipe in Aromas of Aleppo if you're interested).


At fancy sweet shops you might see these preserved whole fruits drained and individually wrapped in plastic, but the more home-style version is to leave the fruits in the syrup and can them or keep them in jars. Here I've used tiny lady apples that are in season now. I read recently that you should peel the apples, something I'd never bothered with before, so I tried peeling half of them, and I can tell you there's barely a difference and it is certainly not worth the effort. It is, however, essential that your core the fruits, or you'll get a mouthful of seeds, a tiny melon baller is the best tool for this.

So there you have it. Now that you know all about these sweets in syrup, you can decide what to call them yourself. I suppose a name isn't that important as long as they're as tasty as these are.


Lady Apples in Syrup
Though you want small apples for these sweets, keep in mind you have to core them, so you don't want teeny-tiny apples or you won't have any flesh left. The apples can be served as dessert on their own and also make great gifts in jars.

2 lbs lady apples
4 cups sugar
4 cups water
2 tablespoons orange blossom water or lemon juice

1. Working from the bottom of the apples, cut a cone out of the bottom, then use a small melon baller to scoop out the seeds from the center. Leave the stem attached on the top.
2. Place sugar, water, and orange blossom water in a wide deep pot. Bring to a boil, stirring so the sugar dissolves. Let boil gently for about five minutes so that the syrup is thick and viscous. Add the apples, stirring to combine. Lower the ehat and let the apples simmer gently in the syrup for 35-45 minutes. The apples should become translucent and soft but should not fall apart. The syrup will reduce somewhat but should not darken in color.
3. Remove apples with a slotted spoon to jars. Pour syrup over top. (If the syrup seems thin, you can continue to boil it until it thickens up a bit, but this shouldn't be necessary). Store in the refrigerator. Serve at room temp, with yogurt or clotted cream.

06 February 2008

Sweet Cream and Pistachio Turnovers

February needs all the help it can get. Really, it’s a pretty dreadful month, when you think about it- the holidays are long gone and a stretch of cold bleak winter sits between you and any whisper of spring breezes. So we stuff February with a bunch of holidays: Groundhog Day, Mardi Gras, Ash Wednesday, Chinese New Year, Valentine’s, President’s Day! Depending on your outlook, some of these holidays are just as bleak as February itself, and few will make it to your list of favorite celebrations.

Which is why February needs a little leg up: a few pancakes on Fat Tuesday, a bite of chocolate on the fourteenth, countless tortilla chips popped into your mouth while watching the Superbowl. I’ve mentioned before that I’m not a huge fan of pancakes, but I do like a little breakfast pastry now and again, a well deserved respite from the usual cycle of cereal and oatmeal and yogurt.


This is a breakfast pastry I came up with for those less adventurous eaters in your life. We all have them- the uncle who’s eaten the same thing for lunch for an entire decade, the friend who doesn’t want any funky sauces or unfamiliar ingredients on his plate. They’ve got other traits that make you love them, but when it comes to feeding them, you better shelve that new recipe for olive jam you want to try. I am however, a strong believer that one’s boundaries can be pushed and prodded a bit. Take a recipe for Middle Eastern sweet cream turnovers (sambousek ‘ashta), and translate it- swap the pastry dough for a buttermilk biscuit dough, instead of Arab-style cream use a bit of cream cheese, add a touch of honey, and make sure to keep the pistachios and rose water for that slightly (but not too!) foreign air.

Before you know it that person who would have run screaming at the word “sambousek” is reaching for another turnover, and chances are you will, too. I know for sure it’s a lot better than a groundhog telling you winter has six more weeks to go. February’s extra long this year, so make yourself a treat and give the month a little help. It really needs it.


Sweet Cream and Pistachio Turnovers
for filling:
4 oz cream cheese
2 tablespoons honey
2 tablespoons orange marmalade
3 tablespoons finely chopped pistachios
1/2 teaspoon cinnamon
several drops rose water
for dough:
2 1/4 cups all-purpose flour, plus more for rolling
pinch salt
2 teaspoons baking powder
1 teaspoon baking soda
1/2 cup vegetable shortening (or half butter half shortening)
1/2 cup buttermilk

1. Preheat oven to 450 F. Line a baking sheet with parchment paper. In a bowl, stir the cream cheese until smooth, add the remaining filling ingredients, but only add one drop of rose water. Stir together until very well combined, set aside.
2. Combine the flour, salt, and leavenings in a bowl. Add the vegetable shortening and rub the mixture into the flour (using your fingers or a pastry cutter) until the mixture resembles coarse crumbs. Stir in the buttermilk until everything is encorporated.
3. Dust a board well with flour. Turn the dough out onto the board and knead the dough gently just for a minute or two. The dough should be firm enough to be rolled out but don’t overwork it, add a touch more flour if necessary. Gently roll or pat te dough out to 1/2” thickness. Cut circles with a biscuit cutter, rerolling scraps only once.
4. Roll each biscuit out slightly so it is an oval, pressing slightly on the edges so that the edges are thinner than the center. Place a dollop of cream cheese filling in the center of each biscuit, then fold over and crimp the edges to seal.
5. Place turnovers on a baking sheet. Bake 14-18 minutes, until golden brown. They may ooze a bit on the edges, that’s ok. When you take them out of the oven, sprinkle a drop or two of rose water over each turnover. Let cool slightly before eating.