30 March 2008

Nine Layer Salmon Bites

Do you ever have those recipes that you just know are going to be perfect and easy and delicious, so you immediately clip them or bookmark them, only to have them sit and linger for months, years even, waiting to live up to their (I know this is sooo delicious) potential? And then, when you finally, finally, get around to making them, you realize they weren't so easy or tasty after all?

This recipe for Seven Layer Salmon Bites was one of those recipes- oh don't get me wrong, it was really delicious, but it was also a little trickier than I had imagined. I've been wanting to make them ever since I saw the gorgeous photo in Gourmet a couple years ago, they just looked so festive and pretty with their spunky salmon roe topping, I could already picture them at my next dinner party. Apparently, it took me two years to come up with an occasion to make them. And even then I couldn't get any decent salmon roe, after trying numerous groceries including Eastern Market, Black Salt, and there was no way I was braving traffic to get to Dean and Deluca (damn you D.C., sometimes you are so inaccessible!!) but I think it was just as good without.

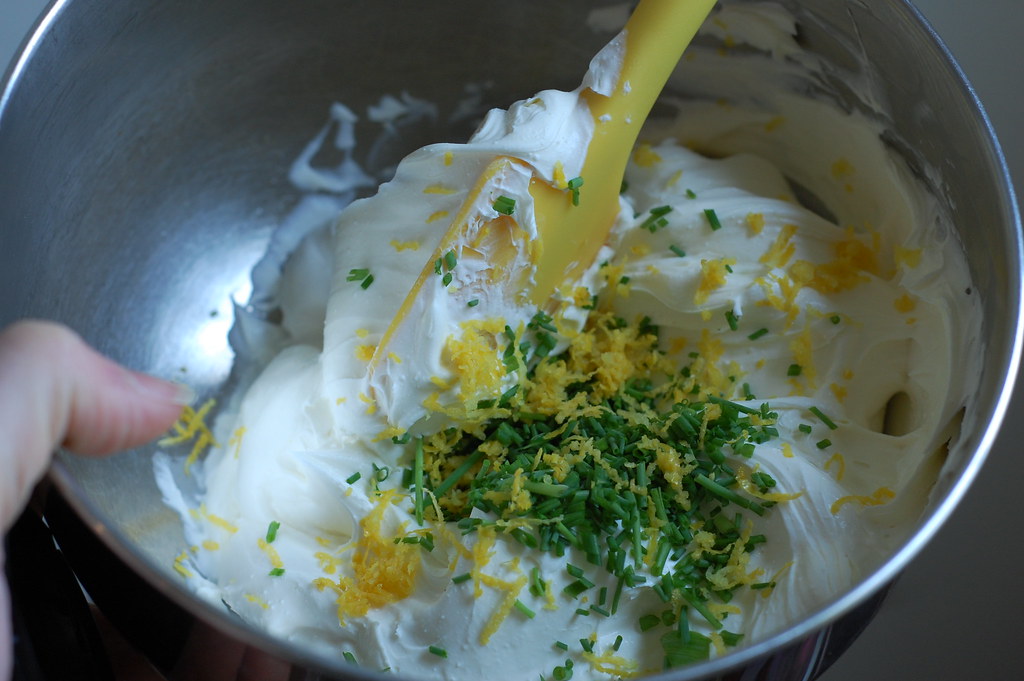
But I had the salmon and the pumpernickel and I stirred up the cream cheese mixture, which flecked with chives and lemon zest and pepper was positively finger-licking good. Then all I had to do was layer it up, chill, and slice. Except (except!) have you ever tried to spread a very sticky cream cheese mixture over a matrix of bread slices? Or over slippery salmon? Yeah, let me just say not the easiest thing I ever did. The cream cheese kept sticking to and dislodging the bread, the salmon was sliding around, and I of course, was cursing like a sailor. In the recipe's defense, it calls for whipped cream cheese and I had used regular, but in my defense the quantities in the recipe were rather off, and I finally solved the cream cheese problem by thinning the mixture with some heavy cream.

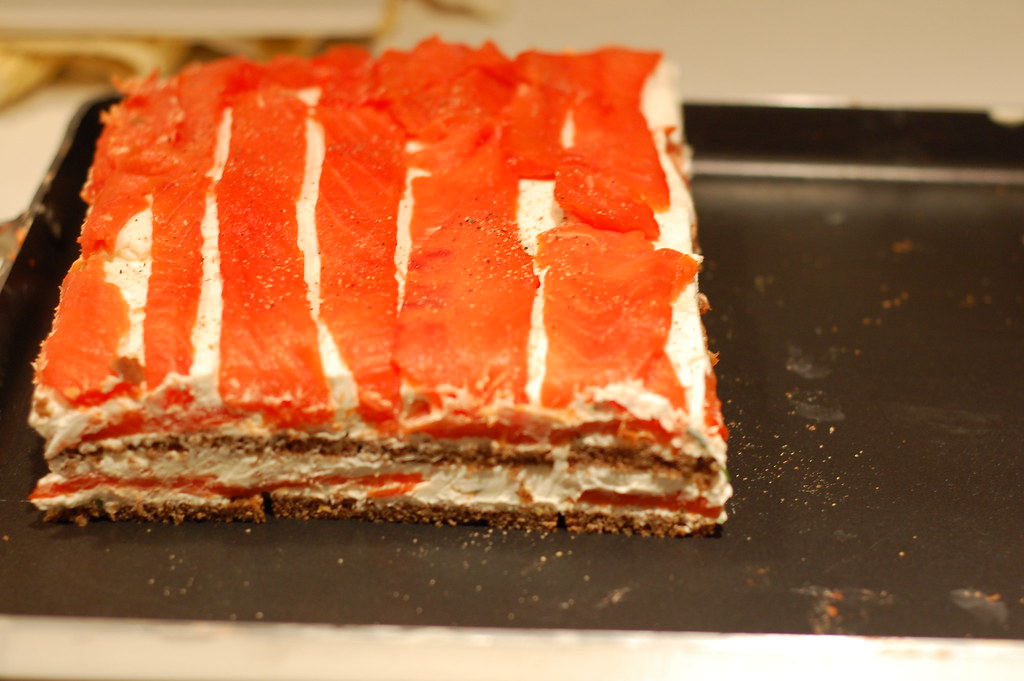
I realize these are small quibbles, but the difference between an easily assembled dish and a frustrating one is often the difference between whether something is adopted with regularity into one's kitchen. And with a few small tweaks, this is a dish that should be adopted into your kitchen. I know salmon-cream cheese canapes are nothing new, but the extra layering effect makes them a bit more special. They disappeared so fast at the party I made a few more later in the week just for myself. So go ahead, bookmark the recipe, I promise this version really is easy and delicious. And please don't wait two years to make it.

Nine Layer Salmon Bites

16 oz cream cheese, preferably whipped type, at room temperature
4 tablespoons heavy cream
1/4 cup chopped chives, plus more for garnish
zest of 1 lemon
several good crackings of black pepper
9 oz thinly sliced smoked salmon
6-8 slices thinly sliced pumpernickel bread

1. Cream together the cream cheese, heavy cream, chives, lemon zest, salt and pepper until smooth and spreadable.
2. Trim the bread slices to squares or rectangles and lay them in a jelly roll pan to form approximately a 16 by 9 inch rectangle, or about 2/3 of the jelly roll pan. Spread 1/2 of the cream cheese mixture over the bread slices. Layer half of the salmon slices on top. Repeat making another layer of cream cheese than another layer of salmon.
3. Slice the entire rectangle in half width-wise to form two squares. Use two large spatulas to transfer one square on top of the other (so it is now double-height). Press down gently then refrigerate the stack for at least half an hour in order for it meld together.
4. Remove from the fridge and using a sharp knife cut into small bites, wiping the knife after each cut. Garnish with chopped chives. Chill until ready to serve.

28 March 2008

Postcard: Spring Preview

Strawberry and White Asparagus Salad
Though I suspect the berries and asparagus I got from my local market were hothouse grown, they were a hopeful reflection of all the tulips and daffodils popping up around town, signs that spring really is here. Make sure to peel the bottom half of white asparagus otherwise the stems will be tough. Combine with mixed greens, berries, a simple dressing and a good cracking of black pepper. A sprinkling of goat cheese is nice if you like.

22 March 2008

Baklava the Eas(ier) Way

Who doesn’t love baklava? If you’ve had real good baklava, not the overly-syruppy goopy stuff, not the piled-too-high nonsense, but proper baklava, then you know the addictive properties of which I speak. I lived in the Middle East long enough to overdose on the good stuff more than once, and I also know better than to chime in on which city or region has the best baklava (or baklawa in Arabic). The people in Beirut’s Taj al-Malouk would probably still recognize my face, I went there so often when studying there, and I can also tip my hat to Tripoli’s Rafaat Hallab, and Damascus’ Merjeh district, and many others in Aleppo, Gaizantep, Amman, and other cities and countries to numerous to mention.


Unfortunately, America is a baklava-bereft land, deprived of the sweet-sticky glories that are good baklava with the exception of only a handful of good bakeries. So for years, I’ve made my own baklava. It is, I’ll admit, a nerve-wracking process, you have all those sheets of phyllo, which must be individually brushed with butter, but you must keep the phyllo covered and work quickly or it will dry out, deftly trying to brush and stack them with expediancy. The baklava was always amazing, but also exhausting, until I learned there was an easier way...

In my favorite baklava shop in Damascus, a tiny place tucked in near the old train station, I peppered the vendor with questions and to my great surprise and delight, he invited me to the kitchen to see how their baklawa was made. The true generosity of Syrians never ceases to amaze me. There in the kicthen I watched as fresh phyllo dough was rolled out in fast deft strokes and layered in large round trays with the nut mixture, then the pans were (smack!) droppped on the ground where someone poured a whole boatload of clarified butter over the whole thing. Be still my arteries. The trays were baked, and then cool syrup was poured over them with a great sizzle as soon as they came out of the oven.


I learned a lot about baklava making that day, but I didn’t realize it could be applicable to my own kitchen. I continued my laborious brush-and-layer routine until I found a tip online that the faster layer-and-pour method could be used just as successfully at home. I’ll admit I was skeptical (after all, fresh phyllo is more absorbant than frozen), but I gave it a try. And you know what, my baklava before was pretty darn good, but this baklava? This baklava was swoon-worthy, I’ll fight you for the last piece good.

I say baklava the easier way because making baklava will never be easy. You have to use clarified butter or ghee, only butter in which the milk solids have been removed will give it that perfect crisp yet melting texture. For the syrup, I find honey much too cloying, but if you do want a touch of honey flavor, I suggest swapping it out for no more than 1/4 of the sugar syrup. All this makes baklava a multi-step process, but not a difficult or complicated one. And finally, don’t be afraid to play around with different nuts and different flavors for the syrup, while it’s not traditional I’ve made many of the versions listed below (most recently the pecan-bourbon baklava), and the effects are really very subtle twists that hug closely to the baklava oeuvre.

I should add one final caveat that the pouring method didn't work quite as well when I tried it on the rolled (cigar or finger shape) baklava, but I found that as long as I gave about every third or fourth layer a good brushing, then poured butter over top, it worked well. Still easier than before! The richness of baklava means it's a perfect special occaision food, whether Christmas, Easter, Eid, or whatever holiday or event you celebrate!

Baklava
My game plan is usually to make the clarified butter and syrup one day, bake the baklava the follwing day, then let it rest overnight. Check out some ideas for unusual variations listed below. Makes a 9x13 inch pan, easily doubled.

1 lb package phyllo dough, defrosted
3 sticks (12 oz) butter or 1 1/4 cups ghee
2 1/2 cups nuts (walnuts, pine nuts, pistachios, cashews)
3 tablespoons sugar
1 teaspoon cinnamon
1 3/4 cups sugar
1 cup water
1 tablespoon lemon juice
1 tablespoon each rose and orange blossom water

1. Clarify the butter: melt the butter in a small saucepan over medium heat. Let it boil gently without stirring just until a layer of foam has risen to the surface and the white solids have sunk to the bottom (do not let the solids brown). Remove from the heat and skim off the foam as best you can. Then carefully pour the golden liquid into another container, leaving the solids behind (I normally strain it through a cheesecloth while doing this). Discard the solids. Skip this step if using ghee.
2. Make the syrup: Place the sugar, water, lemon, and blossom water in a pan and bring to a boil so that the sugar dissolves. Let boil 5-10 minutes until syruppy. Set aside to cool.
3. Preheat the oven to 350F. Place the nuts, sugar, and cinnamon in a food processor and grind until they form a coarse meal.
4. Pour 1/4 cup of the clarified butter in the bottom of your pan. Unroll the phyllo and place half of it in the bottom of the pan, trimming the edges to fit. Drizzle 1/2 cup of butter over the phyllo. Spread the nut mixture over top. Lay the remaining phyllo over the nuts (personally, I don’t like my top layer to be quite so thick so I use only about 2/3 of the remaining phyllo). Slowly drizzle the remaining butter over the pan so that phyllo appears evenly moistened. Using a very sharp knife or a razor-blade, score the top of the phyllo in a square or diamond pattern, then use a knife to cut all the way through the score marks to the bottom of the pan.
5. Place in the oven and bake for 50 minutes to 1 hour, until deeply golden and crisp but not overly browned. Remove from the oven and immediately pour the cool syrup over the hot baklava. Set aside to cool and absorb completely. It is really best if you let it sit overnight, covered with foil, before serving.

Coffee-Hazelnut Baklava- use coffee in place of water in the syrup, use hazelnuts plus 2 tablespoons chocolate-coated espresso beans.
Pecan-Bourbon Baklava- use pecans, substitute 1/4 cup bourbon for water in the syrup.
Champagne-Rose Baklava- replace the water in the syrup with Champagne.
Macadamia-Lime Baklava- macadamia nuts, use the juice and zest of 1 lime and 1 tablespoon rum in the syrup.
Pear-Vanilla-Walnut Baklava- use pear nectar and a vanilla bean to make the syrup.

16 March 2008

Ask and Ye Shall Receive

My dear readers, you've been so wonderfully patient with me. Over the past months you've listened to me prattle on about turnips and varieties of rice and tell exceedingly long tales about the joy of kabobs, offering your comments and suggestions. There's been barely a peep of complaint about the conspicuous lack of sweetness floating around these pages, in fact, my last offering was simply a repeat of our favorite red velvet cake. My goodness, I even wrote about making stock, certainly useful but a pretty lame excuse for a post. I do hope you're not going through sucrose withdrawal.

Well, ask and ye shall receive, because we're about to make up for any possible lost time in the sugar and cream arena today. Ask is what my friend Genie did, when she got the idea to have a birthday celebration featuring a menu of four fancy desserts and plenty of wine to go alongside. We plotted and planned, traded recipes over email, debated chocolate mousses and cakes, shopped and baked. The Monday before Saturday's party I started with the ice cream custard, spacing the baking and churning and simmering over the whole week (making ice cream for forty with one tiny machine is rather time-consuming). Melissa made an absolutely ingenious play on "chocolate sushi," and I fielded last minute questions from Genie about curdled custard for creme brulee (emergency solution- put it in a blender).

I was so busy running around that I barely had time to snap a decent photo, but the complete lack of leftovers (aside from a slice or two of cake) and the amount of empty wine bottles sitting on the curb for recycling day are a good indication of the party's success. Add a blowtorch and a few wigs to the mix and you've got yourself one hell of a good time. Which is why I'm sure you won't mind if I go take a nap now.

"Chocolate Sushi"
Mango and strawberry center wrapped in creamy white chocolate rice, garnished with mint leaves and drizzled with dark chocolate.

Guinness Cake and Cream
Guinness Gingerbread Cake with Guinness Ice Cream garnished with candied pecans.

Rhubarb and Rose Creme Brulee
Rich rose-scented custard with a layer of rhubarb on the bottom and crackly sugar crust. (adapted from here, full recipe listed below)

Chocolate Cakes with Tangerine-Mascarpone Cream, Kumquat Flowers and Orange Syrup
1 recipe chocolate cake
double recipe kumquat flowers (24 kumquats), reserving syrup separately
for tangerine cream frosting
4 tablespoons butter, softened
12 oz mascarpone (Italian cream cheese)
1 tangerine, zest and 1 squeeze of juice
1 lb powdered sugar

1. Prepare chocolate cake and bake in cupcake pans or mini-cake pans for 20 minutes at 350 F. Set aside to cool.
2. Prepare kumquat flowers. Spread the flowers on a sheet of wax or parchment paper to dry and reserve syrup.
3. Prepare frosting: Cream together butter and mascarpone until smooth. Add the tangerine zest and juice. Slowly sift in powdered sugar until the frosting reaches desired consistency. Store in the refrigerator.
4. Assemble: Top chocolate cakes with the tangerine cream. Arrange kumquat flowers on top of cakes. Drizzle syrup decoratively around plates. Serve.

Rhubarb and Rose Creme Brulee
We were a bit short on rhubarb, you may want to double the amount called for. Makes 12.

1 lb rhubarb, trimmed and cut into 1 inch pieces
1/2 cup (3 oz) caster sugar

8 egg yolks
2/3 cup (5 oz) sugar
finely grated zest of 1/2 a lemon
1 vanilla bean
1 tablespoon rose water
2 cups heavy cream
1 cup whole milk
granulated sugar

Preheat the oven to 400ºF. Place the rhubarb in a roasting tray (single layer) and toss well in the sugar. Roast for 15-20 minutes (until the fruit is soft). Cool and divide into ramekins.

Place the egg yolks and sugar in a bowl, whisk until pale and thickened and add the lemon zest. Place the cream and milk in a pan, split the vanilla bean and scrape the seeds into the pan and add the pod. Bring to the boil. Remove from the heat and leave for about 10 minutes to infuse the flavour. Heat the cream again, take the pod out then slowly pour into the egg mixture, stirring all the time. Place the custard into the pan, set over a low heat and cook until the custard coats the back of a spoon, keep stirring! (it takes about 15-20 minutes). Add the rose water. Cool the custard and sieve into a clean bowl. When the custard is cool, pour over the ramekins (with the fruit). Refrigerate for at least 8 hours, preferably overnight.

To serve, sieve the sugar thinly over the custard. Brown the sugar with a blowtorch (you can place under a hot grill if you don’t have one). Repeat this process 2-3 times to make the perfect crunch. The custard will be softer than ‘cooked’ creme brulee, so you need to work fast while you’re browning the sugar.

10 March 2008

Molasses Braised Turnips with Pepper


When I was staying with my mom just before moving to D.C. I warned her: I'm in a phase where I'm cooking primarily Iraqi food now. My mother raised the expected skeptical eyebrow. "But don't worry mom," I said, "Iraqis love turnips." You see, my mother loves turnips, she likes to say she lost fifty pounds eating turnips, which she buys from a quirky bearded farmer at the market each week. They're a rather overlooked vegetable, a healthy alternative to potatoes with a slightly bitter edge. And funnily enough, Iraqis, whose cuisine tends to be meat and rice heavy, also love turnips.


In Iraq, turnips are cooked whole in a sticky molasses mixture and served as a popular street food. When I first heard about this in Nawal Nasrallah's Delights from the Garden of Eden (the go-to reference for anyone interested in Iraqi cuisine) I'll admit I was skeptical: both turnips and molasses can have a bitter edge, and I wasn't sure they could balance each other. But having made this dish three times now, I can tell you they sure do! I like to thickly slice the turnips and slow cook them in a molasses and lemon mixture until they turn translucent and almost caramelized. In Iraq, this would be made with date molasses, but good old plain molasses works perfectly, and my aunt gave me some sorghum molasses recently that I've also used with great results. We top the turnips with a sprinkling of black pepper for spice, or perhaps a few grains of paradise (a neat alternative to pepper). Since I recieved both the cookbook, sorghum molasses, and grains of paradise as Christmas gifts, think of this as a virtual thank you note. Yes mom, I know it's only three months too late.


Molasses Braised Turnips with Black Pepper
At the edge of spring, when I'm still reaching in the root vegetable bin, this is the recipe I reach for. The name in Arabic (maye' al-shalgham) means melting, a fitting name for this slighly sweet side dish.

2 lbs turnips
1/3 cup mild molasses
3 tablespoons lemon juice
1/4 teaspoon salt
fresh black pepper or grains of paradise, for serving

1. Peel the turnips and slice thickly (about 1/2 and inch thick).
2. Place turnips in a wide pot with the molassses, lemon, and salt. Add enough water so that the turnips are covered by 1 inch. Bring the mixture to a boil, then turn the heat very low and simmer for 30-35 minutes, stirring fairly frequently so that the turnips cook evenly. The turnips should be meltingly tender and the liquid should be reduced to a glaze. Serve immediately with fresh cracked pepper.

05 March 2008

The Power of Kebab


Never underestimate the power of a good kebab. Regular readers here may have noticed I don’t eat a lot of meat, I’m not a vegetarian and I eat plenty of seafood, but meat just isn’t to my taste. I’d probably forget about it completely if it weren’t for other people reminding me and a once-a-year hankering for a BLT. But while living in Damascus, there was one meat dish I could always be counted on partaking in, one carnivorous dish I truly loved. Kebab halabi, or Aleppo-style kebabs.

Before we talk about those kebabs, however, it’s important to backtrack and talk about kebabs in general. How unfortunate is it that outside the Middle East people think of kebabs as chunks of things stuck on skewers, how drab, how boring, how limited. No, no, no, I always want to say, you are missing out on the best kebabs! You see, most often the favored kebabs are those made with ground meat. Both kinds of kebabs are available, the kind made with chunks of skewered meat are known as shish kebabs (from the Turkish sis) and the kind made with ground meat are called kefta or kofte kebabs. It is no wonder that kefta kebabs are the favorite kebabs because when you think about it they are really just like hamburgers only made into a different shape. The meat for these kebabs is most likely lean ground beef or lamb, and occasionally camel.

The second key element of eating kebabs is presentation. You do not simply plop the kebab down on a plate all naked and alone. No! Kebabs are always placed over pita breads, which have often been rubbed with a little tomato paste, and then they are usually covered with more bread over top. Just like when you order a hamburger you expect a bun and some ketchup, when you order kebabs you expect it to be sandwiched with those tomato-rubbed flatbreads. And those breads which have absorbed the kebab juices, they’re my favorite part.

At a kebab house, you’ll be presented with a variety of choices of kefta kebab. Most of the choices are named after geographical locations and refer to how the kebab will be seasoned, kebab Istambouli includes pine nuts in the meat mixture, while Izmirli includes cubes of cheese interspersed between the meat. I’ve always been rather fascinated by this, who, for example, decided that Anataklia was synonymous with eggplant or Anatbli with mushrooms?

So what’s so special about those kebab halabi, the Aleppo-style ones? Well, the kebabs themselves have chopped parsley in them, but the best part is the spicy thick tomato sauce they come bathed in. Tongue-tinglingly spiced with the famous Aleppo pepper, that chunky tomato sauce transforms the kebabs into one of my favorite meals.

All the time I’ve lived, worked, and studied in the Middle East, my mom has never come to visit me. She’s practically refused to travel to the region, preferring to send my uncle as an envoy. She’s heard a million stories, seen a plethora of my pictures, and knows more about daily life there more than most Americans, but traveling was never on her agenda. I made Aleppo-style kebabs for dinner together one night, and as we sat and I explained about all the kinds of kebabs, she said “you know, I think I might like to visit there one day.” Just as I said, never underestimate the power of a good kebab.


Aleppo-Style Kebab
While traditionally made with lean meat, I think it’s fine to make these kebabs with a fattier meat, like a shoulder cut of lamb, just make sure to keep an eye on the grill as any dripping fat can cause flare-ups. We make these all the time in the winter using the broiler as well.

2 lbs ground lamb or beef, preferably very lean
2 medium-sized onions, grated or pulsed in a food processor
1/2 cup chopped flat-leaf parsley
1 teaspoon each cinnamon, allspice
salt and pepper to taste
for the tomato sauce:
1/4 cup olive oil
6 garlic cloves, sliced
1/4 cup tomato paste
1 28-ounce can diced tomatoes
1 to 2 teaspoons Aleppo pepper, or substitute a mixture or red pepper and paprika
1/2 teaspoon sumac or lemon zest
to serve:
pita bread (the very thin kind)
lots of chopped parsley

1. Place all the kebob ingredients in a large bowl. Knead the mixture with your hands for 5-10 minutes. The mixture will change consistency and become quite sticky (the nature of the proteins in the meat have changed, which is what you want). Cover the mixture and refrigerate for at least half an hour.
2. Make tomato sauce: Heat the olive oil in a large pan. Add the sliced garlic and cook over low heat so that the garlic softens but does not brown. Add the tomato paste, stirring so that it lightly toasts, then add the chopped tomatoes. Season with salt, pepper, and sumac. Simmer the mixture for about 20 minutes until it forms a nice chunky-thick sauce. Taste for seasoning (it should be pleasantly spicy) then set aside.
3. Preheat a grill or broiler. Have the tomato sauce warm, but not piping hot. Using damp hands, form the kebabs around metal skewers (they may want to fall off at first, just work the meat mixture around the skewer with your hands until it is cohesive). Grill or broil the kebobs for 8-10 minutes, turning once.
4. Open up half the pita breads. Use the breads open-side up to line your serving platter. Slide the kebobs off their skewers onto the bread (if you used a broiler and there are some meat juices on the pan, pour them over the bread as well). Spread the tomato sauce over the kebabs. Sprinkle chopped parsley over the platter. Serve, making sure everyone gets some of the bread, kebab, and sauce, with extra pita bread alongside.