16 May 2007

56 Blues


Blue Velvet Cake with Blue Suede Shoes

Like all good ideas, it emerged out of nowhere. Every year, my uncle has a big blow-out birthday celebration with a theme: the kind of party with specially crafted invitations and funky decorations and re-landscaping part of your lawn. No one remembers how they decided that this year's theme would be blue, but there it was. Last time, we talked about the reason for this annual celebration, now let’s get to the party. I promised blue, and boy, are you all going to get it.


Making blue suede shoes out of marzipan, blue margarita, blue jeans.

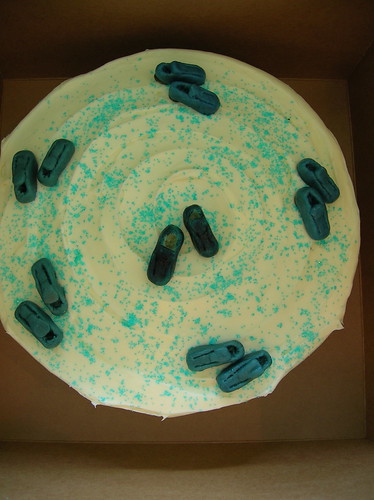
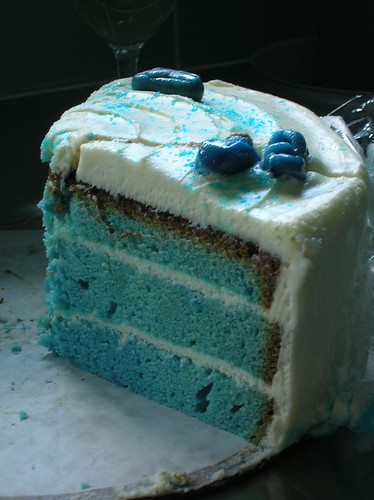
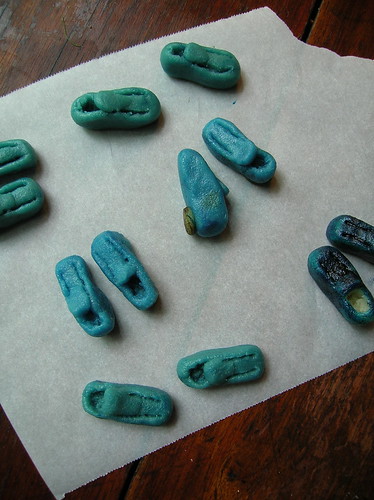
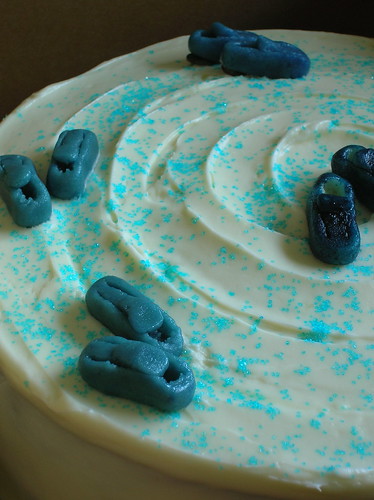
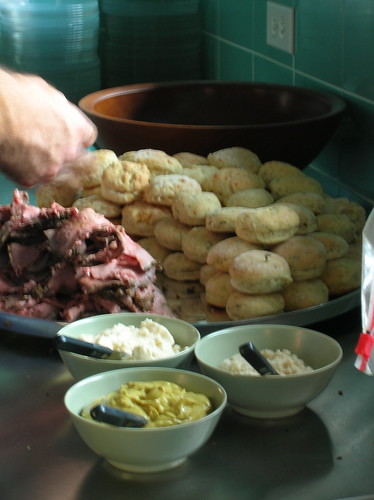
First came a little blue booklet in the mail, inviting us to celebrate, “because he’s been blue before.” A cake was planned, inspired by the classic red velvet, only in blue (fyi- omit the cocoa in the red velvet cake recipe, or you’ll have a black cake, as we learned in a test run). A tent was erected, and because things aren’t done the easy way around here, that involved removing part of the fence and digging up part of the garden. I sculpted tiny blue suede shoes out of marzipan to decorate the cake, managing to dye my hands, fingernails, and mouth blue in the process. I made them ahead of time and carted them oh-so-carefully on the airplane (hello airport security), and after all that, my uncle peered into their box, and asked, are they electrical outlets? Ok, they’re a little funny looking, but outlets, I even put heels on the buggers!

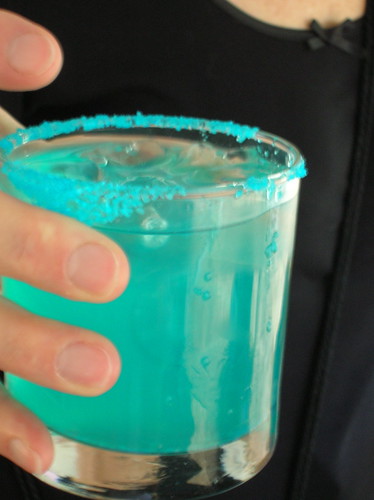
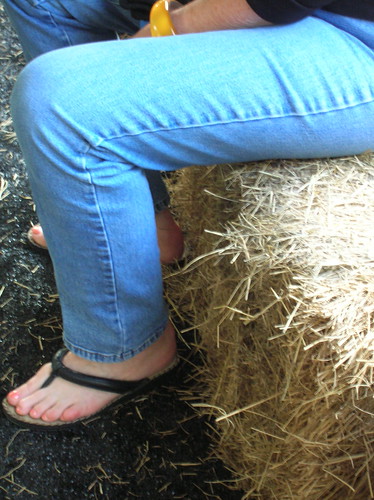
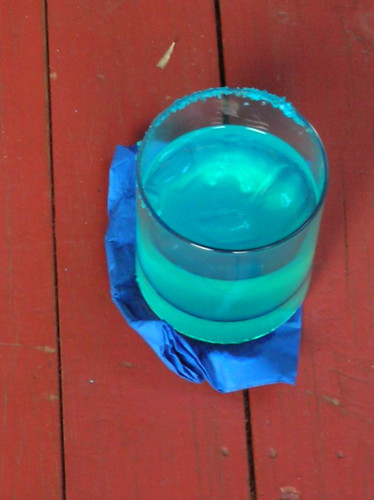
A cd of ‘blue’ songs was made, blue light bulbs, blue cheese, and blue-corn chips were procured. A bluegrass band was hired, and to our delight, they turned out to be fantastic. The weather was perfect, and many guests arrived in blue jeans and blue shirts, and it being Texas, there was a presence of cowboy boots. Bartenders served up blue margaritas lipped in blue salt, which towards the end of the evening my uncle declared, “these aren’t bad, but they’re sort of nasty, I”ve had about five.”


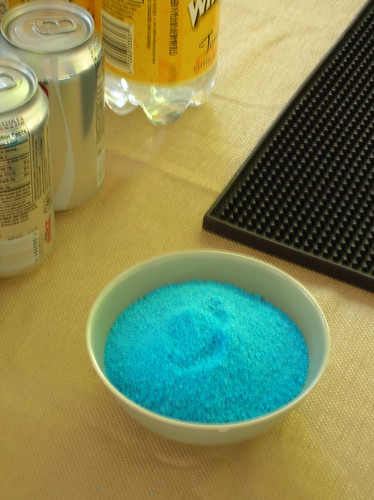
I could say that the key to a successful party is planning, and hiring someone to manage the details, and spending hours making sure the wicks on the oil lamps are just right and blistering your hands in the process. Or maybe it’s those delicious crawfish tamales in banana leaves, or the ones wrapped in cornhusks with spinach and goat cheese filling. But really, a good party is all about having a great balance of friends, and the success of this one is a testament to the hosts who gather such an intelligent, creative, and diverse group of people around them. Because he’s not blue anymore, and that’s worth celebrating.

No recipe today, though you can check out the original red velvet cake recipe. And if you're in the mood for blue food, I highly recommend this Blueberry Blue Cheese Salad, I've made it many times using fresh blueberries in the vinagrette.

__

15 May 2007

A Taste of Yellow

By all logic, I should be asleep by now. It’s past 1 a.m. and I’ve just got in from a long flight and while I should have collapsed into bed, here I am, typing. Typing about yellow food (could it be this desert-candy thing is taking over my life?). You see, there’s an event going around in support of the Livestrong Foundation, whose signature color is yellow (remember all those bracelets?) to benefit the fight against cancer. Livestrong Day is Wednesday May 16th, and I’ll be damned if I don’t get this post up in time.

I’ve just returned from my uncle’s annual birthday bash, and if you remember the last time I went to Texas, you’ll know we had a blast. We were never big on birthdays in my family, a card and cake would suffice, so why exactly am I hauling myself halfway across the country for a party? Well, a few years ago, my uncle was suddenly diagnosed with a dangerous brain tumor. In one week, everything changed. There were doctors and procedures, days spent sleeping the waiting room of the ICU, a 6 hour surgery, and months of radiation. But then, my uncle recovered. We like to say he’s not just the same as he was before, he’s better. He runs everyday, has a fulfilling career, plays with the dogs, and has taken to powder-coating vintage chairs.

And every year we celebrate his birthday in a big way. This year the party’s theme was blue, and you’ll be hearing a lot more about that soon, but right now we’re still on yellow, ok ? (I hope you’re not as color-cross-eyed, tongue-tied as I am) Yellow is Lance Armstrong’s color, and since he’s also a Texan and my uncle and I saw him finish the Tour in Paris one summer, this is tying in rather nicely. Yellow is also the color of this saffron cod chowder. Now, I don’t really like chowders, all too often they’re heavy with cream or awful tinned milk and never seem to have enough seafood in them. This one, however, is completely different. It has a base thickened by potatoes, accented with a touch of cream, and flavored with saffron. Best of all, it has whole chunks of cod fillet and lots of flavor from the clam juice.

I wish I had a better photo for you all, but, people I am tired. But it’s a good tired, the kind where you fall right into a nice deep sleep. You all go off and check out the Livestrong Foundation, make some chowder, celebrate a birthday in a big way. I’ll see you in the morning.

Saffron Cod Chowder
Adapted from Bon Appetit. Serves 4-6.

2 thick-cut slices bacon, cut into 2-inch pieces
1 1/2 cups chopped leeks (white and pale green parts only; about 2 leeks)
16 ounces bottled clam juice
1 pound fingerling or baby Dutch yellow potatoes, diced
1 cup water
1 teaspoon chopped fresh thyme
1/2 teaspoon crumbled saffron threads
1/2 cup cream or milk
1 1/2 lb of cod fillets

- Cook bacon in heavy large pot over medium heat until crisp. Use a slotted spoon to transfer to paper towels to drain. Add leeks to same pot. Cook until leeks are very tender, stirring frequently, about 5 minutes. Add clam juice, potatoes, 1/2 cup water, thyme, and saffron. Bring to boil; reduce heat to medium and cover. Simmer until potatoes are just tender, stirring occasionally, about 7 minutes. Stir in cream. Season chowder to taste with salt and pepper. Use an immersion blender to puree the chowder until thick but still has some chunks in it. Stir in the bacon.
- Sprinkle cod with salt and pepper; place atop chowder. Cover and cook until cod is opaque in center, about 10 minutes. Use a spoon to break the cod fillets into large chunks. Ladle into bowls and serve.

12 May 2007

Mom's Best

choc chip cookies 2
Every woman has an intimate relationship with the cooking of their mother. Perhaps she stands at the chopping block cutting tomatoes just like her mother taught her when she still had to pull up a stool to reach the countertop. Or she puzzles over a family recipe scribbled by butter-stained fingers on a wrinkled index card, trying to remember how mom did this all those years when she should have been paying closer attention. If her mother was a bad cook, then the perfect roast chicken is a rebuttal, because cooking for others is a primary act of nourishment, and thereby motherhood. No matter what, a woman standing fussing over a boiling pot is also, in a way, having a conversation with their mother.

My mother is a very good cook in her own right, my go-to source for chicken-pot-pie, a Sunday roast, or anything involving yeast. Over the years, my cooking interests have grown and expanded beyond my mother’s, and I long-ago took over being the primary chef when we’re together. I’ve added za’atar and soba noodles to our family repertoire, I recently christened my mother’s spiffy new grill which had been sitting unused for over a year on her back deck (“what do you mean you don’t know how to use it!”). So, sometimes I forget that my mother has a wealth of culinary knowledge that far exceeds my own, after all, much of cooking is about experience, and she certainly has some years on me there. I’m often surprised when she’ll say, “oh yes, I made that once,” in reference to items like bagels, yogurt, complex Indian curries or French stews. And though she doesn’t cook much anymore (she claims she’s waiting for retirement), she’s still a wonderful resource.

Naturally, I’ve inherited some of mom’s recipes, her seafood crepes that are worth the days of preparation, a rich moussaka. But one of the standouts are her chocolate chip cookies, which is exactly where a good cookie recipe should come from. My mom’s recipe (originally titled ‘Not Mrs. Tollhouse’ cookies) makes the best chocolate chip cookies, they’ve swayed many a cookie connoisseur. There are a few keys here: ground oats add some texture to the dough, grated chocolate adds extra chocolateyness, and brown sugar brings a deeper flavor.

At the beginning of all this, I said a woman cooking is like having a conversation with her mother. I don’t know if that’s really true, most of the time, I’m just looking to see if the onions have caramelized yet or if the water’s boiling. But if I were to subject myself to my own analysis, my cooking, my search for quality ingredients, my worry over the roast turkey, is in tribute to the nourishment of my mother’s own kitchen, an appreciation of her unflagging encouragement. Simply put, I am saying thank you.


Mom’s Chocolate Chip Cookies
This is my quintessential chocolate chip cookie. The ground oats are key to the taste and texture of them- oats behave differently than flours, so the cookies have just the right chew. We like them small in size and always without nuts, but you can make them larger if you like.

1 stick butter
1/2 cup sugar
1/2 cup brown sugar
1 egg
1/2 tsp vanilla extract
1 cup flour
1 1/4 cups oats, blended to a powder
1/2 tsp baking powder
1/2 tsp baking soda
1/4 tsp salt
6 oz chocolate chips
2 oz milk chocolate, grated
optional: 1/2 cup chopped walnuts or pecans

1. Preheat the oven to 375 F.
2. Blend the oats to a powder in a food processor or blender. Combine the oat-flour with the regular flour, baking soda, baking powder, and salt in a bowl, set aside.
3. Cream the butter with the sugars until light and fluffy. Beat in the egg and the vanilla. Stir in the dry ingredients until just combined. Fold in the chocolates and nuts, if desired.
4. Place golf ball sized cookies two inches apart on a greased or lined baking sheet. Bake the cookies 6-10 minutes, until just golden.
________________________

09 May 2007

The Benefits of Shelling

My grandmother was not the cuddly type. I was born late in my mother’s life and by the time I arrived my grandmother had given up all hope of any more grandchildren and given away all the baby things. Unlike my friend’s grandparents, my grandmother was a generation older, she did not have cute nicknames like “gamma” or “mee-maw,” she wore hats and gloves not tennis skirts, she did not take us kids to the water-park. Not that Grandmother (as her full appellation was always used), loved me any less, but her affections came mainly in the form of exquisite handmade dresses and little knit sweaters. Most of my childhood was outfitted exclusively in her creations, I owned nary a store-bought item of clothing in favor of her beautifully smocked pinafores, which is probably the reason I don’t much like wearing pants to this day.

I was fairly intimidated by the matriarch of our family, a feeling apparently shared by many adults. There was the time she (quite an expert on plants) marched out of the landscaping committee, saying she didn’t care if they “planted the place in tall corn.” Or the disparaging quotation that landed on the front page of USA Today.

Late in my grandmother’s life, weakened by lymphoma, she resided in an armchair in the sunroom, the television turned to the “Today” show and little caged canaries nearby. I was about eight, my mother had gone off somewhere, and Grandmother sent me into the backyard where she still kept a little vegetable plot behind her stone house. As I gathered pea pods from under the shady leaves, Grandmother yelled directions at me, forcing me to trot back and forth between the garden and the back door every few minutes to hear her more clearly. “Don’t pick those, they’re not ready yet,” and “how are the carrots doing?” Lord knows, I had no clue what a carrot plant looked like, but I did manage to gather a big bowl of satisfactory peas. We sat amid the haze of her Kool’s menthol cigarettes and shelled what seemed like thousands of peas. She told me about how once, when she was in the hospital for a minor procedure, she asked my grandfather to bring her a big bag of peas to shell. To the shock of the nurses, she sat propped up in the recovery room, shelling away. Considering I can barely picture my grandmother without a knitting needle or crochet hook in hand, this made perfect sense.

Spring peas, particularly English peas, are in season for about 2 days each year, and have a shelf life of about .3 seconds. However, there isn’t a spring that goes by that I don’t think of Grandmother’s peas, she died not long afterwards, and that is one of the strongest memories I have of her. Plus, fresh-shelled peas have a taste unlike any other, and this year they went into a delicious little pea and radish salad. The sweet peas, sharp radishes, and creamy feta were made for each other. The surprise was the sprouts, my store didn’t have pea sprouts, so I grudgingly grabbed some brocco-flower sprouts. I’d given up on sprouts long ago, as they are often bitter, go rancid quickly, and bring to mind all sorts of terrible attempts at “health food.” However, paired with a lightly sweet dressing, these were delicious, call me converted. This salad was good enough to grace my lunch box about everyday for the past week, and since I’m not superhuman, I’m pleased to report it’s very good made with frozen peas. Just don’t tell Grandmother.


Shortly after posting, I received this email from a relative: "I do remember one year when Mother was not at home and asked me to pick the peas. It was late in the summer, I think, and I was hot and tired of bending over. Sooo, I just pulled the plants up and picked the peas off of them. . . and that was the end of the peas for that year, anyway!"

Pea, Radish, and Feta Salad

2 tablespoons fresh lemon juice
2 teaspoons honey
3 tablespoons extra-virgin olive oil
3 tablespoons chopped fresh dill
4 cups fresh-shelled English peas or 1 pound frozen peas
1 bunch radishes, trimmed, halved, thinly sliced
1 cup crumbled feta cheese (about 4 ounces)
3 cups fresh pea tendrils, pea sprouts, or other sprouts (optional)

1. In the bottom of your serving bowl, whisk together the lemon, honey, oil, and dill. Add the sprouts, if using, and toss to coat.
2. Cook the peas in a pot of boiling salted water, about 5 minutes for fresh, slightly less for frozen. Drain the peas and rinse under cold water to cool.
3. Add the peas to the bowl with the radishes and feta cheese. Season with salt and pepper. Toss everything together. Serve.

*Pea sprouts are available at natural foods stores and Asian markets.
__

06 May 2007

Rhubarb-Cornmeal Tart

rhubarb tart 1
The great thing about the proliferation of food websites and blogs is the ease of sharing ideas and recipes, so many beautiful things to make! These days, I'm just as likely to open up a website rather than the cookbooks that line my shelves when I have a culinary query, and the folded corners of favorite recipes are being challenged by the bookmark tab on my internet browser. Though nothing will supplant the tomes I treasure, I love the immediacy of blogs, and the intimate view into indivual kitchens. With great sites from all corners of the globe, I've learned about exotic fruits, unusual pestos, and French home baking, straight from the source. Reading some of the great sites out of Australia, I'm often reminded how our seasons are flipped, as I huddled at the screen in my cold apartment they wrote about barbeques and ice cream. When I saw this rhubarb tart back in September, I knew I wanted to make it, but it would be six months before rhubarb would be in season!


However, the rhubarb tart (the original version much more visually stunning than mine), stuck in my head, so much so that I even picked up the proper pan for it at an after-Christmas sale. In March, I trawled markets in hopes of early rhubarb, but it was still woefully cold and dreary. Finally, rhubarb has arrived and I got right to the tart. Another thing I've learned from reading blogs is to be comfortable in the metric system, converting grams, ounces, and cups. This tart was worth the wait, and the effort, as it was really delicious. My only regret was that it didn't have more rhubarb- I'll place the stalks more closely together next time. It's not too sweet, so I didn't feel too guilty nibbling on a piece for breakfast one morning. Thanks to Haalo for the recipe, and with apologies to those in the southern hemisphere, expect more rhubarb to be featured here soon!

rhubarb tart 2

Rhubarb-Cornmeal Tart
With a buttery crunchy crust, a creamy filling, and tangy rhubarb topping, this tart's a winner any time of day.

for the pastry:
1 1/2 cups flour
3/4 cup powdered sugar
1 stick (1/4 lb) butter
1 egg
for the cornmeal cream:
1 1/2 cups milk
1 tsp cinnamon
1/3 cup sugar
1/3 cup white cornmeal or semolina
2 egg yolks (or 1 egg)
for the rhubarb:
rhubarb stalks
1/2 cup sugar plus 2 tablspoons

1. For the pastry crust: Combine the flour and powdered sugar in a large bowl. Cut the butter into small pieces and add to the bowl, crumble the mixture together with your fingertips until it resembles coarse meal. Stir in the egg until the mixture just comes together (you could also make the dough in a food processor). Turn the dough out and knead just to make a ball. Flatten it into an ovular disk, wrap it in plastic wrap and chill briefly, half an hour to an hour. Roll the dough out and fit it into a rectangular tart pan (or a round 8" pan). Cover and place in the fridge or freezer to chill thoroughly.
2. For the cornmeal cream: Combine the milk, cinnamon, sugar, and cornmeal in a saucepan and bring to a boil, whisking constantly to prevent lumps. Lower the heat and simmer the mixture, stirring, for 3-4 minutes, until thickened and no longer gritty. Remove the saucepan from the heat and let cool slightly. Stir in the egg yolks until well combined. Press a piece of plastic wrap directly onto the surface of the mixture and set aside or refrigerate until ready to use.
3. Blind bake the tart shell: Preheat the oven to 350. Place baking paper and pastry weights inside the chilled tart shell. Bake the pastry for 15 minutes, then remove the weights and paper and bake another 5-10 minutes, until the pastry is dry and just golden on the edges. Remove and allow to cool slightly.
4. Bake the tart: Spread the cornmeal cream inside the blind-baked tart shell. Slice the rhubarb and layer it over the cornmeal cream, placing the pieces close together. Sprinkle the 1/2 cup sugar over the rhubarb. Cover the tart with foil and bake in a 350 degree oven for 20 minutes, then remove the foil and bake another 15-20 minutes, until the rhubarb is tender. Sprinkle the remaining 2 tablesppons of sugar over the tart and, using the broiler or a blowtorch, briefly caramelize the sugar. Serve warm or at room temperature.

__

03 May 2007

Artichokey


The first time I saw an artichoke growing in its natural form was driving through the Bekaa Valley of Lebanon. It had been a confusing day: touring a vineyard and a wine tasting that could have been in France, an annoying Hezbollah checkpoint, passing the odd Roman ruin in the desert. Driving through the semi-arid landscape, there was a whole field of large spiky-leaved plants with tall stalks, “artichokey” said my seat-partner as I looked wide-eyed at the giant thistle-like plants. It is thought the Arabs were the first to cultivate the artichoke while trying to copy Italian cardoons (though Italians, I am sure, would claim primacy). Minutes later, our bus made a crashing turn off the highway and barreled down a dirt road, stirring up dust in a landscape of fields and farms and which was alarmingly devoid of any buildings as far as the eye could see. That is, until we pulled up to a long low restaurant. Situated amongst the artichoke fields, it’s interior revealed bubbling fountains and a packed house of patrons at 3 in the afternoon. Like any good adventurous traveler, I knew I was in for a delicious and lengthy meal.

Previously, my acquaintance with artichokes had been every spring, when my mother would buy artichokes and steam them and we would peel the leaves and dip them in a big bowl of clarified butter, the tooth-torn leaves piling up on our plates as we ate our way towards the meaty heart. Now, half-way around the world, along with the plates of hummus and tabboule, came big steaming platters of artichokes with nutty butter for dipping: the same preparation, only with the odor of nargileh swirling and the strains of Amr Diab overhead. That afternoon there were also artichoke-bottoms, deftly scooped out and filled with a meat and pine nut stuffing, then covered in tomatoes and béchamel sauce and baked, but it was those leaves I savored the most.

A friend of mine has long-praised a shaved artichoke salad, and this season I decided to give it a go. Just like seeing those artichokes in the field, this salad was a whole new perspective on the vegetable. Like a high school reunion where the dorky kid with the braces and thick glasses returns tall, blonde and enviously successful, so my artichoke transformed into elegant crunchy slivers layered with sharp cheese.

There’s no getting around the fact that trimming the artichokes is a major pain, something to be done only when the season inspires or when enough time has passed that you’ve forgotten the curses you uttered the last time you did it. My own messy process looked much like a a child in a chicken coop, knives and feathers flying. However, you really shouldn’t let that dissuade you, because this salad is truly delicious. It has me wishing (once again) that American markets sold pre-prepped artichokes. I happened to have an asian pear laying around, and a few sweet slices of it paired wonderfully well with the salad, but I imagine some slivers of peppery fennel would also work well. Either way, I hope you are enjoying springs bounty in artichokes and otherwise.


Shaved Artichoke Salad
This flavorful crunchy salad is worth the annoyance of prepping the artichokes. Serves 2-3.

3 artichokes
4 oz parmiggiano-reggiano cheese
1 asian pear (optional)
3 tbl lemon juice
3 tbl olive oil
1 tsp mustard
pinch salt
2 tbl finely chopped parsley

1. Fill a shallow bowl with water and add 1 tablespoon of lemon juice.
2. Pull off the external leaves of the artichoke and cut off most off the top. Pull away the leaves and use the knife to pare away everything but the meaty bottom of the artichoke, scooping out and discarding the fuzzy choke. Place the artichoke bottom in the acidulated water to prevent browning and repeat with remaining artichokes.
3. Using a mandoline or a sturdy vegetable peeler, shave the artichoke bottoms over the bowl, letting the shavings drop into the acidulated water.
2. In a small bowl, whisk together the remaining 2 tablespoons lemon juice, olive oil, mustard, and salt. Drain the artichoke slivers and toss with the dressing to coat. Thinly slice some of the asian pear (I usually only use about half), and add to the bowl with the chopped parsley, toss everything to combine.
3. Place half the artichoke mixture on a serving platter. Shave some of the cheese over the artichokes to cover in a thin layer. Cover with the remaining artichoke mixture, then shave more cheese over top. Serve immediately.

__

01 May 2007

Spring for Green

spring risotto
Last weekend spring finally decided to burst forth, the kind of weather that makes school children gaze longingly out the window, that makes your toes seek the wiggling freedom of flipflops. A weekend that defies you to stay indoors, much less in the kitchen. However, we were having friends for dinner and in addition to throwing open all the doors and windows, I could at least surround myself with the produce of the season. “I hope you like green things,” I asked our guest, noting the array of artichokes, arugula, spinach, asparagus, and peas that littered the kitchen, “I just couldn’t help myself.”

I had remembered a recipe for a risotto made green with spinach, and since I think risotto should not be just a bowl of cheesey rice, I thought I’d brighten it with asparagus and peas. All went well as I stirred and stirred, and soon we were sitting down to dinner and talking and talking and laughing and eating. Oftentimes, this is what good food is for, to serve as the backdrop, a mere supporting role. But when I went back to think about it, I couldn’t remember, was the risotto good? Should it be faulted for not sealing the show? Did it need more cheese?

When revisited, this risotto did indeed hold it’s own at the table. It is light and subtle but also wonderfully delicate and satisfying at the same time. And if your conversation usurps your meal, that’s ok too, because that is what the joy of good friends and good food is all about.


Spring Green Risotto
This risotto turns a lovely green color from the spinach. It is meant to make use of the best spring produce, but is good any time of year. Serves 3-4.

2 tbl olive oil
1 shallot, chopped
1 garlic clove, minced
1 1/4 cups arborio rice
1/2 cup white wine
4-5 cups vegetable stock
10-12 spinach leaves
1 cup spring peas
about 2 cups asparagus tips
1 cup grated parmesan cheese

1. Bring a pot of water to boiling. Add the peas and asparagus tips and blanch until just bright green, about five minutes. Drain the vegetables into a colander and rinse under cold water to stop cooking. Set aside
2. Put the vegetable stock in a pot and maintain on a simmer on the stove top.
3. In a wide large pan or deep skillet, heat the olive oil over medium heat. Add the shallot and garlic and saute until just softened and golden. Add the rice and stir so that each grain is coated with oil and the grains begin to turn opaque, a couple minutes. Stir in the half cup of white wine, scraping up any browned bits in the pan. Stir constantly until the wine has been absorbed and the pan begins to look dry. Stir in half a cup of the warm stock and stir constantly in a gentle circular motion, until the stock is absorbed. Continue this process, stirring and adding more stock when necessary.
4. After about twenty minutes, begin checking the rice for doneness, you want it to be creamy but the grains should still be slightly al dente. It may take another 10-15 minutes depending on the size and type of pan you are using. You may not need all the stock.
5. When the rice is almost done, rinse the spinach leaves well and put them, with the water still clinging to them, into the food processor. Process until you have a puree. Immediately stir in the spinach puree into the risotto, and add the asparagus, and peas. Cook, stirring, another 3-5 minutes, for everthing to incorporate. Remove from heat and stir in half of the cheese. Serve immediately, passing the remaining cheese alongside.
__