04 July 2007

Cheater, Cheater ... Sticky Bun Eater

sticky bun remains
I am not a morning person. I need a good half hour between waking up and engaging in conversation any more complicated than yes or no. I do not wake up and hum as I brush my teeth. And as much as I love breakfast food, I don’t much like cooking in the morning. I usually wake up with an appetite, and getting food in my system is generally part of the successful road to a fully functional, conversational me. Having to undertake any labor more serious than stirring or waiting by the oven for toast can be a recipe for disaster.

Growing up, Sunday mornings meant something special for breakfast, like cinnamon rolls or raspberry crumb cake. And as wonderful as those gooey, pull-apart cinnamon rolls are, they involve yeast, and work, and worst of all, waiting. Get up early to let dough rise (an hour!), roll it out and bake it (another hour!)? Hello, the weekend, sleeping in? The hungry-grumpy me that would result is a picture no-one wants to see, besides I probably would have resorted to eating a bowl of cereal an hour ago. Of course, one could always go out for breakfast, which would probably involve long lines and more waiting, boisterous children, and mediocre toast. And I’d have to get dressed.


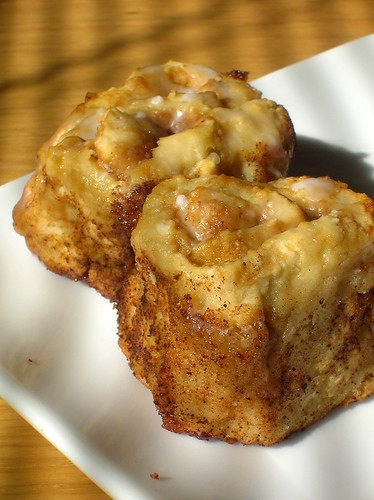
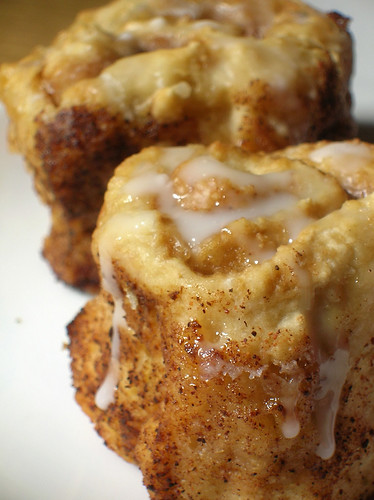
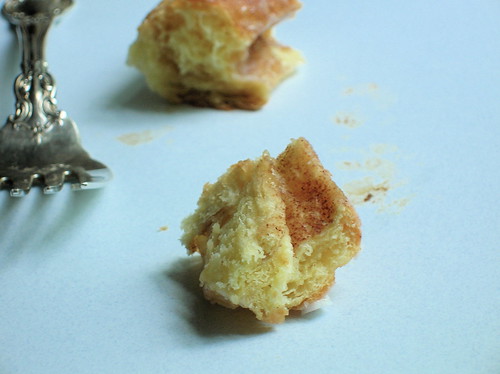
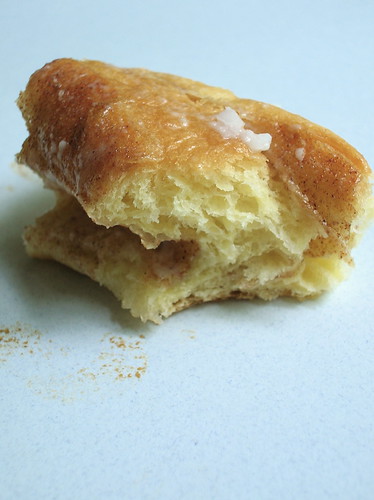
So what’s a girl to do? Well, she makes ‘quick cinnamon buns,’ a happy marriage of biscuit-like dough in cinnamon roll form. No yeast involved, just a quick stir of ingredients and they’re in the oven before you know it. These don’t quite have the luscious pull-apart texture that comes from yeasted dough, but that doesn’t mean they aren’t good. And I’m not complaining because I am sitting at home, in my pajamas, eating a homemade cinnamon bun, warm from the oven.

Quick Cinnamon Buns
The comfort of a homemade cinnamon bun without the wait for yeasted dough, what could be better? You could also add raisins to the filling if you'd like.

2 cups flour
2 tablespoons brown sugar
1 tsp baking powder
1/2 tsp baking soda
1/2 tsp salt
4 tbl (2 oz) butter, melted
3/4 cup buttermilk

filling:
1/4 cup brown sugar
1 tbl cinnamon
tiny pinch of cloves

glaze:
2 tbl cream cheese
2-3 tbl milk
1 cup powdered sugar

1. Preheat the oven to 425F. Grease an 8-inch square pan. In a large bowl, stir together the flour, brown sugar, baking powder, baking soda, and salt. In a glass measuring cup combine the butter and buttermilk. Make a well in the center of the dry ingredients and pour in the wet ingredients. Fold the mixture together in a few swift strokes, stirring only until combined. Transfer the dough to a lightly-floured work surface and roll to a rectangle about 10x18 inches.
2. Combine the filling ingredients and sprinkle them over the surface of the dough. Starting from the short side, gently roll up the dough. Cut the dough into 2 inch lengths, you should have about 8-9 rolls. Snuggle the rolls together in the prepared dish and bake for 20-25 minutes.
3. Stir together the glaze ingredients and drizzle over the rolls.
________

30 June 2007

Portrait of Summer


The other night as I was cleaning up from dinner, I looked out the window and noticed the sky was still pale gray beyond the shadows of the trees. Indeed, it was still light out at well past nine, one of the best signs of summer if I know one. How can I not have noticed the arrival of summer nights, the possibility of late evening walks after dinner, the smell of honeysuckle in the slightly damp air? One of the things I loved about my time in Paris were the evenings when it stayed light until ten or eleven, popping into shops after dinner or stopping for an ice cream.

And while our local markets are going at full speed, that other harbinger of summer, the tomato, is only on the cusp of arriving. My own tomato plants are taller than I am and overburdened with fat orbs still verdant green; I am just itching in anticipation! But for now, the best tomatoes I've been finding around here are these fat yellow ones; thin skinned and ripe, they exude a wonderful tomato smell as soon as you slice them.


The idea for this yellow tomato flan came from a tart in Michel Richard's "Happy in the Kitchen," I was enamored by the bright yellow filling paired with little heirloom cherry tomatoes, but I didn't want to bother with the fuss of a tart shell. Instead I turned the yellow tomatoes into a sort of savory custard, topped with a bright salad, it's a perfect first course or side dish at dinner. This should really be baked in individual ramekins or a shallow baking dish; I baked mine in a brioche pan because I liked the shape, but it took forever for the flan to set. What I love about this is that, unadulterated by milk or cream, it tastes purely of tomato. Make sure to chill this completely before serving, it tastes best cold, and the texture will firm up in the fridge.

In keeping with the ease of summer, the prep for this does not take long at all, so you’ll be in and out of the kitchen quickly. If you do want to dress this up, I imagine a bright breen basil or pesto sauce would be the perfect accompaniement. And if you can, serve it al fresco, under the still-light sky of a summer evening.

Speaking of summer, that means vacation, and we are off for nearly (gasp, joy!) two glorious weeks of relaxation! A long trip and an hour-and-a-half boat ride to one of my favorite isolated islands on earth. I've got some posts written up to keep you all entertained in my absence, but seeing as how internet access is questionable, please excuse me if updates are less-than-regular.


Yellow Tomato Flan
This tastes purely of tomatoes, so make sure to use a mild cheese that won’t overpower the dish (we used Kashkeval). Also, it should be served lightly chilled so that the texture remains firm. This is a lovely side dish at dinner or an elegant first course over salad greens, you could dress it up with a drizzle of basil or pesto sauce if desired.

2 lb yellow tomatoes (about 3 large), diced
4 eggs
1/2 cup finely grated mild white cheese
pinch of sea salt
for serving: halved cherry tomatoes

1. Preheat the oven to 375 F. Grease 6 ramekins or a 9-inch round pan or a large brioche pan, choose a roasting pan that will hold the ramekins or round pan.
2. Heat a tablespoon of olive oil in a skillet. Add the tomatoes and saute over medium heat until the tomatoes are softened and no longer watery, about 5-10 minutes. Transfer the tomatoes to a blender and puree until smooth. Strain the mixture through a mesh sieve into a bowl, discarding and skins or seeds that remain.
3. Add the eggs to the tomato puree, beating until smooth and well combined. Fold in the cheese and season with sea salt. Pour the tomato mixture into the pan or ramekins, bang the pan once on the counter top to remove any air bubbles. Fill the roasting pan with very hot water so that the water reaches at least half-way up the sides of the ramekins/pan (a water bath).
4. Carefully slide the pan into the oven and bake for 40-50 minutes for the ramekins, or 70 minutes for the brioche pan. Top up the water level in the roasting pan as necessary. When done, the top and edges of the flan should be well-set. Remove from the oven, cool, and refrigerate the flans to chill completely. Serve cool, with halved cherry tomatoes on top.

27 June 2007

Bagelicious

The first time my family came to visit me after I moved to New York, they asked where I wanted to meet for lunch and I said, “The 2nd Avenue Deli.” In retrospect, this was an odd choice, seeing as how I’m not big on sandwiches, or meat, or anything piled high with pastrami. But it was a New York icon only blocks from my home, and I was determined to try everything I could in this new city. I have no idea what I ate that day (blintzes, maybe?), but over the years I’ve tasted my way through most of the city, embracing some traditions and discarding others. But the one culinary landmark I’ve adopted more than any other is that most famous one: the bagel.
Don’t get me wrong, there were certainly bagels around growing up, but they often came in heretical flavors like blueberry and chocolate chip (not that I ate those, mind you, although I will admit to twice succumbing to a toasted chocolate chip one, I was ten, and really, I shouldn’t tell you this, but it was quite good, with it’s melty chocolate middles). Back then, my favorite treat was a cinnamon raisin bagel toasted with butter, something I still indulge in when wanting something slightly sweet and densely caloric. Today, pumpernickel bagels are my favorite, with their deep dark brown and undertones of molasses, I love them plain, or with the thinnest schmear of cream cheese.
It was only upon moving to New York that I really discovered the meaning of a good bagel, and it was only when leaving New York that I realized that good bagels are hard to find outside the Big Apple. It wasn’t until leaving the U.S. that making my own bagels even crossed my mind. In fact, if I hadn’t endeavored to make them, I would not have known that bagels are boiled, then baked, it’s the boiling which gives them their characteristic chewey-shiny exterior.

So when this month’s online baking challenge turned out to be bagels, I was happy to try them again. Even though it is a multi-step process, the bagels rise really fast, so there’s not much waiting one usually associates with yeast-doughs. I made both full size and mini bagels (dare I admit that I slightly over-baked one batch of the bagels and then fobbed them off on a friend, who deemed them very good anyways?) I much preferred the mini ones, they made a perfect 3-bite sandwich with caramelized onion and cheese. I’ll probably continue to go to Murray’s for my occasional bagel-fix, but it’s a good skill to have under your belt, especially if you live outside New York.


Bagels
Bagel dough rises like crazy, which means no long waiting periods characteristic of many yeast doughs. Boiling gives the bagels their shiny surface, and malt syrup imports a traditional tangy taste, though if you don’t have any, sugar works just fine. This makes a lot of bagels, so you'd be well advised to halve the recipe.

6-8 cups bread (high-gluten) flour
4 tablespoons dry yeast
6 tablespoons granulated white sugar or light honey
2 teaspoons salt
3 cups warm water
3-5 tablespoons malt syrup or sugar
1 egg, lightly beaten
choice of topping: poppy seeds, salt, sesame seeds, onion, etc.

1. Place the hot water in a large bowl with the 6 tbl sugar to dissolve. Sprinkle the yeast over the surface and stir to combine. Let sit for 5-10 minutes, until the mixture is bubbly.
2. Stir in 3 cups of the flour with the salt to make a soft dough. Continue adding the remaining flour, 1/2 cup at a time, kneading into the dough until incorporated. At some point, you’ll want to turn the dough out onto a well-floured work surface so that you can knead it with your hands. Continue kneading, trying to incorporate most of the flour if possible. It will be quite elastic, but heavy and stiffer than a normal bread dough. Do not make it too dry, however, it should still give easily and stretch easily without tearing.
3. Place the dough in an oiled bowl, cover and leave to rise in a warm place until doubled in volume. This should take about 30 minutes.
4. Meanwhile, fill a large pot with a gallon of water. Add the malt syrup or sugar and bring to a boil. Lower the heat so that the mixture maintains a gentle simmer.
5. Punch down the dough, then divide it into 18-20 chunks of dough (if making mini bagels you’ll want many more chunks of dough). Put half the dough chunks in the fridge while you shape the first half (this will prevent them rising while you are working). Roll each piece of dough into a snake and tuck the ends together to form a bagel. Repeat with remaining dough. Let the bagels sit about 10 minutes, they should rise slightly (technically, they should rise 1/4 volume or ‘half-proof.’)
6. Preheat the oven to 400 F. Working 2-3 at a time, place the bagels in the pot of simmering water. Boil for about 3 minutes, then turn over and simmer another 3 minutes. Remove with a slotted spoon to drain on a towel. Repeat with remaining bagels.
7. Place bagels on parchment or silpat lined baking sheets. Brush the bagels with the beaten egg, and add any desired toppings. Bake the bagels for 20 minutes, then flip them over and bake for a final 5 minutes (flipping prevents flat-bottomed bagels). Cool completely on a rack. Do not attempt to slice or eat your bagels until they are completely cooled, as the interior will be smushy.

______________

23 June 2007

Dinner with Baaba


The other day, a song came on the radio I hadn't heard in years and I was immediately transported to a younger version of myself, when dancing and stiletto heels seemed less a recipe for pain and more part of an average Saturday. It got me thinking about the music that shapes our experiences, if your life had a soundtrack what would be on it?

Chances are, a lot of your favorite music, but also a lot of things you might not have picked yourself. Me, there'd be the Rolling Stones and Johnny Cash played loud on an early summer evening in a beach house, dancing in the kitchen with still-sandy bare feet. Tom Waits would show up, with Nina Simone and Ali Farka Toure. Absolutely anything by J.S. Bach, but particularly the cello concertos for a rainy Sunday afternoon. My days as a dancer would bring along Arvo Part and Conlon Nancarrow, a high school project on Hildegard von Bingen. Trundling in a bus through the desert, Fairuz and Amr Diab would keep me company. An ex-boyfriend or two left behind Blur, M, the Black Dice; a trace of my Argentine roots in Mercedes Sosa.

It's my mother who cultivated a lot of my tastes, and she's the one who found Baaba Maal. I grew up listening to this Senegalese singer, I've heard the song "Koni" a hundred times and could listen a hundred times more. And it was that infectious rhythm and unique voice which piqued my interest in Senegal, the scars of slavery, the Sufi mystics, the writings of Miriama Ba. And who couldn't love a cuisine heavy on peanut butter?


So it was my love of Baaba Maal that lead me to pick up an African cookbook at the library. Written by Marcus Samuelsson, a chef whose background appeals to my own multi-cultural tastes, though the recipes here are my liberal adaptation inspired by Samuelsson's book. I broke out the grill for the beginning of summer and made tamarind-glazed salmon. It took P. to point out the obvious, that salmon probably isn't a traditional African ingredient, but this example of fusion cuisine was delicious. Tamarind is a sweet-tart fruit popular in India and Africa, it comes from the Arabic "tamr al-hind," which means Indian date. The fruit often comes smashed together in plastic wrapped-blocks or in jars of tamarind concentrate and is available at Whole Foods.

But the star of our dinner was the cabbage-citrus salad with it's nutty peanut dressing. Don't be put off by the fancier blood oranges I used, the original recipe actually called for grapefruits, and oranges could also work in what is essentially a slaw. I've modified the dressing so that it comes together in minutes in the blender, and with thin slivers of cabbage and citrus, this is so easy, you'll do it again.

In the soundtrack of our lives there are a lot of memories and an ever-growing playlist that chronicles our experiences, but there are also opportunities for new learning and discovery. If it weren't for Baaba Maal, I doubt I would have picked up an African cookbook or made this meal. So put on some good music, stir up a dinner, and I'd highly suggest a peanut butter pie for dessert.


Tamarind-Glazed Salmon Skewers
Although the recipe specifies skewers, we found that this is equally good when made with slices of salmon fillet or salmon steaks, adjust the cooking time as necessary. Tamarind is a sweet-tart fruit that often comes smashed together in plastic wrapped-blocks or in jars of tamarind concentrate and is available at international markets and Whole Foods. If tamarind is unavailable substitute minced dates.

2 lb salmon fillets, skin removed and flesh cut into 2 inch pieces
1/4 cup peanut oil
1 yeloow onion, chopped
1 garlic clove, minced
1 tbl curry powder
1 cup white wine
1/4 cup red wine vinegar
1 tbl cornstarch
3 tbl tamarind paste
2 tbl sugar
pinch salt

1. For the marinade: Heat 2 tbl of the oil in a medium saucepan. Add the onion and garlic and saute until golden, about 5 minutes. Meanwhile, dissolve the cornstarch in 2 tbl of the wine. Add the curry powder, wine, vinegar, cornstarch mixture, and tamarind to the pan. Season with sugar and salt. Bring the mixture to a simmer and cook for 5 minutes, until slightly thickened. Let cool slightly, then puree the mixture in a blender until smooth.
2. Marinate the salmon: Rub the salmon pieces with the remaining 2 tbl oil. Combine the salmon with half the tamarind sauce and set in the refrigerator to marinate for 30 minutes while you preheat the grill.
3. Grill salmon: Preheat a grill. Brush the excess marinade off the salmon and thread onto skewers. Grill the skewers for 3-4 minutes on each side, brushing frequently with the reserved tamarind sauce. Serve the salmon drizzled with remaining sauce, if desired.

Cabbage-Citrus Slaw

for the dressing:
1/3 cup peanut butter
1 tsp ginger
juice of 2 limes (or 1 lemon)
1 garlic clove, minced
1/4 tsp Aleppo pepper or red pepper flakes
1/4 cup soy sauce
1/4 cup peanut oil
for the salad:
1/2 head napa cabbage, shredded
3 scallions, sliced
2 blood oranges or 1 grapefruit, sectioned
1 tbl sesame seeds or chopped peanuts, toasted

1. Combine all dressing ingredients in a blender or food processor and blend until combined.
2. In a bowl, combine cabbage, citrus, and scallions. Toss with the dressing. Sprinkle with the toasted sesame seeds or peanuts and serve.
_______

20 June 2007

There Is a Balm in Fava Beans


One of the things Umm Hana taught me was that when you have to do something laborious, go ahead and do it all at once and get it over with. A day of chopping, peeling, and cooking may seem a pain, but then you've got a year's worth of jam. One day I stopped by her house and she'd made three chocolate roll-cakes, one for her daughter's birthday, the other two for the freezer. And while you may never see me with that many cakes in my freezer, I do take a 'get it while you can' approach when it comes to seasonal produce. Like those fava beans I got last week, I shelled a huge bag, used some, and set some aside for later. The same approach can be taken for cooking dried beans: (because cooking your own dried beans is much tastier and cheaper than canned) cook a large amount, then freeze them in plastic containers.


So, I shucked in the car, I shucked on the porch, I shucked watching Free to Dance for about the fifth time (who doesn't tear up at 'A Balm in Gilead?'). Anyway, back to the favas. I love them in a simple salad with some chunks of pecorino romano and a drizzle of olive oil, with a bit of mint for accent. This time, my fridge yielded some cave aged-gruyere cheese, and I mounded the salad on top of some toasts as crostini. I ate them sitting in the midday sun of the front porch, and with the cheese melting into the still-warm toasts and the bite of fresh mint, it was the best lunch I've had in a while.


Fava, Pecorino, and Mint Salad
I love the salty chunks of pecorino romano cheese in this salad, but it's equally good with other cheeses: slivers of aged gruyere or crumbles of feta come to mind.

2 cups fava beans, shelled, blanched and peeled
2 oz pecorino cheese, broken into chunks (or substitute another flavorful cheese)
1 tbl slivered mint leaves
a drizzle of olive oil, pinch of sea salt

Combine everything and toss to coat.

Fava Bean Crostini: Toast slices of a baguette or country bread until browned on both sides. Drizzle each slice with a little olive oil, then mound some of the salad on top.
______________

19 June 2007

The Positive Side of Traffic Jams

Last Sunday threatened to be bad. We awoke early after a night of celebrating and champagne, slightly bleary eyed but relatively cheery, if that word can ever be applied to me and morning hours. I suggested we walk down to the Dupont Circle farmers market, remembering my Sunday summer routine when I had lived in Washington. However, it turned out to be further from the apartment where we were staying then I thought, as we trudged the many blocks in coffee-less silence I tried optimistically to point out that at least it was easy to take the subway back. Only a few steps from the market we stopped for that much needed caffeine only to wait for what had to be the longest to-go cup ever. The morning threatened to devolve as the coffee-devoid minutes ticked by, we exchanged terse words over breakfast pastries. Luckily, the coffees finally arrived (Italian espresso + french press!) and were delicious enough to revive us.


The selection at the market was beautiful, there was the same man with the gorgeous lettuces, the beautiful French tarts, the baskets of glorious strawberries. We gathered up what we could carry, and then rain threatened and we dashed to the subway. After a trip to the Corcoran, it was time to head home. Comfortably in the car, we dodged a protest and thought we’d escaped the worst traffic when, at the edge of the beltway, we came to a stand still. We inched along, realizing it would be a long trip home.

When the traffic threatened our sanity, we pulled into a strip mall for a cup of coffee, and I wandered into the neighboring shoe store and emerged with a pair of rock-bottom priced green sneakers. Back in the car, I decided to pass the time shelling the fava beans I’d purchased, pulling them from their soft green pods. I adore favas but they are a major pain, you have to shell them not once but twice, first out of their pods, then blanching them and slipping each bean out of it’s individual casing.


A few shortcuts later, we made it home, spirits and lettuce intact. As I unloaded our purchases, I realized we’d been a little overzealous in our grocery shopping as the refrigerator threatened to burst at the seams. While many people may welcome a full fridge, I see it as one big burden: all those things to be prepared, cooked, eaten! I immediately began culling through recipes, looking for a way to combine a lot of our produce into one dish. That was when I found scaffata.

When it comes to recipes for spring produce, simple asparagus or that old Roman recipe vignarola always steal the show, but I’ll admit I’m always terribly underwhelmed by vignarola. But scaffata, where have you been all my life, because I’m infatuated. I even like saying it, scaffata, your slow-cooked tangle of peas, beans, and onions with slivers of greens and zucchini. Like many vegetable dishes, there was a good bit of prep work involved, though nothing more complex than chopping, and I had already done most of my shelling in the car. Scaffata has already been deemed ‘a keeper’ in our house, and I can foresee a shortcut version using frozen peas and edamame in our future. With all those threats of Sunday dissipated, the potential negatives evolved to positives (good coffee, a refreshing walk, new shoes!), and we sat down to a pleasant evening and a new favorite dish.


Scaffata (Braised Spring Vegetables)
The name of this Ligurian dish comes from the Italian verb scaffare, to shell.The outermost, less tender leaves of a head of greens, which you may not want to use in a salad, are perfect for this dish. If fresh favas are unavailable, substitute frozen baby lima beans or edamame. Adapted from Lidia Bastianich

3 tablespoons extra virgin olive oil
1 cup chopped scallions (white and tender parts; about 6 scallions)
1/2 cup chopped onions
2 1/2 pounds fresh peas in the pod, shelled (about 2 cups)
1 1/4 pounds fresh fava beans in pod, shelled, blanched, and peeled (about 1 cup fava beans)
1 1/2 cups finely diced zucchini
2 cups thinly shredded escarole or romaine leaves
1 tablespoon finely shredded fresh mint leaves

1. In a large, heavy casserole, heat the olive oil over medium heat. Add the scallions and onions and cook, stirring, until softened, about 10 minutes. Add the peas, fava beans, zucchini, and season lightly with salt and pepper. Stir well, reduce the heat to very low, and cover the casserole tightly with a lid or aluminum foil. Cook for 15 minutes, stirring once or twice.
2. Add the romaine and mint, cover the casserole tightly and cook, stirring occasionally, until the vegetables are very tender, about 25 minutes more. (The vegetables should give off enough moisture during cooking to prevent sticking or burning. If you find they are sticking, you can add a few tablespoons of water. Make sure the heat is very low and the pot is tightly covered before continuing to cook. It is fine, however, if the vegetables do brown a little.) Season to taste with salt and serve hot.
________

17 June 2007

Back with Blondies

Sometimes, it’s as if my brain is divided into different departments that don’t want to speak to each other. I mentioned a little while ago the constant care packages I send to a certain loved one, fueling both late nights in the law library and my own desire to bake. And then, after that initial mention, they disappeared, poof, gone, not to be heard from again. My care packages have certainly not stopped, though recently they’ve been targetted to neighbors and family members, but I’ve neglected to share those recipes with you.

I often bake at night after dinner, when there’s no natural light to take photographs, and then I quickly package up what I’ve made to be shipped off in the morning. My own dessert is the few swipes of batter I lick from the bowl and that corner piece that always looks particularly ragged. I like this routine, it’s certainly better than sitting around watching TV and I enjoy puttering about the dark evening warmth of the kitchen. But it also means I neglect to think of those routine baked goods for this blog, something that needs to be remedied.

These blondies have been in my repertoire for a while, and I’ve tweaked them here and there, but in the end I decided they’re pretty darn good as written. They include coffee, alcohol, chocolate, and toffee, so really, what’s not to love? The last time I made these I was in a rush and couldn’t find Heath bars in the grocery, so I used another type of plain toffee candies, and they were not nearly as good as usual. I took them to a friend’s house and we enjoyed them anyways, but they are best with Heath/Skor bars or another chocolate coated toffee (I think the chocolate coating prevents the toffee bits from sinking to the bottom of the pan). That said, these are a snap to make and delicious, so don’t be like me and send them away, unless it’s to someone you really, really love. Or in that case, just double the recipe.


Coffee-Toffee-Chip Blondies
The original recipe called for a double amount baked in a rectangular pan. I’d be in serious danger if I had that many of these blondies sitting around the house, so I usually bake this more modest-sized version. That said, if you have more self control or family members than I do, go ahead and double the recipe and bake in an 11x8 inch pan for 40-50 minutes.

6 tbl butter, softened
1 cup dark brown sugar
1 tbl instant espresso
1 tbl hot water
2 eggs
1 tbl vanilla extract
1 cup flour
1 tsp baking powder
1/2 tsp salt
1/2 cup chopped chocolate
1/2 cup crushed chocolate-coated toffee bar bits (such as Heath/Skor)
optional: 1/2 cup chopped pecans
3 tbl Kahlua

1. Preheat oven to 350 F. Grease and flour an 8” square baking pan (I usually line mine with foil, then grease the foil).
2. Dissolve the espresso in the hot water in a small bowl and set aside. In a medium bowl, whisk together the flour, baking powder, and salt.
3. In a large bowl, cream together the butter and sugar until light and fluffy. Add the espresso and the vanilla. Beat in the eggs one at a time. Fold in the flour mixture, stirring just until any streaks disappear. Stir in the chocolate, toffee bits, and pecans just to combine.
4. Pour into the prepared pan and bake for 25 minutes, or until a toothpick inserted in the center comes out clean.
5. As soon as you remove them from the oven, use a pastry brush to brush the Kahlua all over the top of the blondies. Cool completely before cutting into squares.

If you don't have Kahlua on hand, rum or bourbon make good substitutes.
________