31 August 2007

An Ice Cream Many Days in the Making

boiled peanuts, shelled

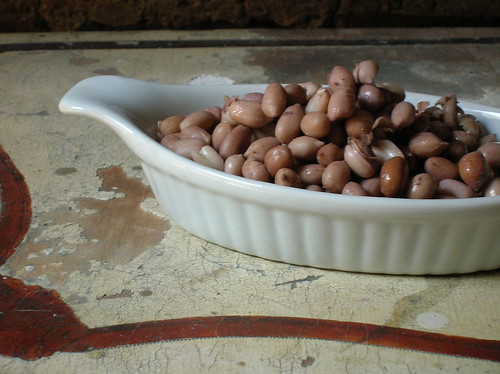
Some foods taste better by the side of the road. Standing next to Highway 17, cars racing past, the smell of diesel fumes and humid swamp air, waiting to grab that warm, damp paper bag full of briney goodness. I’m talking about boiled peanuts, specialty of the South’s Lowcountry, and staple of my childhood memories of South Carolina. My family has vacationed on a small island there for generations, my grandmother lived there for a period, and many summers, spring breaks, and holidays of my life have been spent on that tiny strip of sand between marsh and sea.

We have many traditions when we’re in South Carolina, but among them a bag of boiled peanuts is paramount. At spring break my friend Hollis and I would prowl every possible location for boiled peanuts, even though it was really too early for the season to have begun. We’d scan all the roadside stands along the highway, then we’d ask at the Shell station and the local hardware store, where they might have few bags lurking in the back, next to the beer. Boiled peanuts are raw green peanuts which are cooked in their shells in a salty brine until the nuts are soft. The best place to get them was always the roadside stands, next to the sweetgrass baskets and local peaches, and where the peanuts were scooped directly out of a huge stockpot of bubbly brine. Hollis and I would tear into the still warm bag immediately, and could be heard, between our slurps of peanuts, shouting out, “this one’s got four!” and “I’ve got a fiver,” referring to how many delectable peanuts were in each shell.


I will admit that boiled peanuts are an acquired taste, which may be why they have yet to find their way to other parts of the country, much to my own dismay. Many, many years ago, facing a serious craving, I even ordered a boiled peanut kit from some very funny folks named the Lee Brothers, long before they became New York Times correspondents and famous cookbook authors. I stirred up a several gallon vat of boiled peanuts that I froze in small batches and which kept me satisfied for a year or two. Recently, I got another tip from a Taiwanese friend of P.’s: she told me the Chinese eat boiled peanuts all the time, and to my delight, many Chinese markets sell fresh-boiled peanuts. They usually come already shelled, and with slightly less soft texture and more soy-sauce-flavor, but they are good enough to curb any cravings.

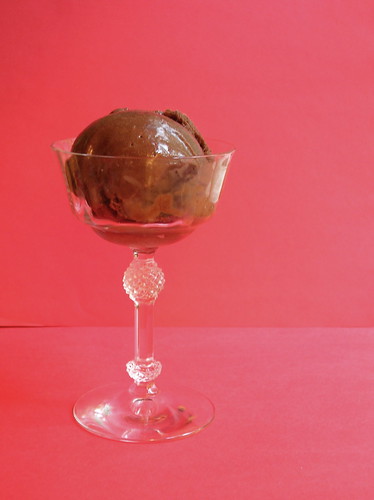
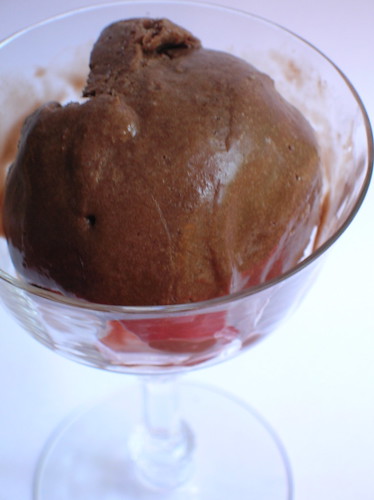
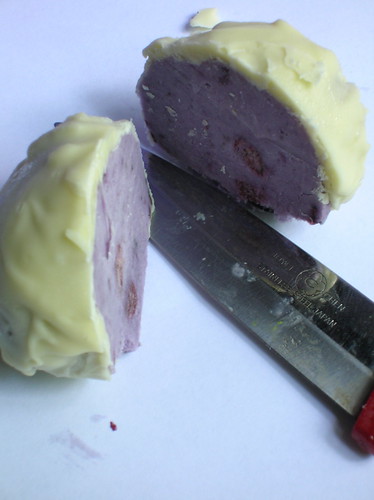
With a few reliable sources for boiled peanuts secured, I’ve been able to turn my thoughts to encorporating boiled peanuts into other recipes. I don’t know how I came up with the idea for boiled peanut ice cream, it was a wacky idea, but with their soft texture and salty-smoothness, one I thought could work. My idea was confirmed when the Lee Brothers published a recipe for boiled peanut ice cream with sorghum swirl. However, while they simply folded boiled peanuts into the ice cream, my idea was to purée the peanuts into the custard base. Again, our Taiwanese friend came to the rescue, telling me about a similar Taiwanese ice cream, for which I was even able to track down a recipe (at this point I was also beginning to feel that any attempt of coming up with anything original was futile).

pretzels

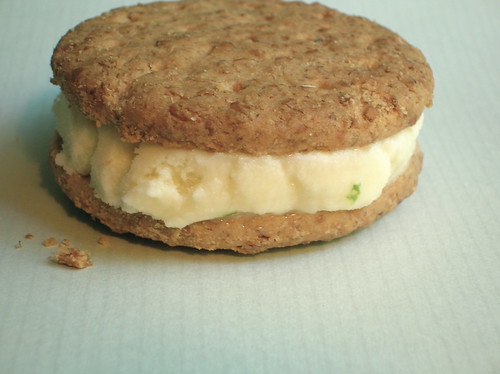
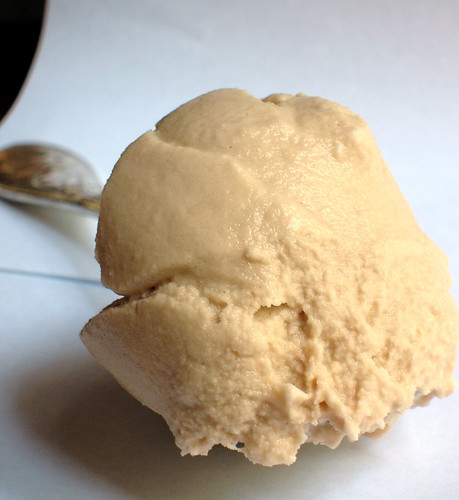
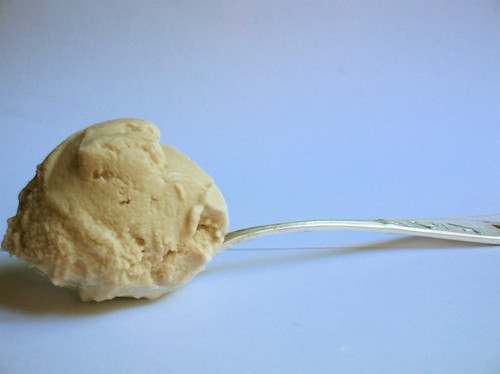
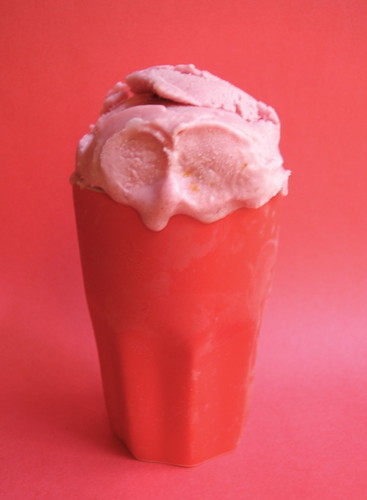
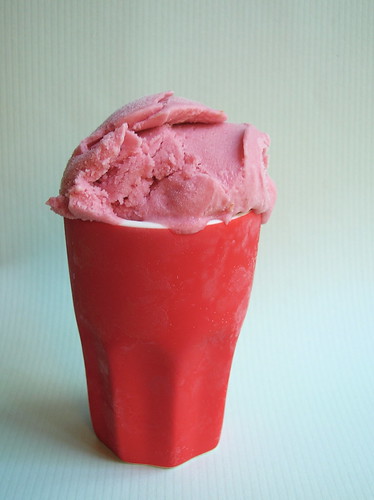
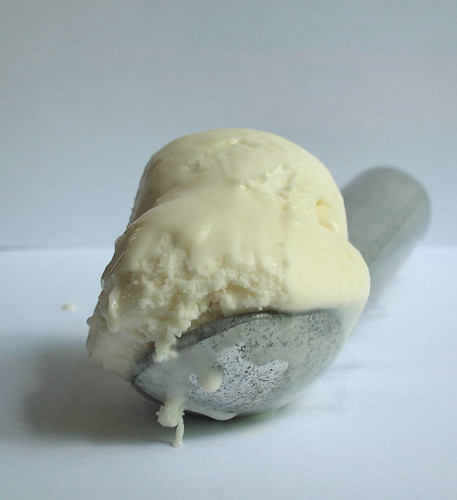
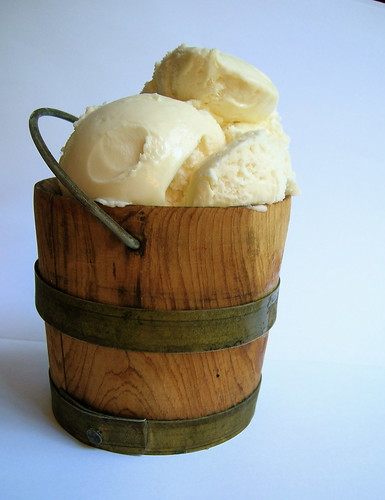
Luckily, other people had shared my idea about (boiled) peanut ice cream because it’s a good one. This ice cream is really delicious, it is wonderfully creamy with a mellow underlying peanut flavor and salty-sweetness. Though you recognize the peanut taste, it’s more subtle and more complex than your average peanut butter ice cream. However, while it’s worth it to track down some boiled peanuts to make this, it works equally well when made with creamy peanut butter. No matter which you use, if you’re looking for a great peanut ice cream recipe you’ve got it.

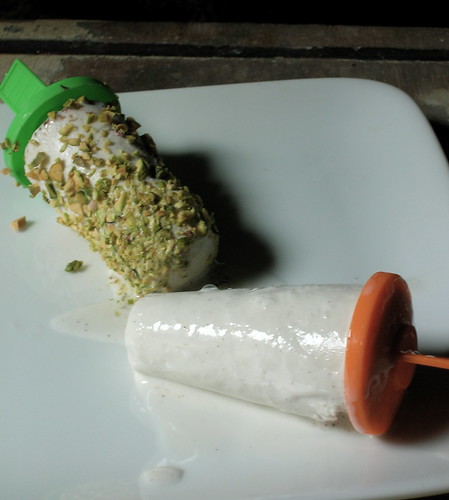
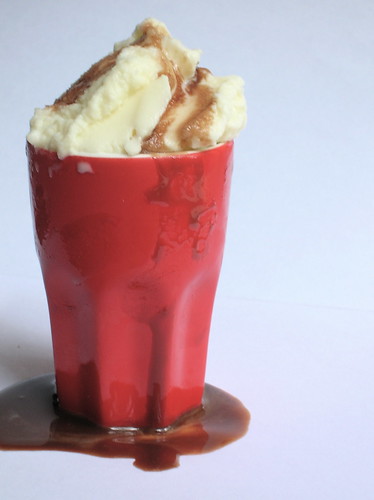
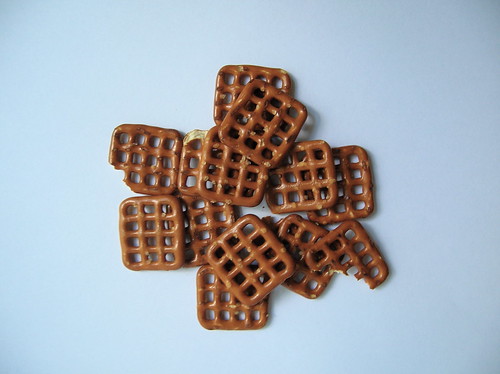
Oh, and while we’re talking ice cream, and road food, it’s time for me to fess up to my favoite ice cream topping: crushed salted pretzels. Seriously, you all have got to try it. I love hunks of crunchy things in my ice cream, and the big chunky salt on pretzels provides the perfect punctuation to the sweet cream. I’m rather picky about my pretzels, and you’ll want something that crumbles easily, like Snyder’s snaps. The topping works particularly well with peanut ice cream, although roasted peanuts are good, too.

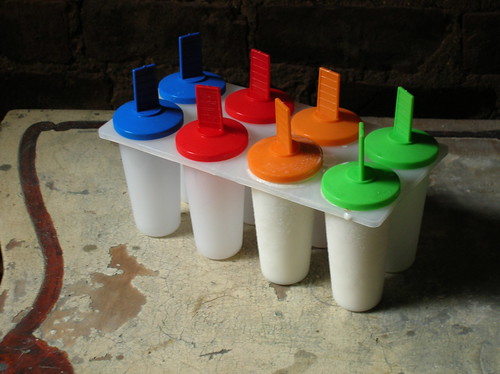
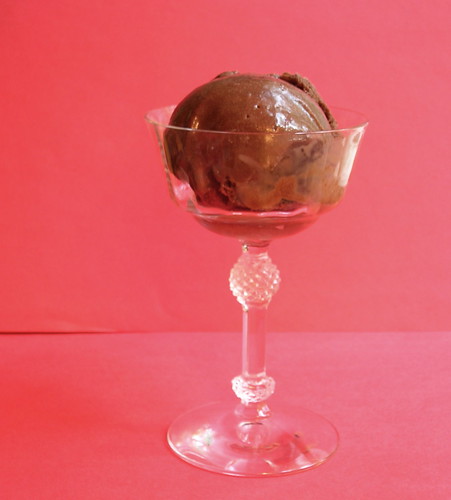
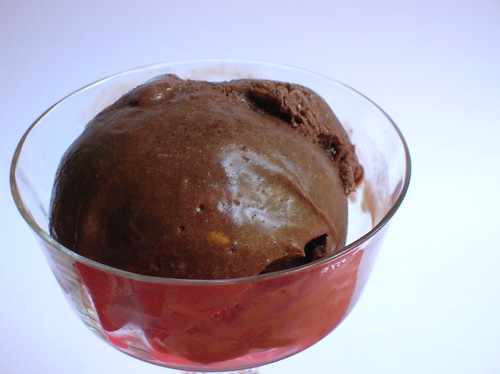
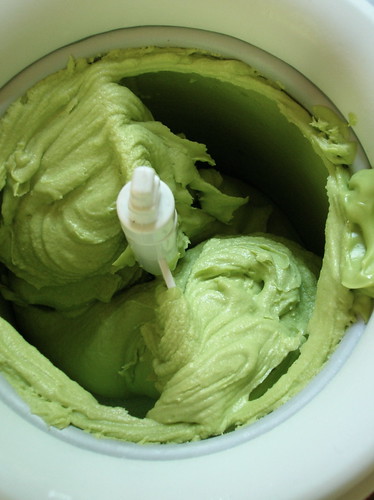
It's with great happiness and relief that I announce today is the last day of August and the final day of the ice cream challenge. I saved one of my favorites for last, but they're all delicious. I'll be posting a round-up soon, after I go bury my ice cream maker in the back yard and swear never to use it again.


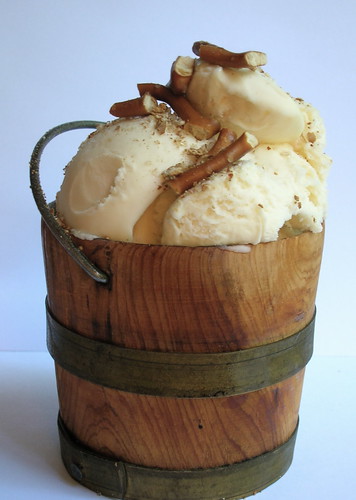
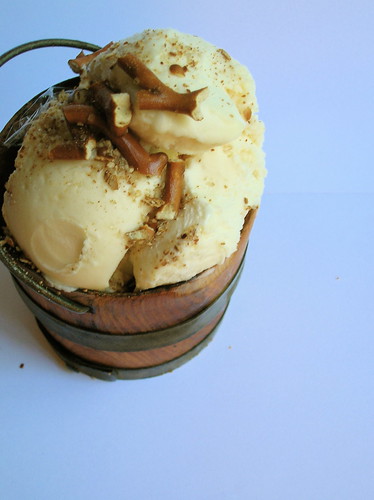
Peanut Ice Cream with Pretzels
Boiled peanuts, which involve cooking raw green peanuts until they are soft, are a specialty of the American South and part of traditional Chinese cuisine. They are available fresh and canned in the American South, and at Chinese markets. In general, Chinese-style boiled peanuts tend to be a bit firmer than American-style ones, so you’ll need to cook them a few extra minutes until soft. Puréeing the soft peanuts is a whole new twist on peanut ice cream, but you can also use peanut butter for convenience.
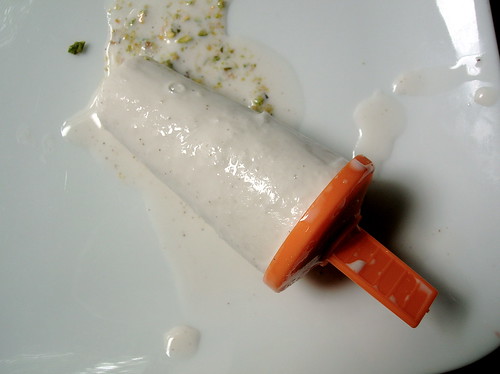
Topping the ice cream with pretzels may sound odd, but it is hands-down one of my favorite ice cream toppings. The pretzels add just the right crunch and the big flakes of salt highlight the ice cream, and particularly the peanut flavor, perfectly. If you’re serving the ice cream right away, you can fold the pretzels into the ice cream, but don’t do it ahead of time, as the pretzels will get stale in the freezer.


1 cup puréed boiled peanuts (from about 2 1/2 cups unshelled boiled raw peanuts), or substitute 1 cup creamy peanut butter
1 1/2 cups whole milk
1 1/2 cups heavy cream
3/4 cup sugar
1 tsp vanilla
4 egg yolks
1/2 cup crushed salted pretzels, for serving

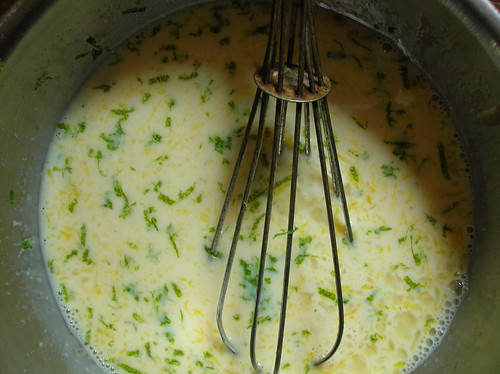
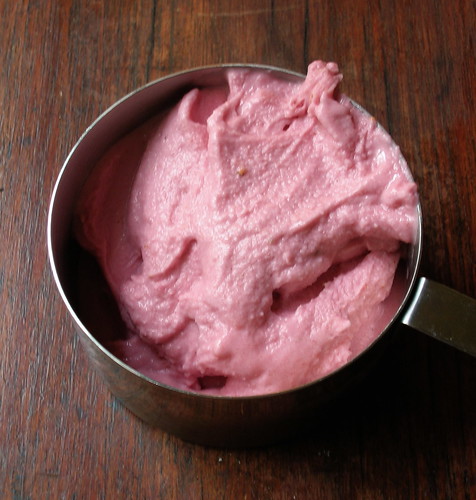
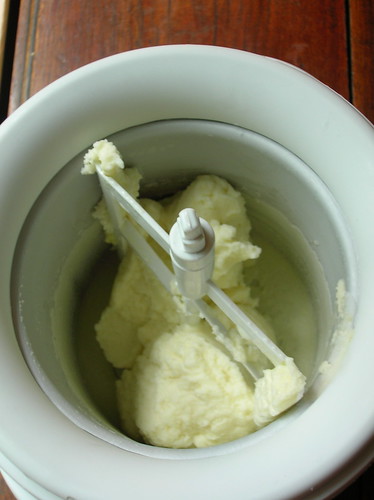
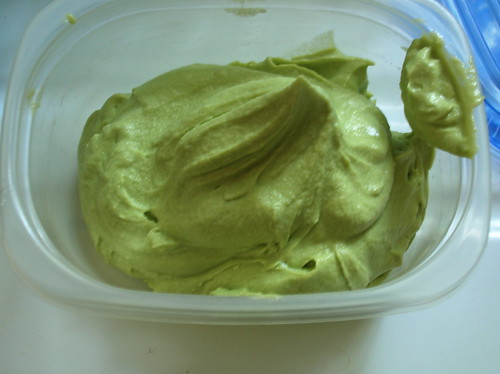
1. If using boiled peanuts: The peanuts should have been cooked until soft. Shell the peanuts, then rinse them very well in a colander to get off the salty brine. Place the peanuts in a saucepan with water to cover and bring to a boil. Boil the peanuts until they are soft, depending on your nuts this may only take one minute or up to 5-6 minutes. Drain the peanuts, transfer to a food processor, and purée the mixture until mostly smooth (a few lumps are ok).
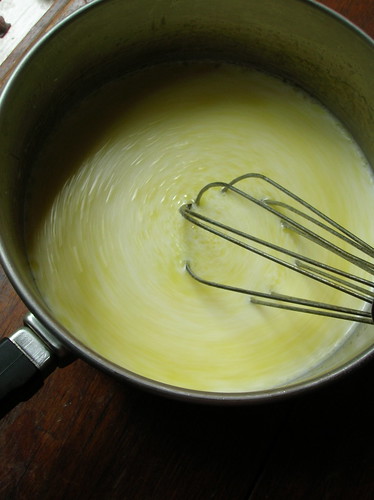
2. Heat the cream, milk, sugar, and vanilla in a saucepan over moderate heat until the sugar is dissolved and the mixture is steaming. Combine the egg yolks in a small bowl, then add a little of the milk mixture to temper the egg yolks. Add the egg yolk mixture to the saucepan and cook over low heat, stirring constantly, until thick enough to coat the back of a spoon. Do not boil it or it will curdle. Remove from the heat and stir in the peanut purée or peanut butter. Taste for seasoning, depending on how salty your peanuts were, you may or may not want to add a pinch of salt.
3. Chill the mixture thoroughly in the refrigerator, at least 3 hours or overnight. Churn in your ice cream machine according to the manufacturer’s directions. Serve with the pretzels sprinkled on top.

Variations:
PB&J- Add a swirl of grape jelly after churning the ice cream.
Double Peanut Chunk- freeze mini peanut butter cups until solid, roughly chop, fold into churned ice cream.
Peanut Crunch Ice Cream- fold in a handful of salted roasted peanuts at the end of churning.
Peanut Banana Chip- fold in banana chips at the end of churning.
Peanut-Sorghum Swirl- add a swirl of sorghum syrup or cane syrup.

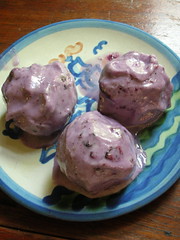
And A Final Note: Those cute little buckets the ice cream is in? My grandfather owned a cedar bucket factory back in the fifties in Tennessee. Nowadays, my mom collects the old cedar buckets, and recently gave me this one.
____________________________________________

30 August 2007

One for the Price of Three

kulfi pops

Should you ever decide to make twenty of any one type of recipe, there are bound to be some bumps along the way. Yet my forays into ice cream making have been remarkably trouble-free. Had I decided to make breads, for example, surely there would have been one that didn't rise or one that was mealy textured, a few duds among the bunch. Yet one after another, beautiful creamy concoctions have emerged from my ice cream maker, sure some have been favored more than others, but each has its own charm, and there's been nary a complaint or problem along the way. It could be that ice cream making is very easy (really, the most complicated thing you'll ever have to do is make a custard), and that pretty much anything tastes good in the form of cool freshly-churned ice cream.

But just when I thought I couldn't go wrong, I seem to have tempted fate, because there have been two duds in our kitchen. The first was most disappointing because I had such high hopes for it: an almondy ice cream made with marzipan and flecked with bits of candied citrus, it was inspired by the French confections callison. Unfortunately, the marzipan left a funny mouthfeel to the ice cream, slightly pasty, and while it wasn't awful, it just wasn't great. It lingered in the freezer, rock hard, until I finally sent it down the drain. Next was an attempt at an inside-out rocky road sundae, and while the first attempt was too sticky-sweet, I still have hopes it can work, so I'll hold off on saying more until I can try again.


Two batches of ice cream down the drain, I was about to give up, when I remembered a recipe for an Indian-style ice cream that was super-easy, it doesn't even require an ice cream maker. Kulfi is a rich Indian ice cream, it has a lovely dense chewy quality, and is flavored with ingredients like cardamom, pistachios, or saffron. Kulfi is traditionally made in tall pointy molds, so I made it in popsicle molds ($3 at the grocery, I couldn't resist). A quick mixture is thickened with bread, whizzed in the blender, then frozen. I like to roll the edges in pistachios because if you add all the pistachios to the custard they'll float to the top before freezing, and I like the textural experience of the crunchy exterior.

If I was worried that my ice cream spell had been broken, I have nothing to fear, because it has been gloriously revived. These were delicious, I love cardamom in my desserts, and it held true in this icy-chewey concoction. As cute as the popsicles were, I actually prefer eating them with a spoon, and I imagine making them in muffin cups or ramekins would work nicely. Just don't forget to coat the edges in ground pistachios, that's the best part.

kulfi pops
Kulfi (Indian-Style Ice Cream) Popsicles
Kulfi is traditionally made with heavy cream and condensed milk, but I find that is a bit too rich for my taste, so I use whole milk instead. While traditionally made in popsicle shaped molds, they are very good when made in muffin cups, then unmolded onto a plate and served with a spoon. They take minutes to make and would be the perfect ending to an Indian meal.

1 cup milk or heavy cream
1 cup evaporated milk
1 cup sweetened condensed milk
2 slices white bread, crusts removed
1 tsp cardamom
1/2 tsp cinnamon
pinch salt
2 tbl finely chopped pistachios, plus 1 cup ground pistachios for serving

1. Place the three kinds of milk in a saucepan with the cardamom, cinnamon, salt, and 2 tbl pistachios. Tear up the bread into pieces and add to the pan. Bring the mixture to a simmer, then remove from heat and let cool a couple minutes. Transfer the mixture to a blender and blend until smooth.
2. Pour the mixture into popsicle molds, muffin cups or tall glasses. Freeze until firm. (Note: for kulfi ice cream, you can churn the mixture in your ice cream maker)
3. To serve, quickly dip the bottom of the mold in a bowl of hot water to release the edges. Unmold the kulfi and roll the edges in the finely ground pistachios.
_____________________________________

29 August 2007

Day 18: (Lower Fat) Key Lime Pie Ice Cream

key lime pie ice cream
When I first started making ice cream, I quickly realized that any attempt to reduce the fat content of the mixture would be very unsuccessful. Using lower fat dairy products instead of the recommended milk and cream will result in a concoction more like a pejorative ice milk than ice cream, not to mention the sacrifices in taste and texture. I accepted this fact and I’ve enjoyed many delicious homemade ice creams, albeit in tiny scoops.

key lime pie ice cream

However, the more ice creams I made, the more I thought that surely there could be a good lower-fat ice cream out there, in part because I was alarmed with the amount of cream I’ve been purchasing lately, and in part because I like a challenge. And while you won’t get a low-fat version like the commercially produced ones made with fancy equiptment and funky sounding stabilizers, you’ll have a homemade treat that’s sure to satisfy. The basic recipe I’ve had the most success with uses condensed milk, a product I’m not very familiar with, and generally avoid due to it’s frightening processed sweetness. However, I will give it credit because it works well here to add both sweetness and smoothness to the ice cream.


If I was going to be making an ice cream using sweetened condensed milk, I figured why not make a flavor that normally uses that ingredient. Two things immediately popped to mind: key lime pie and Thai iced coffee. I went with the key lime version (using regular limes, which worked fine), and let me tell you, this one’s a winner folks. It’s soft and creamy almost to the point of richness, and I love the burst of lime flavor and those pretty little flecks of green. Oh and the graham crackers, please do not forget the graham crackers. I love hunks of things in my ice cream, bits of cookies, crunchy coffee beans, and in this case, graham crackers. I sandwiched the key lime ice cream between two digestive biscuits, and that worked marvelously as well.

I’ll still be making full fat ice creams, but it’s good to have this basic recipe in your back pocket, and I’m looking forward to trying the Thai tea version as well.


Basic Lower-Fat Ice Cream

2 cups milk (whole or 2%)
2 whole eggs
1 (14 oz) can fat-free sweetened condensed milk
pinch salt
1 tsp vanilla extract

1. Beat together the eggs in a small bowl. Place the milk, sweetened condensed milk, and salt in a saucepan and bring to a boil. Slowly add a small amount of the milk mixture to the eggs in a stream, stirring to combine. Pour the tempered eggs back into the saucepan with the milk. Return the saucepan to moderate heat, stirring constantly, until the mixture thickens enough to coat the back of a spoon (do not boil or it will curdle). Strain the mixture through a sieve into a bowl and add the vanilla. Chill the mixture thoroughly in the refrigerator (you can expedite this by placing the bowl in an ice bath and stirring to cool, then chilling in the fridge).
2. Churn the chilled custard in your ice cream maker according to the manufacturer's instructions. Store in the freezer.

Key Lime Pie Ice Cream: After making the custard, stir in 1/2 cup key lime (or regular lime) juice and 1 tsp of lime zest. Fold in crumbled graham crackers after churning, if desired.

Thai Tea Ice Cream: Heat the milk with 1 tbl of Thai tea leaves and set aside to infuse for several minutes. Strain out the tea leaves and proceed with the recipe as directed.
____________________________________________

28 August 2007

Day 17: Chocolate Sorbet


Despite not being much of a chocolate fan, I am endlessly captivated by cocoa powder. Did you know that if you heat cocoa powder and water in a saucepan it will thicken up much like pudding? The natural properties of cocoa give it great thickening power and also lend a wonderful tenderness to baked goods like cakes and cookies and a smooth mouthfeel to ice creams and gelatos.

P., who is much more of a chocolate-eater than I am (I find this role-reversal rather disconcerting), for a period took to pointing out when I did enjoy chocolate desserts, and we found that they were all of the cocoa-powder variety: silky chocolate pudding, tender chocolate shortbreads, and a wonderful cocoa Bundt cake. Freed from the heft of cocoa butter, I find that desserts made with cocoa powder take on an even more intense chocolate flavor, and are satiating without being overly rich.


All these principles exhibit themselves splendidly in chocolate sorbet. Despite the lack of dairy, and only the tiniest bit of chocolate, this is a wonderfully smooth frozen dessert that will defy you to define it as sorbet. Made primarily with cocoa powder, each mouthful packs intense chocolate flavor (and very little caloric heft). I cannot think of any better way to serve this than with a big bowl of sugared raspberries, but it’s full flavor pairs well with a multitude of desserts, from cake to tarts to my favorite beet ice cream. And I’m sure it won’t surprise you all that I actually like this even more than those rich chocolate ice creams.


Chocolate Sorbet
Smooth and full of intense chocolate flavor, this will redefine your concept of sorbet. Also, because it is wheat and dairy free it’s good choice for people with food allergies. A handful of cocoa nibs is a nice addition.

2 1/3 cups water
1 cup sugar
3/4 cup good quality cocoa powder
3 oz semisweet chocolate, finely chopped
1 tbl instant espresso powder (optional)
1 tsp vanilla extract

1. Place the cocoa powder and sugar in a saucepan. Slowly add the water in a stream, whisking until there are no lumps. Place the pan on the heat and bring the mixture to a boil, stirring constantly. When it has come to a full boil, lower the heat slightly and simmer for 5 minutes, stirring frequently.
2. Remove from the heat and immediately add the chopped chocolate and espresso powder. Stir with a whisk until the chocolate is melted and combined (you can also put the mixture into a blender and blitz). Add the vanilla, cover, and refrigerate until thoroughly chilled (at least 3 hours).
3. Give the mixture a good stir, then churn in your ice cream maker according to the manufacturer’s directions. Store in the freezer.

Variations:
Mexican Chocolate: Use Ibarra chocolate and add 1 tsp cinnamon.
Espresso-Chocolate: Use coffee in place of water, add chopped chocolate-covered coffee beans.
Aztec Chocolate: Add 1/2 tsp red pepper.
Chocolate Mint: add a splash of Creme de Menthe or a drop of peppermint extract.
Chocolate Coconut: Use coconut milk in place of the water, add 1/2 tsp coconut extract.

27 August 2007

Day 16: Sour Cream Brown Sugar Ice Cream


I don’t even really need to tell you that this ice cream is delicious. All you have to do is read the title: “brown sugar sour cream,” and know that the creamy tang of sour cream paired with the caramelly sweetness of brown sugar adds up to wonderful ice cream. One thing I’ve learned about making ice cream is to consider using a range of dairy products: sour cream, mascarpone, ricotta, goats milk, cream cheese, yogurt, all make good ice creams. Just writing this, I'm already brainstorming an idea for ice cream using Devonshire cream.


When I thought of this particular brown sugar-sour cream combination, I knew immediately I had to try it, and since all you have to do is combine everything in a blender, it was very easy. A little splash of bourbon brought everything together perfectly, and kept the ice cream soft in the freezer. My only qualm is that the texture is bit more of a sherbert than an ice cream, which is fine with me, really. I think this is very adaptable to different flavor additions: a little cinnamon, or a bit of lemon zest, even a rum-raisin incarnation. And I also shouldn’t have to tell you that this pairs beautifully with peaches.


Sour Cream Brown Sugar Ice Cream
A great ice cream with the caramelly sweetness of brown sugar and the tang of sour cream, this is also a cinch to make. I imagine you could play around with the dairy, using mascarpone or strained yogurt in place of the sour cream, though I haven't tried it.

2 cups sour cream
1 1/4 cups half-and-half
1 cup dark brown sugar, firmly packed
1 tsp vanilla extract
3 tbl bourbon

1. Place all ingredients in a blender and blend until completely smooth. Place in the refrigerator and chill thoroughly. Pour into your ice cream maker and churn according to the manufacturer's directions. Store in the freezer.
__________________________________________________

26 August 2007

Day 15: Can you guess the flavor?

You'll never guess what flavor ice cream this is, and you'll be even more surprised to know it's one of my favorites!

When I first decided I wanted to undertake this challenge, I wanted to come up with some unusual but not outrageous ice cream flavors. As I started perusing recipes, I realized there are some pretty wacky flavors out there, edamame ice cream? bacon? tomato? parsnip? After hearing all those, you start thinking some ice cream flavors sound fairly normal. Like beet ice cream. And you know what, beet ice cream is really good!


I had an idea to try a beet ice cream, though I had no idea how it would turn out and for all I knew it could have been awful. But when I first made the mixture I couldn't believe how delicious it was: I kept going back to the fridge to taste it, claiming to be “tasting for sweetness,” but really I kept going back because it was so good! Beets have a natural earthy sweetness that’s elevated with the addition of orange juice and zest. Bathed in sweet, creamy custard, it’s truly delicious.

The not-so-usual suspects.

The only problem, now that I'd made a delicious beet ice cream, was getting other people to eat it. When I gave this to some friends for a taste test, I had them try and guess the flavor. Raspberry, currant, they suggested, enjoying the bright pink cream, blood orange? They couldn’t guess the mystery flavor, but declared it delicious, and it was only after they’d downed every last spoonful that I told them it was beet. They had no idea! This has to be one of my favorite ice creams I've made, and the best part is that even after two weeks in the freezer, this ice cream was a perfect scoop-able consistency (a major victory for any home-churner).

Beets have a great affinity with chocolate (really, see below), so I like to pair this with a scoop of dark chocolate sorbet or a drizzle of chocolate sauce. It's a very easy ice cream to make, and I really urge people to try it, whether just for yourself to enjoy, or to surprise some unexpecting guests. And if you, too, find yourself eating scoop after scoop, just tell yourself you're getting your vegetables.


Beet Ice Cream

3 medium-size beets
1 small orange
8 oz (about 1 cup) sour cream
3/4 cup sugar
1/2 cup half-and-half

1. Preheat the oven to 400F. Wrap the beets in foil and roast in the oven until very tender, about 45 minutes. Remove, when cool enough to handle, peel beets and chop finely.
2. Place the beets in a blender or food processor. Add the juice of the small orange and about 1 teaspoon of the orange zest. Purée the mixture until you have a rough purée. Add the sour cream, sugar, and half-and-half. Purée the mixture until completely smooth and combined.
3. Press the mixture through a fine mesh sieve (optional). Refrigerate to chill the mixture completely, several hours or overnight. Churn in your ice cream maker according to the manufacturer’s directions.

Perfect Pairing:
Beets have a great affinity with chocolate (if you don’t believe me, check out this). Mix in chocolate chips, drizzle with chocolate sauce, or serve with a scoop of chocolate sorbet.
For adventurous audiences:
In a riff on the classic Eastern European dishes, pair beet ice cream with cucumber sorbet. You could even top it with a little sweetened sour cream and sprinkle of poppy seeds!
_____________________________________________________

25 August 2007

Day 14: Baklava Ice Cream


She's finally gone nuts.

I have found some of the best inspiration for ice cream flavors comes from other desserts, for example, s'mores, cheesecake, and pecan pralines could all make great ice cream flavors. But, it wasn’t until long after I’d brainstormed my ideas and churned many, many batches of ice cream that I thought of baklava ice cream. Surprising because I adore baklava and I’ve eaten more than my fair share of it. I've also gotten to know some of the regional differences in baklava, from Greece, to Turkey, to Lebanon and Tunisia. Though similar, Greek baklava and Arab/Levantine baklava differ in several key ways: Arab baklava uses finely ground nuts, most often pine nuts, pistachios and cashews, and the syrup is simply sugar and water scented with orange blossom water; Greek baklava often has less finely chopped walnuts, and uses honey in the syrup. I generally prefer Arab and Turkish style baklavas, but I knew the sticky-sweet Greek-style would be perfect for turning into an ice cream flavor.


Inspired by the components of Greek baklava, this ice cream has a cinnamon custard base and a crunchy honey-walnut swirl. And yes, it’s just as good as it sounds! I didn’t have any baklava on hand, so I stirred up my own filling mix, but it’s probably easier to crumble purchased baklava into the cinnamon ice cream. I love how the buttery phyllo pieces melt into the ice cream; it’s reminiscent of butter pecan but with the warmth of cinnamon and depth of honey and nuts, I think it's even better. Certainly a keeper.


Baklava Ice Cream
If recipes had subtitles, this one would read "cinnamon ice cream with a honey-walnut crunch swirl," which I think sounds pretty convincing. Although I include a filling recipe, it's easier to just chop up some purchased baklava and fold it into the ice cream.

for the cinnamon ice cream:
2 cups milk
2 cinnamon sticks, broken in half
1 cup heavy cream
4 egg yolks
2/3 cup sugar
for the honey-walnut-crunch swirl:
1 cup chopped walnuts
4 sheets of fillo dough
6 tbl melted butter, divided use
2 tbl brown sugar
1 tsp cinnamon
1/4 cup honey

1. Preheat oven to 350°F. Bring milk and cinnamon sticks to a boil in a 2-quart heavy saucepan, then remove from heat and let steep, covered, 30 minutes.
2. While milk steeps, make nut swirl. Place the walnuts, cinnamon, and brown sugar in a bowl and toss together, drizzle in 2 tbl of melted butter and toss to coat. Working quickly, brush each sheet of fillo with some of the remaining melted butter and stack the fillo sheets on top of one another, fold the stack in half long-ways and brush again with melted butter. Cut the fillo sheets into small strips, match-stick size. Toss the fillo strips with the walnut mixture and spread on a greased or parchment-lined baking sheet. Bake the mixture until the walnuts are toasted and the fillo pieces are crisp but not burned, about 10-15 minutes. Put the nut mixture in a bowl and fold in the honey. Set aside.
3. Meanwhile, strain the milk and discard the cinnamon sticks. Whisk together egg yolks, granulated sugar, and a pinch of salt in a bowl. Return milk to a simmer, then add half of the milk to yolk mixture in a slow stream, whisking until combined well. Add yolk mixture in a slow stream back to milk in saucepan, whisking, then cook over low heat, stirring constantly, until mixture is thick enough to coat the back of a spoon. Do not let it boil or it will curdle.
4. Remove from heat and immeditaely stir in cream, then pour custard through fine-mesh sieve into a metal bowl. Quick-chill custard by setting bowl into a larger bowl of ice and cold water and stirring occasionally until cold, about 15 minutes. Chill thoroughly in the refrigerator.
5. Freeze custard in ice cream maker until almost firm. At the last minute of churning, dollop the nut mixture into ice cream (if using purchased baklava, chop it up and fold it in here). Transfer to an airtight container and store in the freezer.

Serving:Don’t be dissuaded by the title, the scent of cinnamon and honey mean that this ice cream pairs perfectly with apple pie or some sautéed apples.

24 August 2007

Day 13: Peach-Buttermilk Milkshakes


The more ice creams I’ve made, the more I've come up with new flavors to try, so much so that I have many more ideas than I could ever execute. I knew my Southern relatives would be expecting me to make one of the Southern classics, like fresh peach ice cream. I also love the idea of a tangy buttermilk ice cream, but I didn’t have time to make them both! Instead, I tossed some vanilla ice cream in the blender with buttermilk and sliced fresh peaches to make milkshakes. The result was delectable: smooth, creamy, tangy, and fruity, and perfect for summer. I like the leave it on the chunky side, with hunks of peach and cold ice cream, the sort of milkshake where you need a straw and a spoon. Eitherway, this one’s a keeper!

And may I add that we are past the half-way point of the ice cream challenge (wohoo!). I love coming up with the ideas, but couldn't I get someone else to execute them for me? Because resisting the siren call of a freshly churned ice cream dasher just waiting to be licked is proving to be very difficult. Don't worry, I'm sure I'll regain my strength tomorrow.

Peach-Buttermilk Milkshakes
A quintessential summer treat, I like to leave this milkshake with a few chunks of peaches. Some other good additions include a bit of crystallized ginger or a splash of bourbon.

2-3 peaches, peeled and sliced
1 pint (2 cups) vanilla ice cream, softened
1 cup buttermilk
2 tbl brown sugar

1. Place all ingredients in a blender and blend to desired consistency.
____________________________________________________________

23 August 2007

Day 12: Olive Oil Ice Cream


Ceci n'est pas une salade: Olive Oil Ice Cream with Balsamic Chocolate Sauce

If you don’t live in Italy or New York, or haven’t spent much time there, you’re probably thinking I’m totally crazy. Olive oil ice cream, what is she thinking?! If you do live in one of those places, olive oil ice cream is probably old hat for you. In Italy, ice cream is sometimes served with a drizzle of olive oil on top and then a sprinkling of sea salt. It’s a surprising combination, but most surprising in how delicious it is, with the creamy vanilla ice cream accented by the best fruity olive oil and the mellow enhancement of good sea salt. Along those lines, Mario Batali’s pizzeria Otto started churning up an olive oil ice cream a few years ago and New Yorkers went crazy for it. It was the hot food trend everybody talked about, and you can even buy it from a special cart in Washington Square Park.


But why spend $5 on a scoop when I can make excellent olive oil ice cream at home? Even though I had enjoyed Otto’s olive oil gelato, I was still a bit skeptical about how my homemade version would turn out. And you know what, I think my version’s even better! I loved this ice cream, it’s not at all oily, and in fact the oil seems to freeze in the teeniest-tiniest little globles that give the ice cream a wonderful creamy but light texture with a burst of fruity flavor. The only specification would be that you’ll want to use the real stuff- a nice fruity extra virgin olive oil.* This is definitely an ice cream I’d encourage people to make: it’s not something you can buy at the store and it’s truly delicious.

Now that I’ve convinced you to make olive oil ice cream (really, you’re going to, right?), you have to try it with the traditional accompaniement: a few flecks of sea salt on top, or even better, chocolate covered fleur de sel. I actually chose to make a balsamic chocolate sauce and I’m pleased to report olive oil and balsamic go together just as well at the dessert table as they do at the salad bar. However, if you are trepidatious, and I quite understand that I may have gone off the deep end of flavor-experimentation, be comforted to know that olive oil ice cream pairs wonderfully with regular chocolate or sliced fruit.

* CARM, an organic Portuguese label available Whole Foods, is a good inexpensive olive oil. I’ve been addicted to the Tuscan Laudemio ever since I started using it.


"You always were a messy eater."

Olive Oil Ice Cream
Adapted from David Lebovitz.

1 1/2 cups whole milk
1/2 cup sugar
pinch sea salt
4 egg yolks
1 cup heavy cream
1/2 cup fruity olive oil

1. Whisk together the egg yolks in a small bowl. Put the heavy cream in a large bowl and set a mesh strainer on top.
2. Place the milk, sugar, and salt in a saucepan and bring to a simmer, stirring to dissolve the sugar. Add a bit of the warm milk into the egg yolks in a thin stream, stirring to combine, then add the egg yolk mixture back into the saucepan. Cook the mixture over low heat, stirring constantly, until thick enough to coat the back of a spoon (do not boil or it will curdle).
3. Pour the custard through the strainer into the heavy cream. Stir to combine, then whisk in the olive oil. Refrigerate until thoroughly chilled (3-4 hours please).
4. Whisk the chilled custard until well combined, then pour into your ice cream machine and churn according to the manufacturer's directions. Store in the freezer.

Ideas for Serving:
- Serve with a few flecks of sea salt on top.
- This goes nicely with fruit, particularly sliced strawberries or some roasted apricots.
- Serve with Balsamic Chocolate Sauce (see recipe below) or pair with balsamic ice cream.
- Drizzle some bittersweet chocolate sauce over top or make Olive-Oil Cocoa-Nib Ice Cream.

Balsamic Chocolate Sauce
1 cup good quality balsamic vinegar
2 tbl sugar
2 oz semisweet chocolate, chopped

1. Place the balsamic in a saucepan and bring to a boil. Simmer the balsamic over medium heat until the mixture is reduced to 1/4 cup (this could take as long as 20-30 minutes). Remove from the heat and immediately stir in the sugar and chopped chocolate. Stir until the chocolate is melted and everything is combined. Drizzle over ice cream or use as desired.
______________________________________________________

22 August 2007

Day 11: An Accoutrement for Your Ice Cream

chocolate covered fleur de sel
Chocolate-Covered Fleur de Sel

Though I strongly believe ice cream can stand alone as a dessert, it often cries out for accompaniment. The crunch of a waffle cone, a little drizzle of caramel sauce, all are welcome in the enjoyment of frozen concoctions. While this ice cream accompaniment may sound unusual, let me assure you it is delicious: chocolate covered-fleur de sel, yep, that's right, chocolate covered salt. Salt can concentrate and intensify flavors, a principle taken for granted in savory concoctions, and often under-appreciated in sweet ones. Remember that salted-butter caramel, or the joy of a chocolate covered pretzel? I once read about a certain gourmand who always sprinkled a bit of sea salt on his ice cream. The same concept applies here, except here it is chocolate-covered sea salt, and I promise you it will be a revelation.

While I've long been an advocate of the meeting of salty and sweet, I will admit this idea is blatantly stolen from San Francisco's fabulous Bi-Rite Creamery. Nonetheless, making your own chocolate-fleur-de-sel is a cinch, and will be the perfect accompaniment to your next spoonful of ice cream. The only specification is that you use good quality salt, something with big chunky grains, like kosher salt or sea salt, which you can find easily in your grocery store. Obviously, you'll only want a few grains per serving, but trust me once you've tried it, you'll be sprinkling chocolate-salt on every dessert in sight!

Chocolate-Covered Fleur de Sel
2 oz dark chocolate
2 tbl good quality sea salt (fleur de sel)

1. Melt the chocolate in a double boiler or in the microwave. Place the salt in a bowl and drizzle in the chocolate, stirring, just until all the salt grains are coated. Spread the mixture on a sheet of aluminum foil or wax paper, try to spread the grains out so that they are not clumped together. Set aside to harden.
2. Once the chocolates have solidified, peel them off the foil and gently rub them against each other so that they break into individual pieces, but do not rub too hard so that the chocolate comes away from the salt. Store in a covered container. Serve a few grains sprinkled over ice cream.

21 August 2007

Day 10: Orange Blossom Ice Cream

orange blossom ice cream
Anyone who's ever spent a summer in the Middle East knows how devastatingly hot it can be. One summer I was studying in Beirut when the city was plagued with power outages and humidity seeped in through every crevice. When the power would go out, leaving us without even hope of a fan, about the only thing we could muster up the energy for was a trip down the road to the local ice cream shop. Needless to say, we ate a lot of ice cream that summer and did very little studying, in part because it was so hot, and in part because the ice cream was soooo good. From almond to mango, I sampled them all, but it was the wonderful creamy-chewey texture that captured my heart. There was always a line outside the Bliss Street shop, even into the wee hours of the morning, and they always managed to keep the lights on no matter what the power supply. I wanted to create an ice cream recipe in tribute to those Lebanese who maintain a zest for life no matter what it throws at them.

However, recreating Arab-style ice cream at home turned out to be harder than I thought. First, the ice cream is made with mastic and sahlep, two ingredients that can be very hard to find. Mastic (also called gum mastic) is the resin of an evergreen shrub and has a unique enjoyable piney-taste (read more here). Sahlep is the powdered root of an orchid plant and has strong thickening abilities, kind of like arrowroot powder. The ice cream is made with all milk (no cream) and is able to stay creamy when frozen because of the thickening powers of sahlep, it even takes on a remarkable stretchy quality and and you'll see vendors kneading and stretching the ice cream at famous ice cream parlors like Bekdache in Damascus or dondurma vendors in Turkey.

Finding sahlep proved to be very difficult (most of what's offered in stores are sahlep drink mixes), and I had qualms about working on a recipe most people wouldn't have access to. The solution came when I was reading about Sicilian gelatos. Back in school, I had studied about the Arab influence on parts of Italy, Sicily's Egyptian-Mamluk architecture, as well as the influential trade between Damascus and Venice. In Sicily, where it is thought ice cream was first brought by the Arabs, the gelato is made using all milk and thickened with cornstarch. Aha, I thought, cornstarch must have been the local answer to sahlep thickener. Another theory I heard was that Sicilians eschew the eggs and heavy cream present in Northern-style gelatos because it is easier to digest in their hot cimate, something which certainly applies to the Middle East.

I toyed around with an ice cream recipe using cornstarch, and I was finally able to come up with something with a remarkably smooth texture and great flavor, somewhere between a light ice cream and a floral sorbet. It is important to cook the mixture thoroughly to remove any floury-taste from the cornstarch, or you could use arrowroot powder if your prefer. I'm still yearning to recreate the Arab-style ice creams I love, but this will hold me for now. And if there's one thing I learned living in a power-outed Beirut it's the art of making do. And of eating ic cream.

If you want to try your hand at ice cream with mastic and sahlep, I highly recommend this Booza al-Haleeb, as well as this Rosewater-Mastic recipe. Or, check out this Salon article about Orchid ice cream and Harold McGee's column on dondurma.


Orange Blossom Ice Cream
Inspired by Arab-style milk ice creams, I've adapted this so that it can be made with widely-available ingredients, but it still retains it's wonderful floral air. Though I've chosen orange blossom water, you could also flavor this with rose water and pistachios, or even infuse it with saffron. This ice cream does well when adapted with lower fat varieties.

1 1/2 cups whole milk
3/4 cup sugar
1 1/2 cups heavy cream
3 tbl cornstarch or 1 tbl arrowroot powder
1/4 tsp mastic, optional
3 tbl orange flower water

1. Stir together the cornstarch and heavy cream in a bowl, making sure there are no lumps. Place the milk and sugar in a saucepan and bring to a boil, stirring so that the sugar dissolves. Remove from the heat and stir in the heavy cream mixture. (If using mastic, grind it with 1 tbl of sugar and add it here). Return the pan to the stove and cook over moderate heat, stirring constantly. Let the mixture simmer for several minutes, until thickened slightly. Taste the mixture: make sure it does not have any floury taste, if it does, continue to simmer it until the cornstarch is cooked.
2. Remove from the heat and add the orange flower water (or other flavoring of choice). Chill the mixture thoroughly in the refrigerator, then churn in your ice cream maker according to your manufacturer's directions.
_______________________________________________________

20 August 2007

Day 9: Avocado Ice Cream

Attack of the big green monster, run, run for your lives!

Ahem, sorry about that. Obviously, ice cream making is going to my head. That big green blob in the picture up there? Let me explain. When I first got the idea to do an ice cream challenge, I immediately started brainstorming ideas. Of course, I had books about ice cream, I surfed the websites of my favorite creameries to check out their flavor lists, and I soon had a growing list of hundreds of possibilities, from parsnip ice cream to a myriad of chocolate varieties. There was an avocado ice cream on my list, but I had little intention of making it. Partly because I don't really like avocados, but mainly because this project is about exploring some of my own ideas, not just parroting recipes written down by others.

But then my friend Jesse heard I had an avocado ice cream recipe, and could he please, please come over and make it with me. Apparently, he's in the midst of an avocado phase, and I am never one to turn down an invitation to cook (or churn) for someone. Unfortunately, avocado ice cream is not the most action-packed of activities: basically you put all the ingredients in the blender and blitz, then pour the mixture directly into your ice cream machine. What could be easier? Next time he comes over I'll have to make a flambe. Then again, whenever I have friends over to cook with, we usually end up talking the whole time and I'm lucky if I don't burn everything while in an excited discussion of the latest book I read.

But back to the ice cream. As you can see, it is marvelously, shockingly (I might add frighteningly) green. I love the creamy, smooth texture, almost like a frozen mousse, and the bright bursts of lime. The only thing I didn't like was the hint of avocado flavor, but then again, I don't love avocados, and I certainly don't want them in my dessert. However, I checked back with Jesse to see what he thought; apparently, he's been rationing it because he likes it so much. In which case, I just hope I won't have to take any more order requests soon.

avocado ice cream
Avocado Ice Cream
An ice cream for avocado lovers, and an easy and tasty one at that. Adapted from David Lebovitz.

3 medium avocados
3/4 cup sugar
1 cup (8 oz) sour cream
1/2 cup heavy cream
a good squeeze of lime plus it's zest
pinch salt

1. Dice the avocados, put in a blender jar with the remaining ingredients. Blend until smooth. Pour directly into your ice cream machine and churn according to the manufacturer's directions. Store in the freezer.

Lighten up: For a lighter version, you can use half-and-half or whole milk in place of the heavy cream. You can use reduced-fat sour cream, but do not use fat free.
___________________________________________________________

19 August 2007

Day 8: Blueberry White Chocolate Tartufi

blueberry-white chocolate tartufo
Blue balls... blue ice cream balls people, get your minds out of the gutter.

When it comes to ice cream, I generally like things straight up: in a bowl, with a spoon. Don’t try to get all fancy with bombes and baked Alaskas or fancy molds. I don’t even particularly like ice cream cake, I’d rather just have one or the other (and the idea of ice cream + frosting scares me). So tartufi- those Italian truffles of ice cream balls covered in chocolate, I was never enthusiastic about them. Or that’s what I thought, until I suddenly envisioned ones made of real blueberry ice cream and covered in white chocolate. I’m a sucker for colorful foods, and this was a beauty I knew I wanted to make.

Inspired, I set to work with a pint of fresh berries. The blueberry ice cream, a flavor I never would have made otherwise, was delicious and full of flavor. While I’m not usually a big fan of white chocolate, I think it’s great when frozen solid and I loved it here, crunchy-cold and then creamy as it melts on your tongue. Do make sure to use good quality white chocolate, not just because you always should, but because some cheaper white chocolates don't melt properly, and you'll get a big gooopy mass. The tartufi were as delicious as they were colorful, if you ever had “Magic Shell” when you were a kid, this is very much reminiscent.

blueberries cookedblueberry ice cream
white chocolateblueberry ice cream

A few things I learned:
For the blueberry ice cream, I thought I’d puréed all the skins away, but obviously I hadn’t, so it’s worth it to press the mixture through a sieve before churning it.

For the tartufi, the instructions I had said to roll the ice cream balls in the sauce to coat them. Anyone who can roll ice cream balls in chocolate sauce and not make a really giant mess is a genius. Seriously, I made sure mine were frozen completely round and solid a day ahead of time, but still my fourth ice cream ball leaked, the chocolate sauce seized, it wasn’t pretty. I found it much easier to put the ice cream on a rack and pour the sauce over it. In fact, if I did this again, I’d skip the tartufi forming and just put the ice cream in bowls and pour the melted white chocolate on top. Then again, those little ice cream balls were pretty cute, and a fun thing to have on a hot summer day.


Blueberry Ice Cream
A great easy ice cream full of fresh blueberry flavor. Adapted from Gourmet.

2 cups blueberries, picked over
3/4 cup sugar
pinch salt
1 cup milk
1 1/2 cups heavy cream
2 tbl creme de cassis, optional

1. In a saucepan bring blueberries, sugar, and salt to a boil over moderate heat, mashing the berries with the back of a spoon. Simmer for about 5-10 minutes, so that the berries have burst and the mixture is slightly thickened.
2. In a blender, purée the blueberries with the milk until very smooth. Add the cream and pulse to mix. Optional: Press the mixture through a sieve into a bowl, discarding any blueberry fibers. Add the creme de cassis, if using.
3. Chill the mixture thoroughly in the refrigerator, at least 3 hours or overnight. Churn in your ice cream machine according to the manufacturer’s directions.

Blueberry-White Chocolate Tartufi
Prepare two parchment-lined baking sheets or large plates. Soften the blueberry ice cream and form it into balls, making sure there aren’t any jagged edges, use your hands if necessary. Place the balls on one baking sheet, freeze until completely firm. Finely chop 12 oz of good quality white chocolate and place in a bowl. Heat 1/2 cup cream to boiling, then pour over the white chocolate, stir until melted and combined. Working in batches, place an ice cream ball on a rack and pour some of the white chocolate over top, then place on the second prepared baking sheet. Refreeze until serving.

Variations:
I think these would be even cuter if you made tiny ice cream balls using a melon-scooper.
Don't want to form tarufi? Make blueberry-white chocolate chunk ice cream instead.
__________________________________________