06 May 2007

Rhubarb-Cornmeal Tart

rhubarb tart 1
The great thing about the proliferation of food websites and blogs is the ease of sharing ideas and recipes, so many beautiful things to make! These days, I'm just as likely to open up a website rather than the cookbooks that line my shelves when I have a culinary query, and the folded corners of favorite recipes are being challenged by the bookmark tab on my internet browser. Though nothing will supplant the tomes I treasure, I love the immediacy of blogs, and the intimate view into indivual kitchens. With great sites from all corners of the globe, I've learned about exotic fruits, unusual pestos, and French home baking, straight from the source. Reading some of the great sites out of Australia, I'm often reminded how our seasons are flipped, as I huddled at the screen in my cold apartment they wrote about barbeques and ice cream. When I saw this rhubarb tart back in September, I knew I wanted to make it, but it would be six months before rhubarb would be in season!


However, the rhubarb tart (the original version much more visually stunning than mine), stuck in my head, so much so that I even picked up the proper pan for it at an after-Christmas sale. In March, I trawled markets in hopes of early rhubarb, but it was still woefully cold and dreary. Finally, rhubarb has arrived and I got right to the tart. Another thing I've learned from reading blogs is to be comfortable in the metric system, converting grams, ounces, and cups. This tart was worth the wait, and the effort, as it was really delicious. My only regret was that it didn't have more rhubarb- I'll place the stalks more closely together next time. It's not too sweet, so I didn't feel too guilty nibbling on a piece for breakfast one morning. Thanks to Haalo for the recipe, and with apologies to those in the southern hemisphere, expect more rhubarb to be featured here soon!

rhubarb tart 2

Rhubarb-Cornmeal Tart
With a buttery crunchy crust, a creamy filling, and tangy rhubarb topping, this tart's a winner any time of day.

for the pastry:
1 1/2 cups flour
3/4 cup powdered sugar
1 stick (1/4 lb) butter
1 egg
for the cornmeal cream:
1 1/2 cups milk
1 tsp cinnamon
1/3 cup sugar
1/3 cup white cornmeal or semolina
2 egg yolks (or 1 egg)
for the rhubarb:
rhubarb stalks
1/2 cup sugar plus 2 tablspoons

1. For the pastry crust: Combine the flour and powdered sugar in a large bowl. Cut the butter into small pieces and add to the bowl, crumble the mixture together with your fingertips until it resembles coarse meal. Stir in the egg until the mixture just comes together (you could also make the dough in a food processor). Turn the dough out and knead just to make a ball. Flatten it into an ovular disk, wrap it in plastic wrap and chill briefly, half an hour to an hour. Roll the dough out and fit it into a rectangular tart pan (or a round 8" pan). Cover and place in the fridge or freezer to chill thoroughly.
2. For the cornmeal cream: Combine the milk, cinnamon, sugar, and cornmeal in a saucepan and bring to a boil, whisking constantly to prevent lumps. Lower the heat and simmer the mixture, stirring, for 3-4 minutes, until thickened and no longer gritty. Remove the saucepan from the heat and let cool slightly. Stir in the egg yolks until well combined. Press a piece of plastic wrap directly onto the surface of the mixture and set aside or refrigerate until ready to use.
3. Blind bake the tart shell: Preheat the oven to 350. Place baking paper and pastry weights inside the chilled tart shell. Bake the pastry for 15 minutes, then remove the weights and paper and bake another 5-10 minutes, until the pastry is dry and just golden on the edges. Remove and allow to cool slightly.
4. Bake the tart: Spread the cornmeal cream inside the blind-baked tart shell. Slice the rhubarb and layer it over the cornmeal cream, placing the pieces close together. Sprinkle the 1/2 cup sugar over the rhubarb. Cover the tart with foil and bake in a 350 degree oven for 20 minutes, then remove the foil and bake another 15-20 minutes, until the rhubarb is tender. Sprinkle the remaining 2 tablesppons of sugar over the tart and, using the broiler or a blowtorch, briefly caramelize the sugar. Serve warm or at room temperature.

__

03 May 2007

Artichokey


The first time I saw an artichoke growing in its natural form was driving through the Bekaa Valley of Lebanon. It had been a confusing day: touring a vineyard and a wine tasting that could have been in France, an annoying Hezbollah checkpoint, passing the odd Roman ruin in the desert. Driving through the semi-arid landscape, there was a whole field of large spiky-leaved plants with tall stalks, “artichokey” said my seat-partner as I looked wide-eyed at the giant thistle-like plants. It is thought the Arabs were the first to cultivate the artichoke while trying to copy Italian cardoons (though Italians, I am sure, would claim primacy). Minutes later, our bus made a crashing turn off the highway and barreled down a dirt road, stirring up dust in a landscape of fields and farms and which was alarmingly devoid of any buildings as far as the eye could see. That is, until we pulled up to a long low restaurant. Situated amongst the artichoke fields, it’s interior revealed bubbling fountains and a packed house of patrons at 3 in the afternoon. Like any good adventurous traveler, I knew I was in for a delicious and lengthy meal.

Previously, my acquaintance with artichokes had been every spring, when my mother would buy artichokes and steam them and we would peel the leaves and dip them in a big bowl of clarified butter, the tooth-torn leaves piling up on our plates as we ate our way towards the meaty heart. Now, half-way around the world, along with the plates of hummus and tabboule, came big steaming platters of artichokes with nutty butter for dipping: the same preparation, only with the odor of nargileh swirling and the strains of Amr Diab overhead. That afternoon there were also artichoke-bottoms, deftly scooped out and filled with a meat and pine nut stuffing, then covered in tomatoes and béchamel sauce and baked, but it was those leaves I savored the most.

A friend of mine has long-praised a shaved artichoke salad, and this season I decided to give it a go. Just like seeing those artichokes in the field, this salad was a whole new perspective on the vegetable. Like a high school reunion where the dorky kid with the braces and thick glasses returns tall, blonde and enviously successful, so my artichoke transformed into elegant crunchy slivers layered with sharp cheese.

There’s no getting around the fact that trimming the artichokes is a major pain, something to be done only when the season inspires or when enough time has passed that you’ve forgotten the curses you uttered the last time you did it. My own messy process looked much like a a child in a chicken coop, knives and feathers flying. However, you really shouldn’t let that dissuade you, because this salad is truly delicious. It has me wishing (once again) that American markets sold pre-prepped artichokes. I happened to have an asian pear laying around, and a few sweet slices of it paired wonderfully well with the salad, but I imagine some slivers of peppery fennel would also work well. Either way, I hope you are enjoying springs bounty in artichokes and otherwise.


Shaved Artichoke Salad
This flavorful crunchy salad is worth the annoyance of prepping the artichokes. Serves 2-3.

3 artichokes
4 oz parmiggiano-reggiano cheese
1 asian pear (optional)
3 tbl lemon juice
3 tbl olive oil
1 tsp mustard
pinch salt
2 tbl finely chopped parsley

1. Fill a shallow bowl with water and add 1 tablespoon of lemon juice.
2. Pull off the external leaves of the artichoke and cut off most off the top. Pull away the leaves and use the knife to pare away everything but the meaty bottom of the artichoke, scooping out and discarding the fuzzy choke. Place the artichoke bottom in the acidulated water to prevent browning and repeat with remaining artichokes.
3. Using a mandoline or a sturdy vegetable peeler, shave the artichoke bottoms over the bowl, letting the shavings drop into the acidulated water.
2. In a small bowl, whisk together the remaining 2 tablespoons lemon juice, olive oil, mustard, and salt. Drain the artichoke slivers and toss with the dressing to coat. Thinly slice some of the asian pear (I usually only use about half), and add to the bowl with the chopped parsley, toss everything to combine.
3. Place half the artichoke mixture on a serving platter. Shave some of the cheese over the artichokes to cover in a thin layer. Cover with the remaining artichoke mixture, then shave more cheese over top. Serve immediately.

__

01 May 2007

Spring for Green

spring risotto
Last weekend spring finally decided to burst forth, the kind of weather that makes school children gaze longingly out the window, that makes your toes seek the wiggling freedom of flipflops. A weekend that defies you to stay indoors, much less in the kitchen. However, we were having friends for dinner and in addition to throwing open all the doors and windows, I could at least surround myself with the produce of the season. “I hope you like green things,” I asked our guest, noting the array of artichokes, arugula, spinach, asparagus, and peas that littered the kitchen, “I just couldn’t help myself.”

I had remembered a recipe for a risotto made green with spinach, and since I think risotto should not be just a bowl of cheesey rice, I thought I’d brighten it with asparagus and peas. All went well as I stirred and stirred, and soon we were sitting down to dinner and talking and talking and laughing and eating. Oftentimes, this is what good food is for, to serve as the backdrop, a mere supporting role. But when I went back to think about it, I couldn’t remember, was the risotto good? Should it be faulted for not sealing the show? Did it need more cheese?

When revisited, this risotto did indeed hold it’s own at the table. It is light and subtle but also wonderfully delicate and satisfying at the same time. And if your conversation usurps your meal, that’s ok too, because that is what the joy of good friends and good food is all about.


Spring Green Risotto
This risotto turns a lovely green color from the spinach. It is meant to make use of the best spring produce, but is good any time of year. Serves 3-4.

2 tbl olive oil
1 shallot, chopped
1 garlic clove, minced
1 1/4 cups arborio rice
1/2 cup white wine
4-5 cups vegetable stock
10-12 spinach leaves
1 cup spring peas
about 2 cups asparagus tips
1 cup grated parmesan cheese

1. Bring a pot of water to boiling. Add the peas and asparagus tips and blanch until just bright green, about five minutes. Drain the vegetables into a colander and rinse under cold water to stop cooking. Set aside
2. Put the vegetable stock in a pot and maintain on a simmer on the stove top.
3. In a wide large pan or deep skillet, heat the olive oil over medium heat. Add the shallot and garlic and saute until just softened and golden. Add the rice and stir so that each grain is coated with oil and the grains begin to turn opaque, a couple minutes. Stir in the half cup of white wine, scraping up any browned bits in the pan. Stir constantly until the wine has been absorbed and the pan begins to look dry. Stir in half a cup of the warm stock and stir constantly in a gentle circular motion, until the stock is absorbed. Continue this process, stirring and adding more stock when necessary.
4. After about twenty minutes, begin checking the rice for doneness, you want it to be creamy but the grains should still be slightly al dente. It may take another 10-15 minutes depending on the size and type of pan you are using. You may not need all the stock.
5. When the rice is almost done, rinse the spinach leaves well and put them, with the water still clinging to them, into the food processor. Process until you have a puree. Immediately stir in the spinach puree into the risotto, and add the asparagus, and peas. Cook, stirring, another 3-5 minutes, for everthing to incorporate. Remove from heat and stir in half of the cheese. Serve immediately, passing the remaining cheese alongside.
__

29 April 2007

Chocolate Crêpe Cake


I always thought of myself as the obedient type. In grade school, I walked in silent single-file lines in the hallway, my report cards read “does well with structure.” As a dancer, I spent years obediently following choreographers’ directions, twisting my body into odd positions, wordlessly repeating difficult battements and saut-de-chats. But something seems to have happened along the way, because I think I’m developing a little rebellious streak.

I joined a baking group with the simple premise of baking one “challenge” each month, and then sharing all our results online. The idea rests upon everyone following the directions precisely, in order to accurately compare notes. It all seemed fine, until I got into the kitchen. You see, when it comes to recipes I’m not terribly obedient, if I think it can be done better, faster, easier, or more conveniently, I will do it. Over the years, I’ve learned my lessons, I know where I can fiddle and where I should listen to the recipe’s advice, that homemade stock is worth the extra-time, that making your own crystallized ginger is overrated. As I confronted the recipe for a towering cake made of layers of chocolate crêpes, my tweaking-fingers began to twitch.


It didn’t help that it was a Martha Stewart recipe, I’ve never made a recipe of hers that was not flawed or disappointing; they may look good on the page but in my experience they are hit-or-miss (usually miss) in the kitchen. I eyed the recipe skeptically: all that melted chocolate in the crêpe batter and so little flour, wouldn’t they stick to the pan? I made a small test batch, and indeed they were difficult to work with and somewhat gummy in texture. It was not so much an act of outright insubordination but rather one of spontaneous inspiration as I swapped out some of the chocolate for some cocoa powder and upped the flour content. Not loyal to my assignment, but I was much happier with the result.

Then there was the issue of the filling, which contained nearly a pound of butter and almost a cup of cream, in addition to all the other chocolate, butter, cream, and sugar in the cake’s other components. I’m all for using real butter and cream and such, but this seemed a bit excessive, and luckily the group member responsible for this challenge had said we could use whatever filling we liked. 
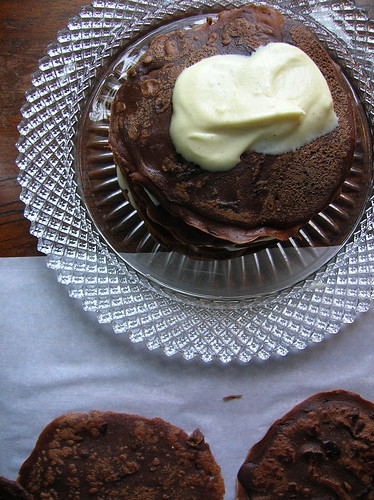
Phew, a little leeway. I decided to make a light pastry cream filling, spiked with rum. This ended up being the best part of the whole experience, the rummy pudding, I was afraid I would eat it all before I got to use it on the cake.


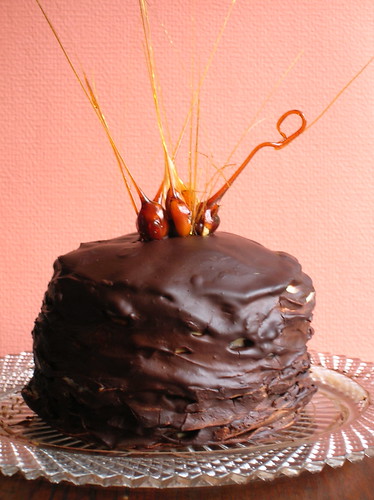
The remaining assembly and glazing was simple, and I proudly put my cake into the refrigerator at night, thinking how I would impress our luncheon guests the next day. And then, in the middle of the night I woke up and thought: the nuts. The cake was supposed to be topped with caramelized nuts. Which is why I could be found at 8 am on Sunday morning, in my pajamas, newspaper strewn across the kitchen floor, spinning caramel strands of hot sugar. Hot sugar, my friends, at 8 am.

In the end, the cake was delicious, gorgeous, and everyone loved the candied nuts on top. It was even better the second day, when all the components had a chance to meld and blend with each other, and I’ve tucked the filling recipe away to be served on it’s own as a simple Rum Pudding. But more than the cake, I learned something about myself along the way: that the kitchen is my space for experimentation and learning. All those years dutifully following directions, I would come home and cook dinner, and revel in the fact that there was no one telling me what to do. Measuring cups and spices are my paintbrushes and pigments. I’m not a complete rebel, I will turn out a crepe cake for you, I will caramelize your nuts and spin your sugar, but I will do it my way.

To find links to other crêpe cake experiences, click here. Also, a lot of participants had major problems with the recipe, so I’ve written out my tweaked version below and I hope you will reap the benefits. Just hope I don’t get fired for insubordination.
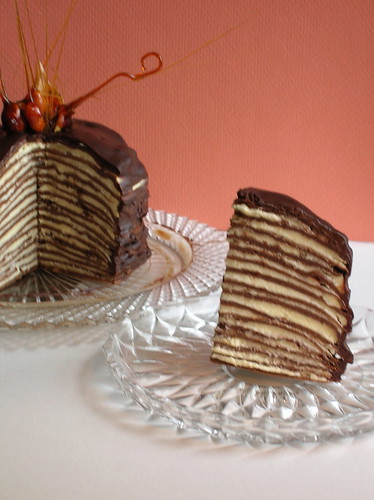

Chocolate Crêpe Cake
Admittedly, this cake has many components and is a bit of a time investment, however it yields an impressive and delicious result. I would advise making the crepe batter and filling two days before, then make the crepes the day before and finally do the finishing touches and assembly. It also keeps well.

Chocolate Crêpes
1 1/2 cups milk
2 tablespoons vanilla extract
3 eggs
1/4 cup sugar
1 1/4 cups sifted all-purpose flour
1/4 cup sifted cocoa powder
1 teaspoon salt
4 tablespoons butter
3 oz chocolate
oil or melted butter for brushing on the pan

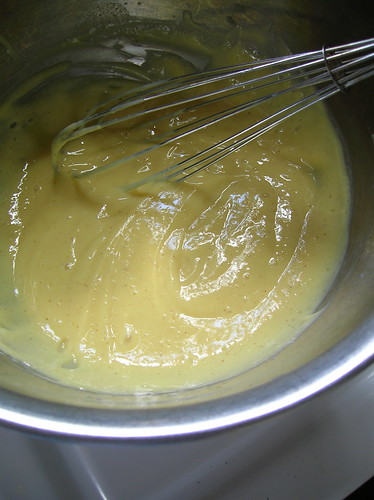
1. Melt together the chocolate and the butter, set aside. Place the milk and vanilla extract in the blender. Add the egg, sugar, salt, then the flour and cocoa powder. Finally, add the butter mixture and blend on high speed 30 seconds.
2. Scrape down the sides of the blender and blend on high speed 30 seconds more. Cover and refrigerate overnight (this is important, letting the batter rest).
3. Heat an 8" crêpe pan or skillet over med-high heat, brush with a little oil or melted butter.
4. Using a 1/3 cup measure (this will help ensure your crêpes are the same size), fill it with batter and pour it into the skillet. Immediately pick up the pan and tilt and swirl it to form a round crêpe. Because the crêpe batter is delicate, you’ll want them a little thicker than usual.
5. Loosen the edges of the crêpe with a metal spatula, gently sliding the spatula under the crêpe as it sets. The crepes may take longer than you expect to cook on the first side, and may threaten to stick, work them gently with the spatula and be patient. When the top is well set and you have loosened the crêpe with your spatula, flip to the second side and cook for only about a minute longer. Slide it to a plate or work surface.
6. Repeat with the remaining batter. You should have at least twenty good crêpes.

Rum Cream Filling
2 eggs
2/3 cup sugar
3 tbl cornstarch
2 1/2 cups low fat milk
1 vanilla bean
2 tbl butter
2 tbl rum (or to taste)

1. Beat the eggs together in a small bowl.
2. In a small bowl, dissolve the cornstarch in about 1/2 cup of the milk, stirring until smooth. Combine the sugar, remaining milk, and cornstarch mixture in a saucepan, stirring so everything is combined. Slit the vanilla bean with a knife and scrape the seeds into the pan (reserve pod for another use). Gradually bring the mixture to a simmer over medium heat, stirring constantly. Let the mixture come to a boil, then remove from heat and whisk a small amount of the milk into the eggs. Scrape the egg mixture back into the saucepan. Continue to cook over medium heat, stirring constantly, until the mixture is thick enough to coat the back of a spoon, like pudding. Remove from heat and stir in the rum and butter.
3. Press plastic wrap onto the surface of the cream and store in the fridge.

Chocolate Glaze
3/4 cup heavy cream
1 tbl light corn syrup
8 oz semisweet chocolate, finely chopped

Bring the cream and corn syrup to a boil in a small saucepan. Remove from heat and stir in the chocolate. Let sit about five minutes, then stir until smooth. Let cool to room temperature before using to glaze cake.
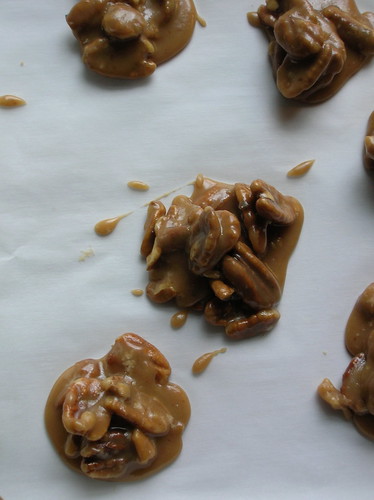
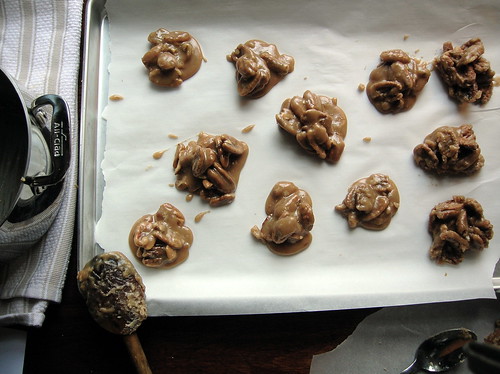
Candied Nuts
9 hazelnuts
1 cup sugar

1. Prick each hazelnut onto tip of a toothpick; set aside. Place a cutting board along the edge of a countertop; set a baking sheet on floor next to edge.
2. Cook sugar and 1/4 cup water in a medium, heavy saucepan over medium heat, stirring occasionally, until sugar has dissolved. Continue to cook, without stirring, until syrup comes to a boil. Watch the mixture closely and let boil until syrup turns light amber, about 5 minutes; remove from heat. Let stand until slightly cooled, 8 to 10 minutes.
3. Dip 1 skewered hazelnut into syrup, coating completely and letting excess syrup drip back into pan. When dripping syrup begins to form a thin string, secure end of toothpick under the cutting board, letting caramel string drip over edge onto sheet. Repeat with remaining hazelnuts. You may want to pour more syrup over the nuts to make the strings thicker Let stand until caramel has hardened, about 5 minutes. Break strings to about 4 inches. Carefully remove toothpicks.

Assembly
1. Place a crepe on your serving platter. Use a spatula or a pastry bag to spread some of the cream filling thickly over the crepe, spreading almost, but not quite, to the edges. Repeat layering until all the crepes are used up. If your cake threatens to lean once you’ve assembled it, insert a heavy-duty plastic straw or a wooden skewer in the center.
2. If necessary, reheat the glaze until just pourable, but not hot. Gently pour the glaze a little bit of the time over the top of the cake, letting it run down the sides, and spreading it along the sides with a spatula. Once the cake is glazed, scrape away all the excess glaze from your serving plate and neaten the bottom edges. Place in the fridge to set. Garnish with nuts before serving.
3. To slice, run a sharp knife under very hot water. Wipe off the excess water, then use the hot knife to slice the cake, rinsing the knife after each slice. This cake keeps for several days in the fridge and is even better on the second and third days.

__

26 April 2007

Why I Live At The P.O.


Two people meet, they fall in love, they share a wonderful summer together, and then they are forced to part. It's a typical love story, one echoed over and over in literature and clichéed in summer romances. My own love story is much the same, with one slight variation: we met, we fell in love, were forced to return to our separate cities, and then the packages began.


My mother instilled in me a love of the postal system: she is one of the few people I know who still sends handwritten letters; traveling in southern France one summer, we stopped at the local post office of each tiny town, sometimes to send a postcard or buy stamps, often with no particular purpose in mind. Now, my mother and I exchange postcards constantly, often with nothing written on the back other than the address, a visual way of saying hello.

My boyfriend and I have lived a short plane hop apart and with as little as a few tangled inches of sheets and as much as 5,663 miles between us. When you love someone that much, you count the miles, the minutes, the inches. We have amassed cell phone minutes and Skype bills and frequent flier miles, and peppered the post with letters and packages.


As a girl that loves to bake, I found my perfect excuse, wrapping up boxes of my mom's stellar chocolate chip cookie recipe, baking macaroons late at night. I nibble at edges, sneak a cookie or two, and then quickly wrap them for mailing lest I pilfer the whole batch. Concerned I might be damaging his glycemic level, I have even made crackers and baked breads, if I could have made and mailed a curry, I would have. I won't pretend every confection was perfect, he has been victim to my baking experiments, low-fat baked goods that probably didn't travel well, but each has been stirred with love.

There were lessons along the way, explaining to my London-born companion what a praline was, about eating them every summer in the market in Charleston, about the low-country cuisine of my youth. Those sugary pecan confections were a hit, even the little crumbly bits at the bottom of the tin, and the parts I scraped out of the pan and crunched from the spoon. There have been lessons of other kinds as well, that distance can be surmounted by dedication, but also that distance can be difficult, and that a box of cookies can't solve everything.


Pecan Pralines
These wonderful confections may take a little practice to get right, but even the not-so-perfect ones will still taste great. Some people prefer to add all the pecans at the end but I like to add half of them at the beginning, so they get a nice toasty flavor without over-crowding the pan.

3 cups brown sugar
2 cups pecan halves
1 cup buttermilk or whole milk
4 tbl butter
1 tsp salt
1 tbl vanilla
special equipment: candy thermometer

1. Line 2 baking sheets or a work surface with parchment or wax paper. Get two large metal spoons and rub them with butter or oil to grease.
2. Place the sugar, buttermilk, butter, salt, and half of the pecans in a medium-sized heavy duty sauce pan. Place over medium heat and stir so that the sugar dissolves. Bring to a boil and cook over medium-high heat until the mixture just reaches 236 F, about 15 minutes.
3. Remove the pan from the heat, add the vanilla and remaining pecans, and stir the mixture rapidly until it just begins to lose its shine, only about one minute. Working very quickly, use the two greased spoons to dollop out pralines onto the parchment. Don't worry if it seems runny at first, the mixture will begin to set very quickly. It's better to start sooner and have a runny one at first then risk having them harden in the pan.
4. Let sit until firm, store in an air-tight container at room temperature.

Note: Inevitably, your last few pralines might be less then pretty, but they'll still taste good. There will probably be some stray sugary pecan bits stuck to the pan, these are excellent crumbled over vanilla ice cream. In the unfortunate event your mixture hardens very quickly, you can pass off the nuts simply as sugared pecans.
__

25 April 2007

Copycat


Most restaurants have a whole slew of kitchen staff, special equiptment, an arsenal of ingredients, and a luxury of time to prepare the dishes they serve. When eating out, I like to enjoy the whole experience, the food, the company, letting someone else do the work, and while I often get ideas and inspirations from dining in restaurants, I rarely try to replicate a dish for the reasons I’ve just listed. (And after reading Bill Buford’s latest article, I’m really glad I don’t work in a restaurant either). I am, at heart, a home cook, I like simple things, and am perfectly happy making lunch out of some fresh fruit and slices of cheese and bread.

However, the other day when I had stopped by the store to pick up a lone red pepper, I emerged with a bag of groceries and a restaurant dish in mind. Some beautifully plump scallops had reminded me of a dish I had recently, and soon I was in the produce department getting asparagus to go with them. When I inquired about salsify, a black root also known as oyster plant, to my surprise the grocer went into the back and brought out a 3 pound bag which he let me pick from; my project was underway.

The preparation here is quite simple and I was very happy my improvisation turned out a dish just as good as the one I had, or at least a fascimile I'm satisfied with. Salsify does in fact taste remarkably like oyster when it is cooked in milk, however (fear not!) in this preparation it has a mild, almost sweet taste. The scallops, crispy on the outside, were positively creamy inside, and along with the asparagus, made use of the best of the season.


Seared Scallops with Asparagus and Salsify
This is an impressive dish with a very simple preparation. You can make this dish richer by adding milk or cream to the sauce, or lighter by cutting back on the butter. Serves 2.

1 bunch fat asparagus
1/2 lb salsify, also known as oyster plant
6 large scallops (about 3/4 lb), or more for a main course
3 tbl butter
1 tbl olive oil
1 tsp salt

1. Trim the bottoms from the asparagus then use a vegetable peeler to peel the bottom half of the stalks. Peel the salsify to remove all black parts, cut into 6 inch pieces and halve lengthwise.
2. Fill a large skillet with about 2 inches of water and bring to a boil. Add the asparagus and salsify to the skillet, they may not be submerged completely, that’s ok. Simmer for about 7 minutes, turning, until the asparagus is tender. Using tongs, remove the asparagus to a bowl and let the salsify simmer another 5-10 minutes, until the salsify is somewhat translucent and tender when pierced with a knife, kind of like a carrot. Remove salsify to the bowl with the asparagus. Drain the cooking water into a separate bowl and reserve.
3. Wipe out the skillet and melt one tablespoon of the butter with the olive oil over medium-high heat. When the foam has subsided, add the scallops and sear until browned on one side, about 5 minutes. Turn and brown on the other side (cooking time may vary depending on size and water-volume of scallops). Set scallops aside.
4. Add about a cup of the salsify cooking water to the pan, scraping up any brown bits from the bottom. Stir in the remaining 2 tbl butter and the salt. Simmer just for the sauce to combine.
5. Arrange the aspargus and salsify on 2 plates, top each with three scallops, then pour the warm sauce over top. Serve immediately, with bread to soak up the sauce.

Dress Up: Drizzle a little white truffle oil over or use lobster butter in the sauce.

__

22 April 2007

A Homecoming, With Ice Cream


Blame my mother. As a child, I was chronically underweight- I liked vegetables, I pushed away meat. When the doctor asked what foods I liked, my mother said ice cream, and he instructed her to give me ice cream every day. So my mother, the only person I can think of who seriously dislikes ice cream, dutifully walked me to the local creamery every afternoon. Little did she know what she was starting, a life-time love affair with concoctions cold and creamy.

Every culture and region seems to have a love and appreciation of ice cream, and I’ve had the pleasure and experience of sampling many of them. There was Capogiro in Philadelphia, Blue Bell in Texas, Jeni’s in Columbus, almond cookie under the Brooklyn Bridge and olive oil flavor in Washington Square Park. Daily summer visits to the Novelty on Monhegan Island. A Heath Bar Blizzard from the DQ carefully balanced on the handlebars of my bike in the melting summer heat. A trip to Paris isn’t complete without a visit to Berthillon and Dammien and on a 10-day trip to Tuscany, I once dragged my poor mother to a different gelateria almost every afternoon. I don’t normally like chocolate, but my mind was changed by a transformative scoop in Barcelona. In Damascus, the ice cream is kneaded by gloved hands at Bekdache, in Turkey the dondurma is thickened by sahleb, powdered orchid root.


Ice cream has become part of my persona, if I’m in a bad mood P. knows an afternoon scoop will brighten it (a technique he’s been known to use shamelessly). Naturally, I’ve also tried my hand at making my own. When I was young, we made ice cream every year at the fourth of July, churned in an old-fashioned bucket with rock salt; my mother always made the churning part sound really exciting, which worked just long enough for each child’s arm to get sore. Somehow we all managed to get duped into this every year. The ice cream was fantastic but it melted quickly and didn’t keep well in the freezer, good for only one day a year. Since then, I got a proper ice cream maker, but despite trying many recipes, I was never able to churn out a version I was happy with. My homemade ice cream often froze too hard or didn’t keep well, and never quite seemed worth the effort. I figured I couldn’t match the quality of commercial ice cream machines or the stabilizers in purchased pints, and left the machine’s bowl to languish in a back corner of the freezer.

Until last week, when I made one of the best ice creams I have ever tasted, hands down. What with all my tasting history that is no small claim, but I hope you’ll believe me, and then excuse me while I do a little dance of joy. Could something so delicious come from my own kitchen? I can’t take much credit because all I did was follow a recipe by David Lebovitz who described it so convincingly, I knew I had to make it. It’s a salted butter caramel, one of my all time favorite flavors, a deep rich caramel tinged with hints of sea salt. We’re already on our second batch in less than a week (we had company, ok?), and I still can’t keep myself from sipping the custard with a spoon.

A few things I’ve learned: make sure to chill your custard thoroughly before churning it, overnight is best. Since ice cream doesn’t do well in the freezer for a long time, I find it’s best to make it in small batches. With this particular recipe, I divided the custard in half and churned half of it after it’s initial refrigeration. Two days later, when we had finished that batch, I churned the remaining custard which I had stored in the fridge. This has the double advantage that you only have to make the custard once, and churning small batches reduces the freezing time, so it’s ready in only 15 minutes. You don’t need any fancy machines, I used an inexpensive Cuisinart ice cream maker and was completely pleased with the results.

David has a new book about ice cream, and I have to say, it’s a really great cookbook, very thorough in technique, with both classic and contemporary flavors, and lots of hilarious anecdotes. I’m already itching to try the Prune-Armagnac and the Fresh Fig ice creams. You can find recipes online for his Roasted Banana and Coffee Ice Creams, as well as his classic vanilla. But first, make this ice cream, it’s one of the best I’ve ever had, trust me on this one, I should know.

Salted Butter Caramel Ice Cream
Please, please, please use a good quality salt, such as sea salt or fleur de sel. This ice cream takes a small amount of extra effort, but is worth every bit of it, one-hundred fold. The crunchy praline bits add a nice contrast in texture and only take an extra ten minutes to prepare. Yield 2 pints. Adapted from David Lebovitz.

For the praline (mix-in):
1/2 cup (100 gr) sugar
1/2 teaspoon sea salt, such as fleur de sel
For the ice cream custard:
2 cups (500 ml) whole milk
1 1/2 cups (300 gr) sugar
4 tablespoons (60 gr) salted butter
1/2 teaspoon sea salt
1 cup (250 ml) heavy cream
4 egg yolks
1/2 teaspoon vanilla extract

1. To make the praline: spread the 1/2 cup of sugar in an even layer in a medium-sized, heavy duty saucepan. Line a baking sheet with aluminum foil and brush it sparingly with unflavored oil, or use silpat.
2. Heat the sugar over moderate heat without stirring until the edges begin to melt. Use a heatproof utensil to gently stir the liquefied sugar from the bottom and edges towards the center, stirring, until all the sugar is dissolved. (there may be some lumps, which will melt later) Continue to cook, stirring infrequently, until the caramel turns deep brown and starts smoking. It won't take long.
3. Without hesitation, sprinkle in the 1/2 teaspoon salt without stirring, then quickly pour the caramel onto the prepared baking sheet and lift up the baking sheet immediately, tilting it to encourage the caramel to form as thin a layer as possible. Set aside to harden and cool. Reserve saucepan, don’t wash it.
4. To make the ice cream: make an ice bath by filling a large bowl or tub about a third full with ice cubes and adding a cup or so of water so they're floating. Nest a smaller metal bowl (at least 2 quarts) over the ice, pour 1 cup of the milk into the inner bowl, and rest a mesh strainer on top of it.
5. Spread 1 1/2 cups sugar in the same saucepan in an even layer. Cook over moderate heat, until the sugar melts completely and is a deep caramel-brown, using the same method described in Step 2.
6. Once the sugar is melted and caramelized, remove from heat and stir in the butter and salt until butter is melted, then gradually whisk in the cream, stirring as you go. The caramel may harden and seize, but return it to the heat and continue to stir over low heat until any hard caramel is melted (this may take a while). Stir in the remaining 1 cup of the milk.
7. Whisk the yolks in a small bowl and gradually pour some of the warm caramel mixture over the yolks, stirring constantly. Scrape the warmed yolks back into the saucepan and cook the custard, stirring constantly until the mixture thickens enough to coat the back of a spoon (160-170 F). If the mixture threatens to curdle, immediately remove from heat and beat rapidly.
8. Pour the custard through the strainer into the milk set over the ice bath, add the vanilla, then stir frequently until the mixture is cooled down. Refrigerate at least 6 hours or until thoroughly chilled.
9. Freeze the mixture in your ice cream maker according to the manufacturer's instructions.
10. While the ice cream is churning, crumble the hardened caramel praline into very little bits, about the size of very large confetti. Add the caramel bits to the ice cream at the end of churning, just before turning off the mixer.
11. Pack the ice cream into containers and chill in the freezer until firm.

Variations: Add a tablespoon of rum to the custard. Substitute chocolate chunks or cocoa nibs for the praline mix in. Add a bit of espresso or some crushed coffee beans for Coffee-Caramel ice cream. It would also be good served with some sauteed apples or over apple pie.
__