12 July 2007

Hummus Dilettante


In general, I am fairly open to different interpretations of dishes, I am not one of those pedants who will tell you couscous must absolutely be made in a special clay pot, or pasta has to be made with just that flour. However, having lived in the Middle East, there are some offenses committed against Middle Eastern/Arab foods that really get under my skin. To name two basic staples: hummus and tabboule. My irritation stems less from the misappropriation of these dishes, but rather that these dishes are so good when properly made that people have no idea what they are missing.

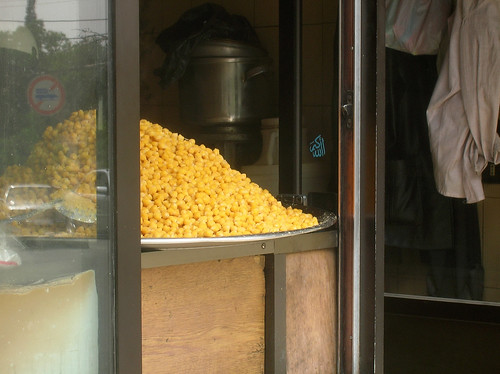
Let's start with that ubiquitous staple: hummus, or it's full name hummus bi tahine. But first let me reveal something: few people living in Middle Eastern cities make their own hummus. They buy it, from hummus vendors, often called hamsani. Just like the French purchase their croissants and Italians buy much of their pasta, Levantine cities have hummus shops on every corner. These shops sell freshly cooked chickpeas, hummus, and dried fava beans called foul. There's usually a few little tables or a counter to eat a bowl of hummus and a takeout counter where hummus is sold by weight in plastic bags. Now, let's get to some of the qualities of good hummus:


One of the important attributes of hummus is that it is a smooth consistency, which is where many attempts at hummus fail. The traditional tool for this is a food mill, but a food processor or blender can work equally well. Another key to the smoothness of your hummus is the chickpeas themselves: the chickpeas should be cooked so that they are meltingly soft and the outer skins have fallen away. In fact,, I really find that the best, smoothest hummus comes when you peel the chickpeas. And yes, this sounds crazy, but it really doesn't take much time (you just sort of pinch them and they pop off) and it makes a vast improvement in the texture of your hummus.

Secondly, the word hummus means 'chickpea.' You are free to mix many things into your hummus, but the base ingredient should remain chickpeas. Not white beans, not red peppers, not olives nor beets. It's totally fine if you use these things, but please use a name other than hummus. There are lots of good variations on hummus that I've listed below.

I've always said one of the keys to Arab cooking is the copious use of lemon juice in everything, and that holds true for hummus. Fresh lemon juice is best. Also, garlic and spices shouldn’t overwhelm, but this can vary on personal taste.

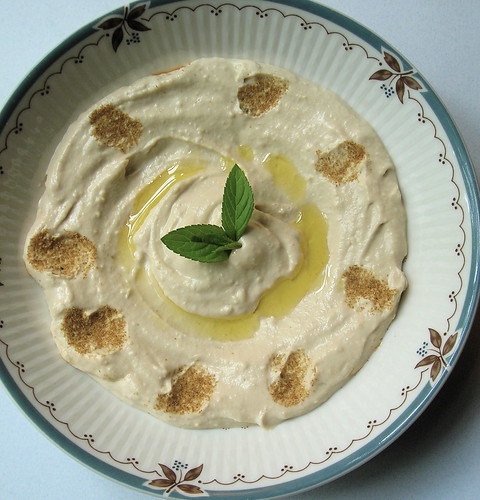
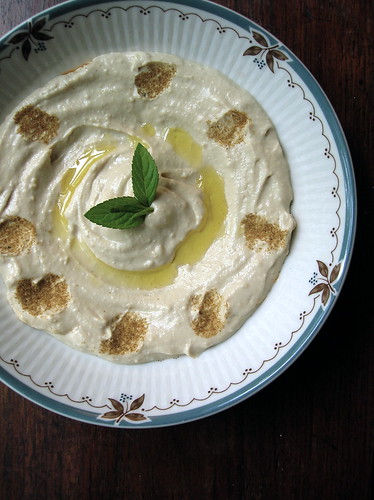
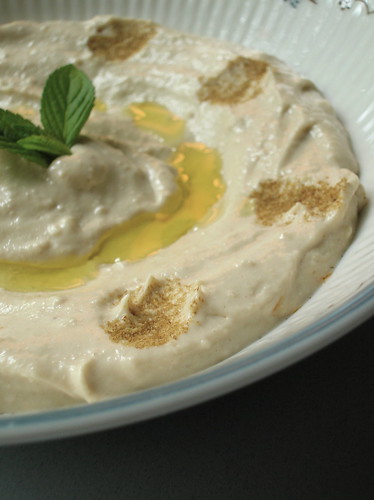
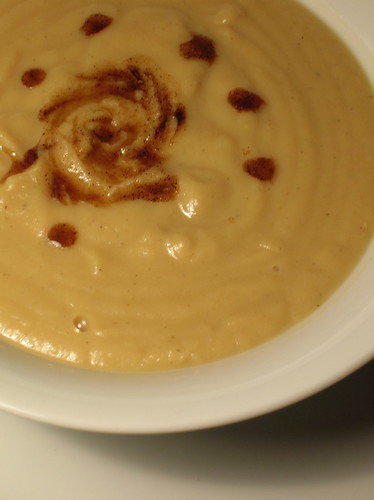
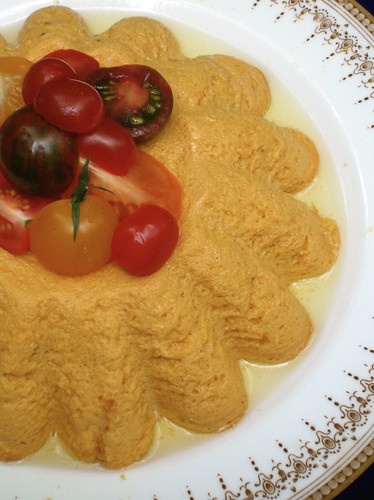
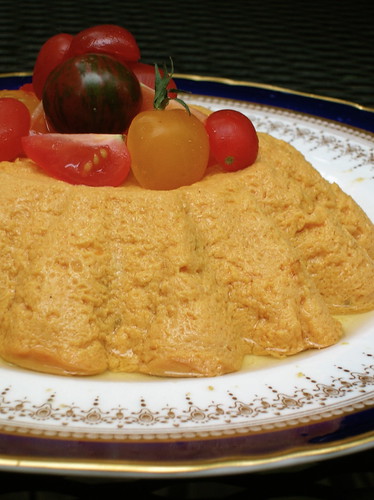
Finally, there is the issue of presentation. This also ties in to the above issue of consistency- your hummus should not be chunky or thick enough to make a mound (see: yes, yes, and no, no). You don't have to be perfect here, but choose a wide flat bowl or plate to serve your hummus. A drizzle of olive oil in the center is traditional, and you can also decorate with spices or chopped herbs.

I realize that this makes me sound like a total hummus dictator; I like to think of it as more of a hummus dilettante. But here’s what I’m saying: with all the rhetoric going around about a better understanding of the Middle East, let’s at least get the hummus right. After all, it’s a dish that’s been perfected over thousands of years, so get to know the classic version. I also realize a lot of people out there have already had these revelations, perhaps at their local Lebanese restaurant, or in their own kitchens and if you have any of your own tips or experiences, please feel free to share them in the comments.


Hummus bi Tahine
Although hummus is best made with freshly-cooked chickpeas, sometimes time and convenience mean that canned chickpeas are an acceptable option. Please also note the directions for making hummus in a food mill at the bottom. Don't be alarmed by the length of this recipe, I'm merely verbose, it's really quite simple.

3 cups cooked chickpeas, from 1 1/2 cups dried chickpeas, or 2 (15 oz) cans
1/2 tsp salt
1 garlic clove
1/2 cup tahini (sesame seed paste)
1/3 cup lemon juice
olive oil, parsley, paprika or cumin for serving

1. For dried chickpeas: Soak the chickpeas overnight in water. Drain, and place chickpeas in a pot and add fresh water to cover by at least one inch, gently rub the chickpeas against each other with your hands. Bring the chickpeas to a boil with a pinch of salt, skim the surface, then lower the heat and simmer until the chickpeas are tender, about 1 1/2 hours. If you are peeling the chickpeas, allow them to cool slightly and then peel them, pinching off the skins. Do not discard the cooking water.

For canned chickpeas: Rinse the chickpeas, then place in a saucepan with water to cover by one inch. Put your hands in the pot and gently rub the chickpeas against each other. Place saucepan on the stove and bring to a boil and simmer until chickpeas are very soft: test a chickpea by squeezing it between your fingers, it should smush easily, this could take between 5 and 20 minutes. Remove from the heat, skim off any chickpea skins that have floated to the surface and discard them. If you are peeling the chickpeas, allow them to cool slightly and then peel them, pinching off the skins.

2. Place the garlic and salt in a food processor and pulse to chop. Add the tahini and lemon juice and process until the mixture is slightly whitened and contracted. Use a slotted spoon to transfer the chickpeas to the processor (don't discard the cooking liquid) and process until very smooth. Thin the hummus to the desired consistency with the reserved cooking liquid. Taste and adjust seasoning with lemon juice and salt.

4. Make ahead: if you are making your hummus ahead of time, or don't plan to serve it immediately, the hummus will thicken up and stiffen as it sits. I recommend leaving the hummus in the bowl of the food processor until you are going to serve it (refrigerating overnight if necessary), and reserving some of the chickpea cooking liquid. Then, when you're ready to serve the hummus, simply process the hummus with a bit more cooking liquid to achieve the desired consistency. On the up-side, if you accidentally made your hummus too thin the begin with, then pop it into the fridge to thicken up a bit.

5. To serve: spread hummus in a shallow bowl, drizzle with olive oil and sprinkle with spices if desired. Traditional accompaniments include pita bread, pickles, fresh mint, and hot tea.

Variations:
- Hummus with Meat: In a pan, sauté some ground beef in a pan with a pinch of allspice and cinnamon until well browned, about 5 minutes. Crumble into small bits and scatter the meat over the hummus. You can also add diced onion and pinenuts to the meat mixture.
- Hummus Beiruti: Stir a large handful of chopped parsley into the hummus before serving.
- Hummus Musabahha: This version of hummus leaves the chickpeas somewhat chunky.
- Hummus bi Zeit (Hummus with oil): replace the tahine with olive oil. Please note that hummus is rarely made with both oil and tahini in the puree, it's either hummus with tahini, or hummus with oil, though olive oil is drizzled on top of both for serving.
- Warmed Hummus: Spread hummus in a shallow baking dish and bake until warmed through.
- Hummus bel Snoobar (Hummus with Pine Nuts): Sauté pine nuts in a generous spoonful of clarified butter. Pour the butter and toasted pine nuts over the surface of the hummus.
- Hummus Akhdar: Add in roasted red peppers and pomegranate molasses for a beautiful sour-sweet hummus. 
- Hummus bi Sujuk: Sujuk is a traditional (and delicious!) Lebanese-Armenian beef sausage. Serve hummus topped with sauteed sujuk, or other sausage of choice.

*Also Note: I give instructions for using a food processor here, because I find it is most convenient in the modern kitchen, but the traditional way is to use a food mill: purée the chickpeas in a food mill. In a mortar and pestle smash together the garlic, salt, and lemon. In a large bowl, stir the garlic-lemon mixture into the tahini so that it lightens in olor and contracts slightly. Add the chickpea purée to the tahine mixture, adjust seasonings. Pass through a food mill one final time to combine. This traditional way produces the best, smoothest hummus in my opinion.

11 July 2007

Housekeeping

A few housekeeping things around the Desert Candy abode today: It was only through some nice reader comments that I even knew I was a 'Blog of Note,' and I want to express my sincere gratitude to whoever has been reading along and making note. It's nice to know there's someone out there other than my mother. I want to welcome all the new readers and I hope you'll stick around and keep sharing your brilliant insights and random thoughts, I'm flattered to hear from all of you. Due to the uptick in comments, I had to enable the 'moderate comments' feature in order to prevent spam, but I hope that won't deter anyone from commenting in the future!

I also noticed when I was doing some cleanup in the recipe section that Desert Candy is seriosuly lacking in the soup section. How could this be, since I adore soups and make them often?! I love smooth pureed soups and I usually make them with whatever I have on hand, carrot ginger is a favorite, or a chilled vichyssoise or tomato bisque. Since I wouldn't dare leave you without a recipe, I did a little cleaning of my own, and found this chickpea soup I made back in the winter, topped with cumin oil. This soup is easy as can be (in keeping with today's clean out the pantry theme) and absolutely delicious. And now back to regularly-scheduled programming...

Creamy Chickpea Soup with Cumin Oil
This soup is best when made with fresh-cooked chickpeas, but you can use canned also.

3 1/2 cups cooked chickpeas with their liquid
half a medium onion, chopped
1 garlic clove, smashed
1/2 cup cream or milk, optional

1 teaspoon cumin seeds
3 tablespoons extra virgin olive oil

1. Place the chickpeas with some of their liquid in a pot with the onion and garlic. There should be enough liquid to cover the chickpeas, add water or chickpea liquid as necessary. Bring the mixture to a boil and season with salt and pepper. Lower the heat and simmer for 15-20 minutes, replenishing water as necessary.
2. Meanwhile, make the cumin oil. In a dry skillet, lightly toast the cumin seeds until just fragrant. Remove from the heat and grind in a coffee grinder or crush with a mortar and pestle. Heat the olive oil in a skillet until shimmering, add the ground cumin, swirling to combine, and remove from the heat.
3. Puree the chickpea soup in a blender until smooth. Add more water or some vegetable broth to thin the soup to your desired consistency. (If you are really picky, you can also press the soup through a sieve or tamis to ensure it is super-smooth). Stir in the cream, if using. Taste for seasoning, add salt or pepper if needed. Ladle the warm soup into bowls, swirl the cumin oil over top.
_____________

08 July 2007

Of Bunny-Topped Cakes and Birthdays

There are recipes that every family keeps close to their hearts. Sometimes they are the source of mystery and intrigue, the ingredients closely guarded, the procedure taking days. "I heard she stirs counterclockwise for hours without stopping," someone might whisper at the table. Then there are recipes that just slip themselves into your lives and acquire the comfort of a well- worn tee-shirt. They may not be complicated but the smell wafting from the kitchen is the smell of home. This is one of those recipes.


The year I was born, Gourmet Magazine published a feature for a children’s birthday party, which included little croque-monsieur sandwiches and a carrot cake topped with marzipan bunnies. My mother saved the article and for my birthday party she made the carrot cake, 3 layers sandwiched with apricot preserves and covered in cream cheese frosting. She even crafted little bunnies to sit on top of the cake with tufts of carrot tops for grass, and marzipan carrots to go around the sides. The cake was such a hit, she made it the next year, and the year after that, and after that...

For my entire life I have celebrated my birthday with the same exact cake. Ok, well, there was one year when I was about eight and insisted on an ice cream cake, but that was only a temporary moment of rebellion. I am, after-all, a creature of habit. When I went away to camp for the first time, my mother made sure a carrot cake was delivered to my dormitory. After scouring Beirut bakeries for days, I conceded carrot cake was unheard of in the Middle East and attempted to make my own in a very tiny kitchen with a broken oven. These days I make my own birthday cake and even though I am way too old for a cake decorated with small animals, I still make them if I have the time, resulting in many late nights sculpting marzipan and some funny reactions from friends. However, if you make fun of my cake, you may not get any, and then you will be very sorry.


The folded, stained issue of Gourmet is a testament to the strength of the recipe (it's also a prized possession, since Gourmet's online archives don't go back that far). Despite my fiddling with the measurements, I still make it generally as written, at this point I know it by heart. Everyone has their own idea of what carrot cake should be, but for me, this is it. Chock full of carrots (a full 4 cups), absolutely no pineapple or raisins. The cream cheese frosting recipe always makes too much but I make the whole amount everytime, and steal spoonfulls from the fridge all week. Hey, it’s my birthday after all. This year, here I am once again, grating carrots, stirring batter, the smell of warm cinnamon reminding me of the inevitable passing of years. So here’s to twenty-ahem years and counting, may there be many more bunny-topped cakes to come.


Carrot Cake for Birthdays
I've had this exact cake for my birthday for almost every year of my entire life, if that isn't tried and true than I don't know what is. My mom always used carrots with their tops still on because she said they were fresher and the carrot tops could be used as garnish, but I'll admit I just use regular carrots as long as they are fresh. And yes, I still sculpt the marzipan bunnies, too. Adapted from Gourmet.

2 cups flour
2 cups sugar (I prefer brown, but white sugar is fine)
2 tsp baking soda
1/2 tsp each cinnamon, allspice, nutmeg
1/4 tsp cloves
1/4 tsp salt
4 eggs
1 cup vegetable oil
4 cups grated carrots
1/2 cup walnuts, optional (I never include them, but if you want to...)
to assemble:
1/2 cup apricot jam
cream cheese frosting (recipe follows)
marzipan and food coloring for bunnies, if desired

1. For the cake layers: Preheat the oven to 350 F. Line 3 eight-inch round pans with wax paper, grease and flour the pans.
2. Sift together the flour, sugar, baking soda, spices, and salt. In a large bowl, beat the eggs until frothy, then add the oil in a stream, beating to combine. Gradually stir in the flour mixture just to combine. Fold in the carrots.
3. Divide the batter between the 3 prepared pans, bake for 25-30 minutes, or until a toothpick comes out clean. Let cool in pans for 10 minutes, then invert onto a rack to cool completely.
4. To assemble: Peel the wax paper away from the bottom of the cake layers. Place 1 cake layer on a platter and spread with half the apricot jam. Top with a second layer, and spread that with the remaining jam. Top with the final cake layer. Frost the top and sides of the cake with cream cheese frosting. If desired, sculpt bunnies and carrots out of marzipan. Arrange bunnies around top of cake, with carrot tops as grass, and place carrots around side of cake.

Cream Cheese Frosting
Some of the best stuff on earth. Using cold cream cheese and softened butter prevents any lumps.

1 lb cream cheese, cold
1 stick (8 tbl) butter, softened
4 cups confectioners sugar, sifted
2 tsp vanilla

1. With an eletric mixer, beat together the cream cheese, butter, and vanilla until smooth and combined. Add the powdered sugar in 3 additions, beating only until sugar is incorporated (do not overbeat). Store in the refrigerator.

*Alterations: Over the years I fiddled with this recipe many times and if you're watching your calories I have found it is plenty moist with only 3/4 cup oil and with the sugar reduced by 1/4 cup; also whole wheat pastry flour does very well.
_____________

04 July 2007

Cheater, Cheater ... Sticky Bun Eater

sticky bun remains
I am not a morning person. I need a good half hour between waking up and engaging in conversation any more complicated than yes or no. I do not wake up and hum as I brush my teeth. And as much as I love breakfast food, I don’t much like cooking in the morning. I usually wake up with an appetite, and getting food in my system is generally part of the successful road to a fully functional, conversational me. Having to undertake any labor more serious than stirring or waiting by the oven for toast can be a recipe for disaster.

Growing up, Sunday mornings meant something special for breakfast, like cinnamon rolls or raspberry crumb cake. And as wonderful as those gooey, pull-apart cinnamon rolls are, they involve yeast, and work, and worst of all, waiting. Get up early to let dough rise (an hour!), roll it out and bake it (another hour!)? Hello, the weekend, sleeping in? The hungry-grumpy me that would result is a picture no-one wants to see, besides I probably would have resorted to eating a bowl of cereal an hour ago. Of course, one could always go out for breakfast, which would probably involve long lines and more waiting, boisterous children, and mediocre toast. And I’d have to get dressed.


So what’s a girl to do? Well, she makes ‘quick cinnamon buns,’ a happy marriage of biscuit-like dough in cinnamon roll form. No yeast involved, just a quick stir of ingredients and they’re in the oven before you know it. These don’t quite have the luscious pull-apart texture that comes from yeasted dough, but that doesn’t mean they aren’t good. And I’m not complaining because I am sitting at home, in my pajamas, eating a homemade cinnamon bun, warm from the oven.

Quick Cinnamon Buns
The comfort of a homemade cinnamon bun without the wait for yeasted dough, what could be better? You could also add raisins to the filling if you'd like.

2 cups flour
2 tablespoons brown sugar
1 tsp baking powder
1/2 tsp baking soda
1/2 tsp salt
4 tbl (2 oz) butter, melted
3/4 cup buttermilk

filling:
1/4 cup brown sugar
1 tbl cinnamon
tiny pinch of cloves

glaze:
2 tbl cream cheese
2-3 tbl milk
1 cup powdered sugar

1. Preheat the oven to 425F. Grease an 8-inch square pan. In a large bowl, stir together the flour, brown sugar, baking powder, baking soda, and salt. In a glass measuring cup combine the butter and buttermilk. Make a well in the center of the dry ingredients and pour in the wet ingredients. Fold the mixture together in a few swift strokes, stirring only until combined. Transfer the dough to a lightly-floured work surface and roll to a rectangle about 10x18 inches.
2. Combine the filling ingredients and sprinkle them over the surface of the dough. Starting from the short side, gently roll up the dough. Cut the dough into 2 inch lengths, you should have about 8-9 rolls. Snuggle the rolls together in the prepared dish and bake for 20-25 minutes.
3. Stir together the glaze ingredients and drizzle over the rolls.
________

30 June 2007

Portrait of Summer


The other night as I was cleaning up from dinner, I looked out the window and noticed the sky was still pale gray beyond the shadows of the trees. Indeed, it was still light out at well past nine, one of the best signs of summer if I know one. How can I not have noticed the arrival of summer nights, the possibility of late evening walks after dinner, the smell of honeysuckle in the slightly damp air? One of the things I loved about my time in Paris were the evenings when it stayed light until ten or eleven, popping into shops after dinner or stopping for an ice cream.

And while our local markets are going at full speed, that other harbinger of summer, the tomato, is only on the cusp of arriving. My own tomato plants are taller than I am and overburdened with fat orbs still verdant green; I am just itching in anticipation! But for now, the best tomatoes I've been finding around here are these fat yellow ones; thin skinned and ripe, they exude a wonderful tomato smell as soon as you slice them.


The idea for this yellow tomato flan came from a tart in Michel Richard's "Happy in the Kitchen," I was enamored by the bright yellow filling paired with little heirloom cherry tomatoes, but I didn't want to bother with the fuss of a tart shell. Instead I turned the yellow tomatoes into a sort of savory custard, topped with a bright salad, it's a perfect first course or side dish at dinner. This should really be baked in individual ramekins or a shallow baking dish; I baked mine in a brioche pan because I liked the shape, but it took forever for the flan to set. What I love about this is that, unadulterated by milk or cream, it tastes purely of tomato. Make sure to chill this completely before serving, it tastes best cold, and the texture will firm up in the fridge.

In keeping with the ease of summer, the prep for this does not take long at all, so you’ll be in and out of the kitchen quickly. If you do want to dress this up, I imagine a bright breen basil or pesto sauce would be the perfect accompaniement. And if you can, serve it al fresco, under the still-light sky of a summer evening.

Speaking of summer, that means vacation, and we are off for nearly (gasp, joy!) two glorious weeks of relaxation! A long trip and an hour-and-a-half boat ride to one of my favorite isolated islands on earth. I've got some posts written up to keep you all entertained in my absence, but seeing as how internet access is questionable, please excuse me if updates are less-than-regular.


Yellow Tomato Flan
This tastes purely of tomatoes, so make sure to use a mild cheese that won’t overpower the dish (we used Kashkeval). Also, it should be served lightly chilled so that the texture remains firm. This is a lovely side dish at dinner or an elegant first course over salad greens, you could dress it up with a drizzle of basil or pesto sauce if desired.

2 lb yellow tomatoes (about 3 large), diced
4 eggs
1/2 cup finely grated mild white cheese
pinch of sea salt
for serving: halved cherry tomatoes

1. Preheat the oven to 375 F. Grease 6 ramekins or a 9-inch round pan or a large brioche pan, choose a roasting pan that will hold the ramekins or round pan.
2. Heat a tablespoon of olive oil in a skillet. Add the tomatoes and saute over medium heat until the tomatoes are softened and no longer watery, about 5-10 minutes. Transfer the tomatoes to a blender and puree until smooth. Strain the mixture through a mesh sieve into a bowl, discarding and skins or seeds that remain.
3. Add the eggs to the tomato puree, beating until smooth and well combined. Fold in the cheese and season with sea salt. Pour the tomato mixture into the pan or ramekins, bang the pan once on the counter top to remove any air bubbles. Fill the roasting pan with very hot water so that the water reaches at least half-way up the sides of the ramekins/pan (a water bath).
4. Carefully slide the pan into the oven and bake for 40-50 minutes for the ramekins, or 70 minutes for the brioche pan. Top up the water level in the roasting pan as necessary. When done, the top and edges of the flan should be well-set. Remove from the oven, cool, and refrigerate the flans to chill completely. Serve cool, with halved cherry tomatoes on top.

27 June 2007

Bagelicious

The first time my family came to visit me after I moved to New York, they asked where I wanted to meet for lunch and I said, “The 2nd Avenue Deli.” In retrospect, this was an odd choice, seeing as how I’m not big on sandwiches, or meat, or anything piled high with pastrami. But it was a New York icon only blocks from my home, and I was determined to try everything I could in this new city. I have no idea what I ate that day (blintzes, maybe?), but over the years I’ve tasted my way through most of the city, embracing some traditions and discarding others. But the one culinary landmark I’ve adopted more than any other is that most famous one: the bagel.
Don’t get me wrong, there were certainly bagels around growing up, but they often came in heretical flavors like blueberry and chocolate chip (not that I ate those, mind you, although I will admit to twice succumbing to a toasted chocolate chip one, I was ten, and really, I shouldn’t tell you this, but it was quite good, with it’s melty chocolate middles). Back then, my favorite treat was a cinnamon raisin bagel toasted with butter, something I still indulge in when wanting something slightly sweet and densely caloric. Today, pumpernickel bagels are my favorite, with their deep dark brown and undertones of molasses, I love them plain, or with the thinnest schmear of cream cheese.
It was only upon moving to New York that I really discovered the meaning of a good bagel, and it was only when leaving New York that I realized that good bagels are hard to find outside the Big Apple. It wasn’t until leaving the U.S. that making my own bagels even crossed my mind. In fact, if I hadn’t endeavored to make them, I would not have known that bagels are boiled, then baked, it’s the boiling which gives them their characteristic chewey-shiny exterior.

So when this month’s online baking challenge turned out to be bagels, I was happy to try them again. Even though it is a multi-step process, the bagels rise really fast, so there’s not much waiting one usually associates with yeast-doughs. I made both full size and mini bagels (dare I admit that I slightly over-baked one batch of the bagels and then fobbed them off on a friend, who deemed them very good anyways?) I much preferred the mini ones, they made a perfect 3-bite sandwich with caramelized onion and cheese. I’ll probably continue to go to Murray’s for my occasional bagel-fix, but it’s a good skill to have under your belt, especially if you live outside New York.


Bagels
Bagel dough rises like crazy, which means no long waiting periods characteristic of many yeast doughs. Boiling gives the bagels their shiny surface, and malt syrup imports a traditional tangy taste, though if you don’t have any, sugar works just fine. This makes a lot of bagels, so you'd be well advised to halve the recipe.

6-8 cups bread (high-gluten) flour
4 tablespoons dry yeast
6 tablespoons granulated white sugar or light honey
2 teaspoons salt
3 cups warm water
3-5 tablespoons malt syrup or sugar
1 egg, lightly beaten
choice of topping: poppy seeds, salt, sesame seeds, onion, etc.

1. Place the hot water in a large bowl with the 6 tbl sugar to dissolve. Sprinkle the yeast over the surface and stir to combine. Let sit for 5-10 minutes, until the mixture is bubbly.
2. Stir in 3 cups of the flour with the salt to make a soft dough. Continue adding the remaining flour, 1/2 cup at a time, kneading into the dough until incorporated. At some point, you’ll want to turn the dough out onto a well-floured work surface so that you can knead it with your hands. Continue kneading, trying to incorporate most of the flour if possible. It will be quite elastic, but heavy and stiffer than a normal bread dough. Do not make it too dry, however, it should still give easily and stretch easily without tearing.
3. Place the dough in an oiled bowl, cover and leave to rise in a warm place until doubled in volume. This should take about 30 minutes.
4. Meanwhile, fill a large pot with a gallon of water. Add the malt syrup or sugar and bring to a boil. Lower the heat so that the mixture maintains a gentle simmer.
5. Punch down the dough, then divide it into 18-20 chunks of dough (if making mini bagels you’ll want many more chunks of dough). Put half the dough chunks in the fridge while you shape the first half (this will prevent them rising while you are working). Roll each piece of dough into a snake and tuck the ends together to form a bagel. Repeat with remaining dough. Let the bagels sit about 10 minutes, they should rise slightly (technically, they should rise 1/4 volume or ‘half-proof.’)
6. Preheat the oven to 400 F. Working 2-3 at a time, place the bagels in the pot of simmering water. Boil for about 3 minutes, then turn over and simmer another 3 minutes. Remove with a slotted spoon to drain on a towel. Repeat with remaining bagels.
7. Place bagels on parchment or silpat lined baking sheets. Brush the bagels with the beaten egg, and add any desired toppings. Bake the bagels for 20 minutes, then flip them over and bake for a final 5 minutes (flipping prevents flat-bottomed bagels). Cool completely on a rack. Do not attempt to slice or eat your bagels until they are completely cooled, as the interior will be smushy.

______________

23 June 2007

Dinner with Baaba


The other day, a song came on the radio I hadn't heard in years and I was immediately transported to a younger version of myself, when dancing and stiletto heels seemed less a recipe for pain and more part of an average Saturday. It got me thinking about the music that shapes our experiences, if your life had a soundtrack what would be on it?

Chances are, a lot of your favorite music, but also a lot of things you might not have picked yourself. Me, there'd be the Rolling Stones and Johnny Cash played loud on an early summer evening in a beach house, dancing in the kitchen with still-sandy bare feet. Tom Waits would show up, with Nina Simone and Ali Farka Toure. Absolutely anything by J.S. Bach, but particularly the cello concertos for a rainy Sunday afternoon. My days as a dancer would bring along Arvo Part and Conlon Nancarrow, a high school project on Hildegard von Bingen. Trundling in a bus through the desert, Fairuz and Amr Diab would keep me company. An ex-boyfriend or two left behind Blur, M, the Black Dice; a trace of my Argentine roots in Mercedes Sosa.

It's my mother who cultivated a lot of my tastes, and she's the one who found Baaba Maal. I grew up listening to this Senegalese singer, I've heard the song "Koni" a hundred times and could listen a hundred times more. And it was that infectious rhythm and unique voice which piqued my interest in Senegal, the scars of slavery, the Sufi mystics, the writings of Miriama Ba. And who couldn't love a cuisine heavy on peanut butter?


So it was my love of Baaba Maal that lead me to pick up an African cookbook at the library. Written by Marcus Samuelsson, a chef whose background appeals to my own multi-cultural tastes, though the recipes here are my liberal adaptation inspired by Samuelsson's book. I broke out the grill for the beginning of summer and made tamarind-glazed salmon. It took P. to point out the obvious, that salmon probably isn't a traditional African ingredient, but this example of fusion cuisine was delicious. Tamarind is a sweet-tart fruit popular in India and Africa, it comes from the Arabic "tamr al-hind," which means Indian date. The fruit often comes smashed together in plastic wrapped-blocks or in jars of tamarind concentrate and is available at Whole Foods.

But the star of our dinner was the cabbage-citrus salad with it's nutty peanut dressing. Don't be put off by the fancier blood oranges I used, the original recipe actually called for grapefruits, and oranges could also work in what is essentially a slaw. I've modified the dressing so that it comes together in minutes in the blender, and with thin slivers of cabbage and citrus, this is so easy, you'll do it again.

In the soundtrack of our lives there are a lot of memories and an ever-growing playlist that chronicles our experiences, but there are also opportunities for new learning and discovery. If it weren't for Baaba Maal, I doubt I would have picked up an African cookbook or made this meal. So put on some good music, stir up a dinner, and I'd highly suggest a peanut butter pie for dessert.


Tamarind-Glazed Salmon Skewers
Although the recipe specifies skewers, we found that this is equally good when made with slices of salmon fillet or salmon steaks, adjust the cooking time as necessary. Tamarind is a sweet-tart fruit that often comes smashed together in plastic wrapped-blocks or in jars of tamarind concentrate and is available at international markets and Whole Foods. If tamarind is unavailable substitute minced dates.

2 lb salmon fillets, skin removed and flesh cut into 2 inch pieces
1/4 cup peanut oil
1 yeloow onion, chopped
1 garlic clove, minced
1 tbl curry powder
1 cup white wine
1/4 cup red wine vinegar
1 tbl cornstarch
3 tbl tamarind paste
2 tbl sugar
pinch salt

1. For the marinade: Heat 2 tbl of the oil in a medium saucepan. Add the onion and garlic and saute until golden, about 5 minutes. Meanwhile, dissolve the cornstarch in 2 tbl of the wine. Add the curry powder, wine, vinegar, cornstarch mixture, and tamarind to the pan. Season with sugar and salt. Bring the mixture to a simmer and cook for 5 minutes, until slightly thickened. Let cool slightly, then puree the mixture in a blender until smooth.
2. Marinate the salmon: Rub the salmon pieces with the remaining 2 tbl oil. Combine the salmon with half the tamarind sauce and set in the refrigerator to marinate for 30 minutes while you preheat the grill.
3. Grill salmon: Preheat a grill. Brush the excess marinade off the salmon and thread onto skewers. Grill the skewers for 3-4 minutes on each side, brushing frequently with the reserved tamarind sauce. Serve the salmon drizzled with remaining sauce, if desired.

Cabbage-Citrus Slaw

for the dressing:
1/3 cup peanut butter
1 tsp ginger
juice of 2 limes (or 1 lemon)
1 garlic clove, minced
1/4 tsp Aleppo pepper or red pepper flakes
1/4 cup soy sauce
1/4 cup peanut oil
for the salad:
1/2 head napa cabbage, shredded
3 scallions, sliced
2 blood oranges or 1 grapefruit, sectioned
1 tbl sesame seeds or chopped peanuts, toasted

1. Combine all dressing ingredients in a blender or food processor and blend until combined.
2. In a bowl, combine cabbage, citrus, and scallions. Toss with the dressing. Sprinkle with the toasted sesame seeds or peanuts and serve.
_______