Showing posts with label French. Show all posts

28 March 2012

Paul's Amazing Triple Pork Torte

DSC_0008

There are some recipes that I just look at and think, I'll never make that. It involves more than 10 pans for one recipe, it contains (a) chemicals or (b) purchased cake mix, or it contains way too many weird organ meats for my taste. Luckily, that's why I have Paul around. Because Paul is willing to take some of those leaps I won't take, and he comes up with delicious recipes like these.

So, let me start out by saying that this recipe originally called for several pounds of pig snouts. Yes, snouts. (Don't worry!! I'm not giving you a recipe for weird pig parts, just keep reading.) So after we quickly discovered the difficulty of purchasing pig snouts, we also rejected the recipe's suggested alternative of pig's feet. I had a bad pig's foot experience once and will never quite get over it.

DSC_0006DSC_0003

So of course, geniuses that we are, we thought why not make a pork torte filled with delicious things like bacon! pork belly! ground pork! Sounds much better, right?

DSC_0011

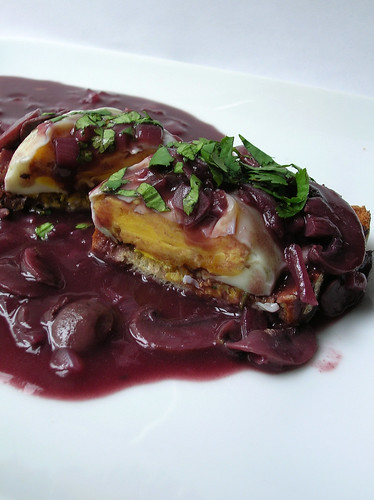
And indeed, it is. I have to say, when Paul was making this, I was mostly trepidatious because I am a petite person, and large quantities of pork fat do not sit well with my stomach. But in addition to be totally addictively delicious, this recipe was also shockingly light. Well, you know, as light as anything wrapped in puff pastry and filled with potatoes and pork can be. But in all seriousness, the leeks in the pork mixture plus the acid of mustard and vinegar really lighten the pork, and the pastry and potatoes add a starchy balance to the meat. This would make an excellent special dinner with a green salad alongside.

DSC_0015

Paul's Amazing Triple Pork Torte
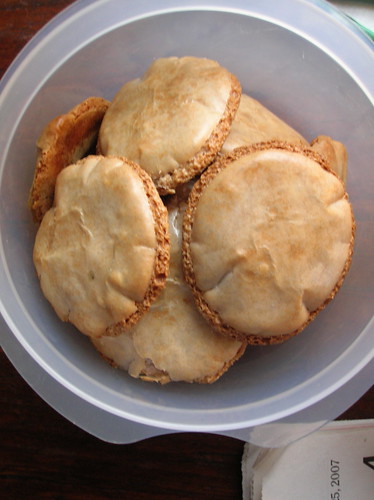
Adapted from Saveur. I bet you could make small individual size tortes for a special first course.

1 package puff pastry, defrosted (preferably Dufour brand)
1 lb pork belly
1/2 cup stock or broth (any type)
1 lb ground pork
4 thick-cut slices of bacon, diced
1 teaspoon fennel seeds
1 shallot, minced
4 garlic cloves, minced
2 leeks, white and light green parts sliced
1/2 cup chopped parsley
1 1/2 tablespoons mustard
2 tablespoons red wine vinegar
6 medium-largish potatoes (a waxy kind like yukon gold)
butter, salt, pepper
1 egg for egg wash (optional)
equipment: 1 8" springform pan

1. Prepare the pork belly: Preheat oven to 300 F. Cut the belly into 4 or 5 thick slices and season with salt and pepper. Place the pork in a small roasting pan, fat side up, add the stock, and then add enough water so that the liquid comes half-way up the side of the pork belly. Cover the pan tightly with foil and roast for 2 to 2 1/2 hours, or until the meat is cooked and there is a good layer of fat on top.

2. Remove pork from the oven, and if there is still skin on the belly, peel it off at this point. Raise the oven temperature to 450F, remove the foil from the pan, and cook the pork another 20 minutes uncovered, until the fat on top is nicely crispy. Discard juices and set aside to cool.

3. Set a large pot of water to boil. Once the water boil, cook the potatoes whole until tender when pierced with a knife. Drain and set aside to cool

4. In a skillet over medium heat, add the ground pork, bacon, fennel seeds, and salt and pepper to taste. Saute, stirring occasionally and breaking up pork, until bacon is browned and crispy and ground pork is cooked through. This may take as long as 20 minutes. Use a slotted spoon to transfer the pork mixture to a large bowl.

5. Drain all but one tablespoon of the fat from the skillet. Again over medium heat, saute the shallot, garlic, and leek until softened and tender. Add these to the bowl with the pork. Stir the mustard, parsley, and red wine vinegar into the pork-leek mixture. Set aside.

6. Preheat oven to 400F. Chop the pork belly and add to the pork-leek mixture.

7. Peel the potatoes and thickly slice.

8. Line the bottom of your springform pan with parchment. Unfold your puff pastry onto a floured surface. Cut the puff pastry at a 2/3 - 1/3 divide. Roll out the larger (2/3) piece until it will line the inside of your pan with a one inch overhang. Fit the pastry into the pan.

9. Fit a layer of overlapping potato slices into the bottom of the pan. Top with half the meat mixture. Repeat another layer of overlapping potato slices, the the remainder of the meat. Top with a final layer of overlapping potato slices.

10. Fold up the edge of the puff pastry over the potatoes. Roll out the second square of puff pastry and lay it on top of the torte, tucking the edges by smushing them down into the pan. Poke air vents in the top of the pastry with a knife tip (you can make a design if you like. Cut a small hole in the center of the top - roll up a 2 inch piece of parchment paper to form a 2 inch tall cone. Wedge this cone into the hole at the top of the torte as a steam vent.

11. Brush the torte with egg wash if desired, then transfer to the oven to bake for 40 minutes, until golden. Remove from oven. Let rest for 20 minutes before serving.

15 November 2010

The Month of Eating French

DSC_0014
Well, I had a fish tagine recipe all ready to go for you all, but it seems my computer ate it, and then I decided to give up and go to Chicago to eat delicious food at Topolobampo and Blackbird. I'm kidding, but I highly recommend some margaritas the next time your computer goes on the fritz.

Besides, ever since we got back from France I've been on a full-on French cooking kick. First I made pain d'epices (from this recipe), which is deceiving because you expect it to be a sweet and it's really just a bread.
DSC_0007

Then there were stuffed poussins with pearl onions and a fabulous cream sauce (adapted from this recipe). Damn, poussins are expensive in the U.S., but they were delectable.
DSC_0019

There were two attempts to recreate the fabulous gratin dauphinois we had, trying both Julia Child's and Anthony Bourdain's recipes. Bourdain won, for what it's worth.
DSC_0060

And by the time I got around to making a chicken liver pâté, I think Paul was about to call the psych consult. "You don't even like pâté," he said. Luckily, the guests at our party did.

But all this was not before I made, not one, not two, but three tarte tatins. What can I say? Tarte tatins are pretty damn awesome. We made one with pears and cardamom, and two with apples. Despite many people's fear of caramel, tarte tatin is much easier than you'd think, and you don't even have to make a true caramel. Afterward the oven should do the work for you. Even if you aren't in French cooking madness mode, it's worth a try.

DSC_0001
(Lentil de Puy Salad with Pomegranate and Fennel)

Tarte Tatin
Though puff pastry is 100% traditional, I confess that I also like to make this with a nice thick pie dough. The crispiness of the pastry stands up nicely to the apples. Can be made with pears, make sure to used firm pears.

5-6 large cooking apples (we used staymans)
juice of 1 lemon
1 ½ cups granulated sugar
4 Tbl unsalted butter
14 ounces puff pastry (or pie crust)

1. Peel and quarter the apples, removing the cores such that each quarter has a flat inner side. Toss the apple quarters in a large bowl with the lemon juice and ½ cup of the sugar. Set aside while you start the caramel, about 30 minutes.

2. In a 9-inch cast-iron skillet melt 4 tablespoons of the butter. Add the remaining 1 cup sugar, mixing with a fork or flat whisk. Cook the mixture over medium-low heat, stirring regularly, for about 15 minutes, or until the mixture has come together in a smooth, bubbly, pale caramel color. Do not let it get too dark.

3. Turn the heat off and carefully add apple quarters, arranging them rounded-side-down in a decorative pattern. Arrange a second layer of apples on top wherever they fit, closely packed. I usually cut up any larger ones for smaller pieces in the second layer.

4. Preheat the oven to 375 degrees Fahrenheit.

5. Cook the apples over medium-low heat for about 20 minutes, occasionally spooning the bubbling caramel liquid over them. Press them down gently with the back of a spoon — don’t worry if they shift a bit in the liquid; just move them back to where they were. Shift the pan as necessary so that the apples cook evenly. They are ready when the liquid in the pan has turned to a thick, amber ooze. The apples should still be slightly firm. Do not allow them to get entirely soft.

6. While the apples are cooking, roll out the pastry. Cut out a circle about 10 inches in diameter (1/2 inch wider all around than the skillet), and trim away any excess. When apples are ready, carefully lay the pastry circle over the apples in the skillet, tucking the overlap down between the apples and the inside of the pan.

7. Place the skillet on a rimmed baking sheet, and bake for about 30-35 minutes, until the pastry has risen, and is dry and golden brown. Remove the skillet from the oven, and let it to rest for a minute or two. Tilt the pan and look down inside the edge: if there is a lot of juice, pour most of it off into the sink. [Do not pour it all off, or the apples may stick to the pan.] Place a serving platter upside-down over the skillet and, working quickly and carefully, invert the tart onto the platter. Rearrange any apple slices that may have slipped or stuck to the skillet.

18 April 2007

A Recipe for Optimism


My mother has a cookbook in which she has written in the margin, “made Nov. 1968, lamb chops $.80/lb.” I love this note, and in fact my mother’s cookbooks are littered with similar ones, scribblings of when and where she made the dishes, noting substitutions and alterations, cakes made for birthdays and cookies perfect for Christmas decorating. Like Billy Collins’ Marginalia, the white space on the side of the page is there for our seizing, and it is also an insight into the thoughts of others.

I like knowing what made someone choose a particular recipe, what made them think it would be good, why it piqued their interest. Maybe they happened to have all the ingredients in their pantry, maybe they are searching for their grandmother’s
version of coconut cake. Me, I have a tendency to look for unusual combinations or techniques, something different or new.

Over a year ago, I bookmarked a recipe for oeufs en meurette, or eggs in red wine sauce. The fact that I folded down the page corner is a testament of true optimism, an optimism of time, an optimism of finances. When would I have the time to make a recipe which involved multiple pots and pans and delicate poaching operations? When would I have the finances to use an entire bottle of red wine on something which is essentially a dressed-up version of eggs on toast? And did I mention I’m not a big fan of poached eggs?

But for some reason, this recipe called out to me, and each time I opened the cookbook it faced me with with it’s little tabbed page. As I confronted it again and again, the guilt grew. Why haven’t you made me, the recipe asked insolently, what are you waiting for?

Finally, in part so that I wouldn’t feel guilty everytime I glimpsed the book on the shelf, I went out and made the thing. And you know what? It was the best damn thing to come out of my kitchen in a long time. It was worth every little bit of extra effort, and even those dirty pots and pans. I realize I spend a lot of time advocating recipes which are simple or uncomplicated; this one is neither of those, but it is also really good. The earthy mushrooms, the red wine sauce, the soft egg, all melting into a warm crunchy hunk of toast. You’ll be happy to know all the components can be assembled ahead of time, making this the perfect dish for an impressive brunch or lunch. I'd even make it for dinner, optimistically speaking.


Oeufs en Meurette
This classic bistro dish is based on meurette, a red wine sauce used to accompany eggs or fish. It takes a bit of time and concentration, but it is worth the effort and can be prepared ahead of time. If you make it with white wine it is known as oeufs en meursault. Adapted from Cooking with Wine and Saveur Cooks Authentic French. Serves four.

4-8 eggs (depending on if you want one or two eggs per serving)
- for the sauce:
1 bottle French Burgundy
2 cups beef stock
1 shallot, chopped
1 carrot, sliced
1 garlic clove, crushed
1 bay leaf
a few thyme sprigs
- for the garnish:
1/4 lb slab bacon, diced
1/2 lb mushrooms, sliced
- for the toasts:
4 thick slices of bread, crusts removed
- for finishing:
2 tbl butter
2 tbl flour
parsley sprigs

1. Place the wine and stock in a large pan. Bring to a boil, then lower the heat so the mixture is just simmering. Break an egg into a ramekin, then slide the egg into the simmering wine. Repeat with the remaining eggs, poaching until the whites are firm and the yolks are just beginning to set . Using a slotted spoon, transfer eggs to a plate. Trim any stringy whites, then set aside.
2. Add the shallot, carrot, garlic, bay leaf, and thyme to the red wine mixture, raise the heat slightly, and simmer until reduced by half, about 25 minutes.
3. Meanwhile, place the bacon in a skillet over medium heat and cook until the bacon is browned and crisp, about 5 minutes. Move the bacon to paper towels and drain off all but 1 tablespoon of the fat from the skillet. Add the mushrooms to the skillet,
season with salt and pepper, and sauté them until brown and tender, 10-15 minutes. Set the mushrooms aside with the bacon.
4. Make the toasts: the traditional way is to sauté the toasts in some butter until browned on both sides, but you can toast them under the broiler or toaster if you prefer.
5. Finish the sauce: In a small bowl, smash together the 2 tbl butter with the flour to form a paste. Strain the red wine mixture through a fine meshed sieve into a medium saucepan. Discard the vegetables. Put the sauce pan with the wine mixture over low heat and whisk the paste into the sauce a little bit at a time, so that the sauce thickens.
6. Stir the mushrooms and bacon into the red wine sauce. Taste for seasoning. Keep sauce warm.
7. To serve: Place a toast on each plate. Top the toast with one or two eggs. Spoon the sauce over the eggs. Garnish with parsley sprigs.

To make ahead: Make all the components ahead of time: store the poached eggs in some water in the refrigerator, store the strained sauce and mushroom-bacon garnish separately in the refrigerator. Reheat the eggs briefly in simmering water, reheat the sauce and garnish on the stovetop, and rewarm the toasts in the oven. Assemble and serve.

__

12 March 2007

Hibiscus Macarons


It seems French macarons, those wonderful confections decorating Parisian patisseries, have finally made it across the pond. Unlike their American double 'oo'-ed cousins, these almond cookies bear smooth tops and sandwich creamy fillings for a wonderful chewey texture. And as they pop up in more and more American bakeries, I just want to say that I was there first. Me, ahead of the trend.

Several years ago I had read somewhere about the famous macarons of LaDuree and made a point of seeking them out on a week long soujourn in Paris. Immediately, I was smitten with the colorful myriad of flavors and I will admit I made an almost daily pilgrimmage from my 5th arrondisement hotel for my macaron fix (I say almost daily because it had to broken up with some Damien's caramel beurre salle ice cream, of course). When I returned to the U.S., a country sadly macaron-less at the time, I set out on a quest to make my own.

However, I soon discovered that making macarons was not as easy as I thought. First, even finding a recipe was difficult, as I searched through cryptic pastry chef recipes in French with metric measurements. Luckily, a thorough discussion on EGullet and Pierre Herme's recipes helped. But there were also the cookies themselves, which are notoriously difficult to master. The goal is to get macarons with frilly little 'feet' around the edges and smooth tops. I whipped egg whites, piped and baked, piped and baked again, but my cookies came out flat or deflated. Finally, on my third or fourth try, there they were, a whole sheetfull of little feeted cookies. I baked up bunches of chocolate macarons that day, and then I never made them again. I had conquered the macaron, and I had no desire to return to battle.


Over the following years, a few well-timed trips to Paris kept my macaron craving sated, but recently I'd begun to get a little itchy. I knew it was bad when on a trip with a layover at Charles DeGaulle, I considered whether I could have macarons delivered to the airport (I already knew you couldn't get them in duty free). Luckily, my more frugal side kicked in, and I decided to try my hand at making them again.

Now, if this tale has not made me sound crazy enough already, this is the part where my Indian grocer and his flower powders come in. There is a small Indian grocery near my appartment in New York who stocks all kinds of wonderful spices and dried beans and flours and international products. I had stopped in there to pick up some zaa'tar, a staple in my house, and was as usual browsing the unusual products lurking on the shelves. Norwegian root powder? Red seaweed? And there in a little plastic bag, a pink powder labeled hibiscus flower powder. "Do you know what you use this in?" I asked the grocer; but the man speaks not a word of English. So, since I apparently do not posess the normal-person's fear of purchasing strangely colored powders in tiny subterranean stores, I bought it anyway.

A few days later as I embarked on my macarons (I also made this ginger-apple version), that little pink bag caught my eye, and I thought I could experiment with a batch of hibiscus macarons. I didn't expect the hibiscus to make a big difference, but to my surprise they turned out wonderfully, with the hibiscus bringing a pronounced tart-sweet floral note and a bright purple interior. I should have made a proper buttercream filling, but after all those cookies, I lazily folded some jam and hibiscus into some whipped cream I already had in the fridge, and the result was lovely. They lasted about 3 days chilled, but we had no problem devouring them all by then.

Please don't be put off by all my mis-adventures with macarons. Once you get a feel for them they are quite easy to make. It is important that the batter have just the right consistency, so if you have a kitchen scale, now's the time to use it. Also, as you'll see in the note below, hibiscus powder is not that hard to find, but you could also experiment with other flavorings, like these and these..


Hibiscus Macarons
Hibiscus powder adds a tangy floral note and can be made by grinding hibiscus tea or dried hibiscus flowers into a powder. You could also experiment with using dried roses or another floral or herbal tea blend.

1 cup (100 g) powdered sugar
1/2 cup (50 g) ground almonds
3 tbl hibiscus powder
2 egg whites, at room temperature
1/4 cup (55 g) sugar

1. Preheat the oven to 375 F. Line baking trays with parchment paper.
2. Pulse the ground almonds, powdered sugar, and hibiscus powder in a food processor a few times to combine (this will also help make sure you don't have any large chunks of almond). In a clean bowl, beat the egg whites with an electric mixer until they hold soft peaks, gradually add the sugar and beat until the whites hold stiff peaks.
3. With a spatula, fold the almond mixture into the egg whites. Fold using smooth strokes until the mixture is encorporated- the whites will deflate somewhat and the batter should be thick and flow like magma.
4. Transfer the batter to a piping bag and pipe into 2 inch rounds (about 2 tablespoon-fulls) on the baking sheets. Bake in the center of the oven for 15-18 minutes, the macarons should form frilly 'feet' and smooth tops. Let cool completely, then remove from the parchment. Sandwich the macarons with a tablespoon of filling.

Quick Hibiscus Filling:
1 cup whipped cream
1/4 cup Damson plum jam or tart seedless berry jam
2 tbl hibiscus powder

Combine all ingredients. If you use this filling you'll have to keep the macarons refrigerated to keep the cream from running.
You can also make a basic buttercream by creaming 6 tbl butter and 1 cup powdered sugar, then fold in the hibiscus for a more stable filling.