27 September 2007

Oh Sweet 100


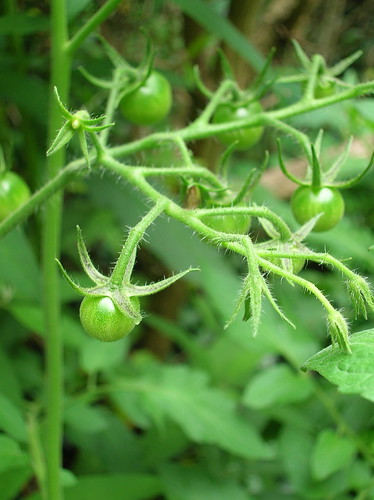
I first read about sweet 100 tomatoes in Mario Batali's Babbo Cookbook, and later in the Zuni Cafe Cookbook, two splattered, well-loved members of my cookbook collection. I have to admit, at first I thought they were pretentious, calling for a specific kind of tomato, surely any cherry tomato would do? But when I was planting tomatoes in the spring and saw sweet 100's at the nursery I immediately chose them; just the name is evocative enough. Now I can tell you that if you ever grow any tomatoes, grow sweet 100's, they're almost candylike in their sweetness and best of all they are amazingly prolific, you can even grow them in pots on your fire escape.

As the end of summer approached, I heard many people bemoaning the end of summer heirlooms, while others even admitted they'd be relieved when tomato-fanaticism was over. But anyone who actually grows tomatoes knows otherwise, just when I thought I could pull them out and plant things for fall, my tomato plants set all new blooms. The slightly cooler nights help set tomato blossoms (creating the fruits), so that when temperatures drop slightly at then end of August you've got a whole new crop to look forward to in October or up until the frost free date. Connoisseurs know that fall tomatoes are actually the best tomatoes.


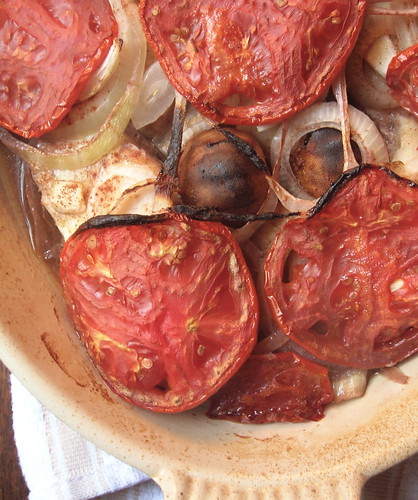
I let some of my tomatoes go (goodbye hard to grow Brandywines) to make room for broccoli and beets, but those sweet 100's are sticking around for a while, mainly because we love them in this particular dish. I first started making a side dish of sauteed tomatoes, and we fell in love with the simplicity of just warm garlicky tomatoes, especially the way the little ones burst in your mouth. It was the obvious next step to make it a sauce for pasta, in our case whatever spaghetti or fettucini was in the cabinet. It sounds rather obvious, but this simple combination is truly spectacular.

A few notes on the recipe: I generally shy away from olive oil by the cup-full, but you really do need to be generous here, and don't worry you won't ingest it all. That oil is going to infuse with garlic and then it's going to coat those wonderful tomatoes and then it's going to coat the pasta, and you really don't want to have to worry about anything sticking, and when you transfer the pasta to your serving bowl any excess oil will stay behind in the pan.

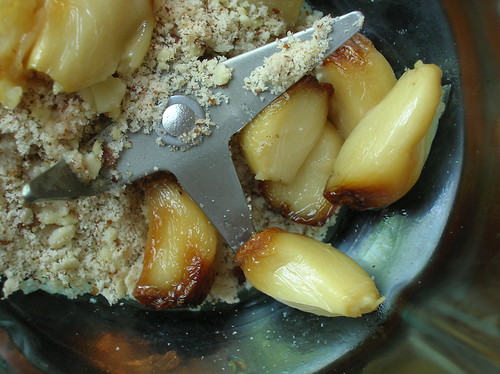
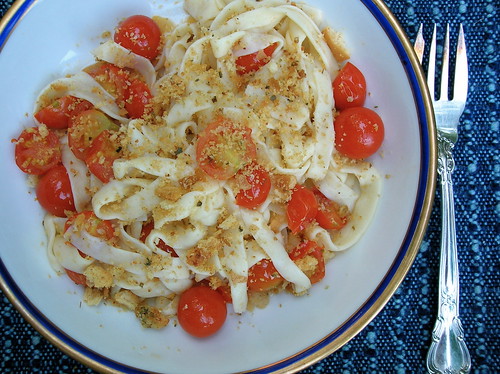
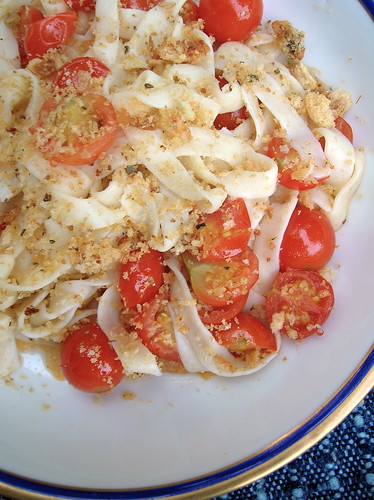
When I'm feeling zealous I like to add a crunchy breadcrumb topping to this simple pasta dish. Toasted breadcrumbs (specifically pangrattato) are a traditional addition to pasta in Sicily. Whenever I've made pasta dishes with breadcrumbs, the crispy crumbs just went limp and mushy in the sauce, I always thought I was doing something wrong, but I recently learned from Amanda that this is actually the way the dish is supposed to be, the breadcrumbs were a way for poor people to bulk-up the dish. Personally, I don't like soggy breadcrumbs, so I devised my own solution by adding some ground almonds to the topping which stay nice and crunchy atop the pasta. I like the contrast they add, but the dish is good even without them.

You've got a good bit of tomato season left, and if you make this you're guaranteed a few moans of gustatory pleasure, which is pretty impressive for a 5 minute pasta dish. I'm not saying you have to use sweet 100's, any cherry tomato will do, but I know I'll never go back.

I'm off to Portland, Oregon, for a few days, so if I'm a bit slow in posting and responding to comments I hope you'll understand.


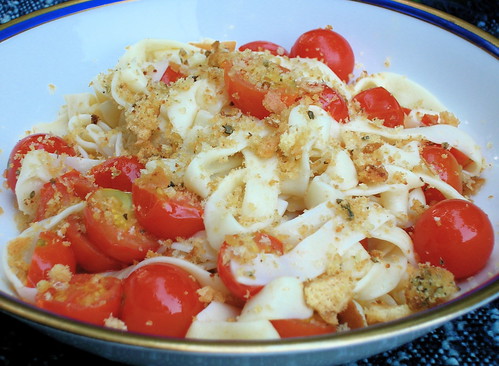
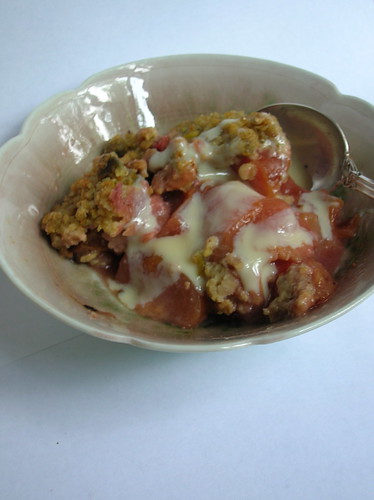
Pasta with Sweet 100 Tomatoes and Crunchy Breadcrumbs
The ultimate seasonal version of classic pasta and tomatoes, we like to make it with the sweet 100 tomatoes that come in September. Serves 4.

1 lb pasta, like spaghetti or bucatini
1/4 cup olive oil
4 garlic cloves, thinly sliced
2 pints cherry tomatoes, like Sweet 100's
salt and pepper
for the topping:
olive oil
1 1/2 cups fresh breadcrumbs
1/2 cup finely chopped or roughly ground almonds
1 tbl minced fresh basil or garlic chives

1. For the topping: Combine the breadcrumbs, almonds, and herbs in a bowl with some salt and pepper, rub everything together with your finger tips to combine. Heat a glug of olive oil in a saute pan. Add the breadcrumb mixture to the pan and cook, stirring frequently, until the mixture is well toasted and browned. Put the bread crumbs back in the bowl and set aside.
2. Halve about half the tomatoes, leaving the smaller ones whole.
3. Set a large pot of water to boil and cook the spaghetti according to package instructions until al dente. Meanwhile, wipe out the skillet you used for the breadcrumbs and heat the 1/4 cup of olive oil in it. Add the garlic and cook over low heat until the garlic is soft, golden, and fragrant (but not too browned!), about two minutes. Add the tomatoes and cook, swirling the pan occasionally, until the tomatoes are just about to burst. Season with salt and pepper.
4. When the pasta is done, use tongs to transfer it to the pan with the cherry tomatoes. Toss everything together over the heat just to combine, about a minute. Divide the mixture among serving bowls and sprinkle with breadcrumb topping, serve immediately.

See Also: Growing Fall Tomatoes
________________________________

26 September 2007

G.O.O.P.


My grandfather always said of our island retreat in South Carolina, “if you have to ask what there is to do there, then it's not the right place for you.” He meant, of course, that you weren’t supposed to do anything when you were there, there was the beach and the creek, sunrises, sunsets, birds to watch, sea shells to collect, and if that didn’t fill your day up already, a few good books to read.

The area has changed a lot since my family started going there generations ago, the encroachment of chain stores and fast food outlets is painful, but the island is still relatively untouched and standing on the beach looking out the view is the same. We don’t get there nearly as often since my grandparents passed away over a decade ago, and when we do I’m afraid we don’t quite live up to Grandfather’s mantra. We’ve got a laundry list of things to do: visiting friends, swinging in hammocks, renting bikes, eating shrimp and grits and boiled peanuts, looking at alligators in the state park. Don’t get me wrong, we still plan our days around the tide charts, but we also make sure to go to Frank’s restaurant, where we play bocce on the back court and where we always, always order the G.O.O.P. appetizer.


GOOP (it’s name was the kitchen code for garlic olive oil plate) is an addictively delicious plate full of roasted garlic, speckled with olives and capers and herbs. It’s also perfectly easy to make at home, and it’s as simple as it’s acronym suggests. Basically, put some garlic heads in a pan with some olive oil and herbs and capers, cover and roast for about an hour. That’s all, after it’s cooled you can add some olives if you like, and then you get out your baguette and go to work. Dip the bread in the olive oil, use a knife to spread the soft warm garlic over your bread, or fish an olive out with your fingers. Oh, and have you ever had a fried caper? Boy, you’re in for a treat because capers fry up into crunchy, salty explosions of flavor. This was actually a result of a mistake, I’m pretty sure the restaurant adds both capers and olives after roasting, but I accidentally put them in before, the crunchy capers were a delight, the olives not so much.


GOOP, or if you prefer roasted garlic plate, is a great thing for entertaining, not only because it is easy and delicious, but also because it needs a good bit of time to cool down (don’t want to burn anyone with hot oil now). So, toss it in the oven several hours before your guests are going to arrive, then put it on the back burner while you run around for a half hour hoping your guests don’t knock on the door before you’ve gotten dressed. I recommend one head of garlic per person, because people really devour the stuff. I actually love to make this on a night when I just don’t feel like fixing dinner, just a good baguette, maybe some wedges of cheese or fruit, a movie, and a lot of roasted garlic. It’s just the kind of quiet, simple pleasure that I think my grandfather would have approved of.


G.O.O.P. (Favorite Roasted Garlic Plate)
Roasting garlic turns it's flavor soft and mellow and perfect for enjoying on it's own. Any leftover oil can be filtered and reserved. Serves 4.

4-6 heads garlic
1 1/2 cups olive oil
4 sprigs thyme or rosemary
salt and pepper
1 tbl extra-large capers
mixed olives, optional
baguette or country-style bread for serving

1. Preheat the oven to 300 F. Cut the garlic through the equator to that the tips of the cloves are exposed, discard top bits. Pour the olive oil into a small roasting dish. Add the salt, pepper, thyme, and capers to the oil. Nestle the garlic cut-side down in the dish and cover tightly with foil.
2. Roast the garlic for 45-50 minutes, until the bottoms are well browned and the garlic is soft. Set aside to cool for at least 20 minutes (important! the oil is hot!).
3. To serve: add the olives, if using, and turn the garlic cut side up. Dip your bread in the oil, and scoop out garlic cloves and spread on bread with capers, munch on olives, etc.

25 September 2007

Postcard from Lunch


Dragon fruit (pitaya). So pretty, I just had to share it. I also had some grapes, blue cheese, and crackers. Highlight of an otherwise banal Tuesday.
dragon fruit + grapesafter lunch

23 September 2007

Raspberry Cream Cheese Swirl Brownies


Last time I promised more care package concoctions, and I was not kidding, though even I was not expecting that they might come so soon. I don't bake brownies very often, I've got a killer brownie recipe I keep in reserve, but I only make them on rare occaision or by request. However, ever since I saw this photo of swirly cream cheese brownies, I've wanted to make them. Some people get songs stuck in their head, I get images of beautiful baked goods that won't leave my prefrontal cortex until I actually make them. Which is precisely what I did this week.


I added raspberry jam to the cream cheese swirl, resulting in a pink accent both fruity tart and tangy. Also, I picked up some dark cocoa powder, and the resulting batter and brownie were so chocolatey black it was almost shocking, as well as delicious. As much as I love my standby brownie recipe, there's a case to be made here for an all-cocoa brownie (this recipe's base), and I love how it is dark and fudgy without being underbaked.

If you like baking brownies, or are just looking for more inspiration, there's a monthly blogging event called Browniebabe, and I recommend you check it out. Of course, for all sorts of mail-able sweets and treats, you can stay tuned here for the next care package...


Raspberry Cream Cheese Swirl Brownies

for brownie batter:
8 tbl (4 oz) unsalted butter, cubed
1 1/4 cups sugar
3/4 cup unsweetened cocoa powder (natural or Dutch-process)
1/4 teaspoon salt
1/2 teaspoon pure vanilla extract
2 cold large eggs
1/2 cup all-purpose flour
for swirl:
4 oz (1/2 block) cream cheese, room temperature
2 tbl sugar
1 egg white
1/4 tsp lemon zest (optional)
1/2 cup raspberry jam


1. Preheat the oven to 325°F. Grease an 8" square baking pan or line with parchment paper.
2. For cream cheese batter: Beat cream cheese with granulated sugar, egg white, and lemon until light and creamy. Set aside.
3. For brownie: Place butter in a saucepan and heat until the butter is just melted. Add the cocoa and sugar and heat, stirring, until everything is combined, smooth, and warm to the touch. Remove from the heat and set aside briefly until the mixture is only warm, not hot.
4. Stir in the vanilla with a wooden spoon. Add the eggs one at a time, stirring vigorously after each one. When the batter looks thick, shiny, and well blended, add the flour and stir until you cannot see it any longer, then beat vigorously for 40 strokes with the wooden spoon or a rubber spatula. Spread evenly in the pan.
5. Dollop about one third of the cream cheese mixture over the batter. Stir the raspberry jam into the remaining cream cheese mixture, then dollop that over the batter in blobs. Use a toothpick or knife to swirl the cream cheese/raspberry mix through the brownie batter.
6. Bake until a toothpick plunged into the center emerges slightly moist with batter (not completely dry), 20 to 25 minutes. Let cool completely on a rack.

21 September 2007

Molasses-Ginger Cookies for Fall


I don't know about you, but I am so invigorated by fall. The slight crispness in the air, still warm but with a hint of chill, and it seems that light falls in the house in a whole different way that I find newly beautiful. There is a school several blocks from my house, but through some strange configuration of sound waves, I am able to hear the sounds from it's playing field in perfect sharpness through my bathroom window. Standing before the mirror at 8 a.m. I hear the children's shouts, the teacher's whistle.

In my mind, fall is a time of return. A return to school, to work, a return to the sweaters you packed away all summer, to meetings and plans, to the warmth of an old boyfriend's sweatshirt. Girls stand at the bus stop in their pressed school uniforms carrying new notebooks and I'm almost (but not quite) nostalgic for my own school days. It's a time when the leaves return to the ground and when we begin to return to our own kitchens, returning to the soups and stews that we avoided for most of the summer.


For me, it's also a return to baking and to my regular care package sending. Summer presents a challenge to anyone who likes to send homemade goodies through the mail, the potential of your package sitting all afternoon in 100 degree heat is not an appealing thought, chocolate is out of the question. Molasses ginger cookies, however, are just right for the early hint of fall.

For years I've struggled over molasses cookies, mine were tasty, but never quite right. Fancy cakes, delicate macarons, those I can master, but finding a recipe that produced the molasses cookie of my dreams eluded me (that dream cookie, by the way, produced by a little bakery in Maine we visit every summer). Finally, I've found a recipe I'm satisfied with, and it's got two important points. One, you have to use shortening. Two, do not over-bake the cookies, you want the insides to stay meltingly soft, so as soon as the outsides are set and crackly, take them out.

On a final note, those boxes are part of a little kit for packaging homemade treats and were a great birthday gift from my mom (thanks!). I plan on putting them to serious use around the holidays, and in some more care packaging coming very soon.


Molasses-Ginger Cookies
Of all cookies, the molasses-type is one of my favorites. Sometimes I like to make them on the smaller side (like in the photo), but often I like them big, jumbo cookie monsters, you'll want to adjust your baking time accordingly. Also, it's important to use shortening to prevent spreading, look for one that's free of trans fats.

2 cups all purpose flour
2 teaspoons ground ginger, 1 teaspoon cinnamon, 1 teaspoon cloves
2 teaspoons baking soda
1/2 teaspoon salt
1/2 cup finely chopped crystallized ginger
1 cup (packed) dark brown sugar (preferably muscovado)
1/2 cup vegetable shortening, room temperature
1/4 cup unsalted butter, room temperature
1 large egg
1/3 cup molasses
demerrara sugar for rolling

1. Combine the flour, spices, baking soda, and salt in medium bowl; whisk to blend. Mix in crystallized ginger. In a large bowl using an electric mixer beat shortening and butter to combine, add brown sugar and beat until well-combined and fluffy. Add egg and molasses and beat until blended. Add flour mixture and mix just until blended. Cover and refrigerate 1 hour.
2. Preheat oven to 350°F. Grease/line 2 baking sheets. Spoon sugar in thick layer onto small plate. Using wet hands, form dough into 2-inch balls; roll in sugar to coat completely. Place balls on prepared sheets, spacing 2 inches apart, flatten slightly.
3. Bake cookies until cracked on top but still soft to touch and moist inside, about 10-12 minutes (do not overbake). Cool on sheets 1 minute. Carefully transfer to racks and cool.

19 September 2007

Sara's Loumi

Fish Baked with Pomegranate and Lime

We were on our usual Friday morning stroll through the market when my friend Sara suddenly let out an excited shriek. “Look,” she cried, “loumi!” Startled, I looked around confused, what, noumi, loumi? It didn’t help that the items at which she was wildly gesticulating were small shriveled black orbs, harder than rocks and somewhat resembling tiny dried brains. Before I could ask any clarifying questions, Sara had already rushed over and was engaged in intense negotiations with the vendor of the little black things, which I had now decided looked more like little grenades. “Loumi,” she asked him, “loumi bosra?” I was beginning to get a little worried about the intense activity around these bizarre objects. You can buy a lot of odd things at a Damascus souq, and I wasn't sure if we wanted these. Finally, Sara turned to me, clutching the newly-purchased package to her chest. “They’re a special kind of dried limes,” she explained, “my dad used them to make this soup whenever we were sick.”

Sara grew up in Britain but her dad hails from Bosra in southern Iraq and he has always been the cook in their family. The soup she described is much like a local version of chicken noodle soup, except it involves lamb and rice and those whole limes simmered in a thin broth. Sara doesn’t much like to cook herself, and when she moved away I inherited those dried limes and I’ve carted them around with me through many kitchens over the years, unable to throw them away because she had cherished them so dearly.


Finding something to make with my loumi proved to be very difficult. Also known as Omani limes or black limes, they have a strong sour-bitter flavor and are often used to flavor rice dishes. However, recipes were few and far between, and most called for grinding loumi into a powder (ironically, General L. Paul Bremmer, who also trained as a French chef in addition to being the former military head in Iraq, discovered loumi while in Baghdad and encorporates them into classic sauces). Anyway, when I found a recipe in Mary Bsisu’s The Arab Table for fish baked with dried limes, I pounced.

It’s called samak tibsi in Iraq, samak meaning fish and a tibs being the kind of pot it is usually baked in. I ended up deviating greatly from Bsisu’s recipe (which called for 4 lbs of fish for only four servings, and had you scatter raw diced celery over top before serving, ???). Basically, you layer onions, garlic, and fish in a baking dish, nesting the dried limes amongst them, and then you top it with a layer of sliced tomatoes and pour pomegranate juice over top. This is one of those dishes that, as you are putting it together, you know it’s going to be good. As the dish bakes, the vegetables soften and caramelize and the liquid reduces into a wonderfully thick sweet-tart sauce.


I have a tendency to declare something is my “new favorite dish” about once a week, but this really is my new favorite. I’ve made it three times in the past two months, including once for company, and I already know it’s going to be a staple. Let me outline it’s benefits: first it is supremely easy, all you do is slice some things, layer them in a dish, and bake them. It's got your vegetables and protein all in one dish, so you don't need to fix much else, a green salad and some bread perhaps. It is perfect for entertaining, where your guests will love the intricate flavors and tender fish, or for you to eat solo over several days. I’ve also discovered that this is just as good when using whole fresh limes, and since pomegranate juice is readily available in groceries nowadays, you don’t even need any special ingredients.

By now, I'm beginning to sound like my friend Sara, ecstatic over her limes. In the end, it turns out her excitement was worth it. I'll stop my enthusiastic raving, but only if you promise to go out and make this dish as soon as possible.

Note: you should use more tomatoes than in this photo.

Fish Casserole with Pomegranate and Lime (Samak Tibsi)
Hands down one of my favorite dishes, easy and sure to impress. Despite the long oven time, the fish remains moist thanks to the syrup and the insulation of the vegetables. When serving, you shouldn't actually eat the whole limes. Serves four.

1 tbl all spice, 1 tsp cumin, 1 tsp cinnamon, 1/4 tsp red pepper flakes, pinch salt
2 tbl butter
2 lb thick white fish fillet, such as orange roughy or red snapper
3 very large white onions (I used vidalia)
4 dried limes or 4 key limes or 2 regular limes
4 cloves of garlic, minced
1 lb tomatoes, sliced
1 cup pomegranate juice (or 3 tbl pomegranate molasses dissolved in 3/4 cup water)

1. Preheat the oven to 400 F. Combine the spices in a small bowl. Rub half the spices over the fish fillets.
2. Grease a casserole dish with 1 tbl of the butter. Thinly slice the onions and seperate into rings. Toss the onions with the remaining spices to coat. Spread half the onions in the bottom of your dish. Cut the fish into medium-sized pieces and arrange over the onions. Cut several slits in the dried limes (if you have larger fresh limes, halve them) and nestle the limes amongst the fish. Scatter the minced garlic over top. Dot the remaining tablespoon of butter over top. Top with the remaining onions, then cover the whole dish with the tomato slices. Overlap the tomato slices slightly as the will shrink when baking. Pour the pomegranate juice over top.
3. Bake the dish for 45-50 minutes, until the onions are softened and the sauce is slightly thickened. Serve warm.

Dried Limes can be found at Middle Eastern stores and ordered from Kalustyans.
Other recipes with dried limes: khorest ghaimeh

16 September 2007

How to Make Friends in the Middle East

Or a Rather Long Story on Why I Made a Maté Roll Cake with Sesame Cream

The first day I met Umm Hana, the woman who would become my Syrian adoptive mother, she cooked me a fabulous lunch. We hit it off right away, even though my Arabic was terribly out of practice, and after the lunch dishes were cleared, she asked if I would drink maté. Mate, I said, like yerba maté from Argentina? Thrilled that I was familiar with the drink, she fixed me a cup and we sat for hours, the first of many afternoons and evenings whiled away sipping cups of maté.

I knew yerba maté from my family’s Argentine side, the small shrub grows all over Argentina, and it’s leaves are dried and then used to make an herbal infusion much like green tea. The chopped, dried maté leaves are packed into a cup about halfway full and then simmering water is poured over top. The leaves swell to fill the whole cup, and the drink is sipped through a special straw with a filter on the tip: you suck out the infused water, and then continue adding hot water, drinking, and refilling, drinking, and refilling. Maté has a distinctly grassy herbal taste that many people find unappealing, and less courageous drinkers add sugar to mask. It is caffinated but also said to have many health benefits, as Umm Hana indicated to me that first day, patting my back and telling me it was good for my kidneys.


As I lived in Syria, maté-drinking became an important part of establishing connections with the people I met and interacted with. Maté is only drunk at home in Syria, you’ll never see it in a restaurant or cafe, and tends to be favored by the lower classes. Taxi and bus drivers always have a cup on their dash board, and stop at special roadside stands for hot-water refills. As a young independant American girl in Syria, I was naturally a curiosity to many locals I met. Speaking decent Arabic was the first step in establishing a relationship, but drinking maté was another.

Occasionally I would go out to rural areas to meet with poor families for work. We would sit on mats on the floor of their homes and be offered drinks; when I chose maté, a conversation would immediately begin as to how I knew about the drink. I would explain about my Argentine family, and since Syrians consider all lineage from the father’s side, I was now no longer American but Argentine in their eyes, an automatic plus. The conversation would then turn to the old Argentine-Syrian relations: many Syrians immigrated to Argentina in the early 1900’s, including the ancestors of Argentine President Menem. This migration and resulting trade is how maté first made it’s way to Syria, and in fact Syria is the world’s largest maté importer and one of the only places it is consumed outside South America. The conversation would usually then turn to Messi and football, and by this time I was no longer a suspicious foreigner but someone they could talk to.


One time when P. was visiting, we hiked up to an historic mosque high on the mountainside above Damascus. After the requisite tour, in which we were shown where the cave drips tears from the days of Cain and Abel, and then massaged with a holy stone, I chatted with the lone imam about what it’s like to be a hermit. Alone, a tough hike above the city, he tends his grapevines, enjoys a calm routine of prayer and ritual, and praises the freezer for keeping the meals people bring him. He offered us tea, but I had already spied his maté cup, and suggested that instead. Since he only owned one maté straw, we sat and passed the cup between the three of us, sipping and sharing.

Jamiyya al-Arba'een (Mosque of the Forty) nestled into a cave on the side of Kasayoun Mountain

Back home in the U.S. I noticed the proliferation of green tea flavored baked goods in shops and cookbooks. The Japanese often flavor sponge cakes, cookies, and ice creams with traditional matcha tea, a trend picked up by French patissieres. Matcha sounds quite similar to mate, which is how I first thought of using mate in a dessert. But which dessert? At first, I was going to use mate in one of Eric Keyser’s French tarts, but then I decided to reach into my own roots and make one of my favorite desserts: a roll cake. Having decided to make a maté-flavored cake, I had to decide what kind of filling to use.

The answer came to me when reading about molecular bases for food pairings: one listed pairing was green tea and sesame. Of course, sesame is traditional in Japanese cuisine, and Arabs use tahini in everything, not to mention the benne seed wafers of my youth! I used a dark roast tahini to make the filling, tahini is sesame seed paste and it can vary from pale white made with raw sesame seeds all the way to very dark and peanut-butter-like from roasted sesame seeds. If you can’t find a darker tahini, you can use another nut butter with delicious results.

All those experiences and research paid off, because this is one fabulous cake. If I were a chef and had a list of “signature dishes,” this would be on it. It’s unique, but it’s also accessible, and most importantly, delicious. And it will certainly make you a lot of friends in the future!


Maté Roll Cake with Sesame Cream

cake:
4 eggs, separated
3/4 cup sugar
1 heaping tablespoon yerba maté or green tea*, finely ground in a coffee grinder
1 tablespoon vanilla
3/4 cup cake flour, sifted
3/4 teaspoon baking powder
1/4 teaspoon salt
1 drop green food coloring (optional)
filling:
1/2 cup dark roast tahini or nut butter**
1/4 cup cream cheese
1/2 cup powdered sugar
1 1/2 cups heavy cream (for 3 cups whipped cream)

1. Make the filling: combine tahini, cream cheese, and powdered sugar until smooth. Whip the cream to stiff peaks. Gently fold the whipped cream into the tahini mixture and refrigerate until ready to use.
2. Preheat oven to 375 degrees F. Line a 15 by 10 by 1-inch jelly roll pan with wax or parchment paper. In a small bowl beat egg whites until stiff but not dry and set aside. In another bowl, beat the egg yolks until light. Gradually add the sugar and vanilla, and mix well. Sift together the flour, baking powder, mate, and salt. Add the sifted flour mixture to the egg yolk mixture. Fold in the egg whites into the egg mixture and pour the batter into prepared pan. Bake for 10-12 minutes or until the cake is golden.
3. Loosen edges of cake, invert cake onto a towel dusted with confectioners' sugar. Gently peel wax paper off cake. If your cake edges are very crusty you can trim them off (personally, I don't bother). Begin with the narrow side and roll the cake and towel up together. Cool cake, seam side down, for 10 to 15 minutes (but no longer, or the cake may crack when you unroll it).
4. Once cake has cooled slightly, gently unroll and spread cake with filling and re-roll. Sprinkle with confectioners' sugar.

* Yerba maté is available at Latin groceries and Middle Eastern markets. You can substitute green tea or matcha tea with excellent results.
** Tahini is sesame seed paste, for this recipe I prefer to use tahini that is made with roasted sesame seeds and has a dark color and nutty aroma. You can substitute another nut butter like peanut butter, almond butter, or soy nut butter.

13 September 2007

It's That Time of Year Again...


It's fresh date season once again, and I happily plopped a large yellow bunch into my basket the other day. A French lady at the market asked me what they were, and I explained they were fresh dates (balah), that they were dates that are picked early before they've ripened into the wrinkly brown state we're familiar with.

Fresh dates are also a reminder that Ramadan is emminent. Although Islam follows a lunar calendar (meaning seasonal foods don't associate with holidays), dates are an important symbol of breaking the Ramadan fast. During the holiday stores stock up on the most lush juicy dates, as well as dates in various stages of ripeness, date pastes and date molasses. When the fast is broken at sunset, the loudspeakers boom out from the mosques with the call to prayer and a steaming feast is set out on the table before a hungry family gathered together. Traditionally, dates are passed around the table first, as a gentle way of breaking the daily fast. This is usually followed by lentil soup, and then the rest of the meal which will contain a variety of dishes and special juices like a popular tamarind drink. Even though one may be quite hungry after fasting all day, the meal goes at a slow pace, and most people aim to eat modest portions.

Just-picked dates hanging in Palmyra, Syria.

As a foreigner and non-Muslim, I have often found myself anticipating Ramadan with a certain amount of foreboding. Like any holiday, it can also be a hectic time, and the traffic gets absolutely crazy as people rush to get home to break the fast, and hungry people mob the markets to buy last minute groceries. Just try shopping at four o'clock with a market full of people who haven't eaten all day and are eyeing the special pastries in the display windows, let me tell you. There's the added issue that at the office, any time we'd try to schedule meetings or conferences, it was always that Ramadan was coming or happening or ending, and it seemed like we'd lose two months of work to the holidays.

However, having experienced Ramadan in a Muslim country (it's different in places where the population is more mixed, like Beirut or parts of Cairo), I can tell you it's a truly amazing experience. When everyone is fasting together, there is an amazing sense of community, of shared experience, and it is also a time for reflection, family togetherness, and charity (alms-giving is an important part of Ramadan).

I was thinking about all these things when I bought my fresh dates the other day, even though the holiday had not yet begun. Fresh dates are tart and crunchy and quite similar to apples. In a culinary sense, they don't have much to offer, they make a nice snack on their own. One afternoon, I decided to slice them up and use them in a salad, along with some fresh walnuts I got at a farm recently and some crumbly cheese. This is one of the best salads I've had in a long time, it's one of those salads you have for lunch and then come home and say to your partner/boyfriend/spouse, I had the best lunch today! And then you make it every day for the rest of the week, which is exactly what I did.

If you spy fresh dates at your local market, I urge you to try this salad, or if not you could always substitute some slivers of tart apple. I hope to do some more posts about Ramadan as the holy month gets under way, and if you're observing Ramadan (or any other holiday), I wish you all a happy and joyous year to come.


Fresh Date, Walnut, and Cheese Salad

8-10 fresh dates (the yellow crunchy kind) or substitute a small Granny Smith apple
1/2 cup walnuts
1/2 cup crumbly cheese- shanklish, goat cheese, or feta
6 cups mixed greens
olive oil, salt

1. Place the greens in a serving bowl and drizzle the olive oil over top and sprinkly with salt. Toss to coat.
2. Pit the dates and slice. Lightly toast the walnuts. Place the dates, walnuts, and cheese over the greens. Serve.

11 September 2007

Green Gage Plum and Pistachio Crumble


Sometimes recipes just fall in your lap. On an August afternoon I made my way over to the market, where late summer plums were in their full regalia. I was drawn to the unusual green plums, called green gages, and though I pondered them curiously, I'd never had a green plum and was unsure if I would enjoy them. That very same evening, I read Luisa's post which raved about a wonderful plum crumble she'd made and, already cursing myself for leaving the market empty handed, I asked if she thought the recipe would work with green gages.


Luisa responded so enthusiastically that I scampered back to the market as soon as I could to get myself those special plums. Quite frankly, I've always been rather blase about plums; but oh how wrong I was. Just one green gage was enough to convince me otherwise. Plums are the last fruits of the summer season, and they hold all the juiciness of those summer stone fruits, but also with a depth and warmth that only the early tinge of cooler evenings can bring. Of all plums, I prefer the smaller European varities like prune-plums and damsons, and among them green gages are prized for their flavor.

Since I'd been contemplating green fruits, I had the idea to add green pistachios to the crumble topping (also because I accidentally bought too many at the shop last week, who knew one pound was so many?!). I had forgotten that the green gage plums turn a beautiful pink-orange color when cooked, so instead of the monochromatic dish I had pictured, I ended up with something more reminiscent of when you first pick your own outfit for kindergarten. A riot of pink and green, the crisp was just as flavorful and delicious as it was colorful. Adding pistachios gives this a special flavor and makes it quite unlike any crisp or crumble I've had before. Plum season is just getting into full swing, so you've got plenty of time to seek out those wonderful green gage plums and make yourself a crumble.


Green Gage Plum and Pistachio Crumble
Green gage plums are the princes of late summer fruit, full of juicy flavor, they turn deep pink/orange when cooked. The pistachios in the topping give this a special touch. Inspired by Luisa and Marion Burros.

12-15 green gage plums, prune plums, or green pluots
3 tbl brown sugar
3 tbl flour
1/2 tsp each cinnamon and ginger
1 tbl fresh lemon zest
for the topping:
3/4 cup flour
1/4 cup finely chopped (or roughly ground) pistachios
3/4 cup sugar
1 tsp baking powder
1 egg, beaten
4 tablespoons butter, cold

1. Preheat the oven to 375 F. Halve the plums, pit them, and slice into thick wedges. Toss the plums with the remaining filling ingredients in a bowl and set aside.
2. For the topping, combine the dry ingredients in a bowl. Agg the egg and stir with a fork to make a crumbly mixture.
3. Place the prunes in a deep 9" pie pan or small casserole. Sprinkle the crumble mixture over the top. Very thinly slice the butter into slivers and lay it over the surface of the crumble (yes, I know it's a bit tedious). Use as much butter as necessary to make sure the whole surface of the crumble is thinly covered with butter. Place in the oven and bake 35-45 minutes, until the top is browned and the filling is bubbly.

08 September 2007

Summer, Preserved

summer, preserved
Bourbon-Preserved Peaches

Somewhere at the height of summer, as we feasted ourselves on another dinner of corn, butter beans, and tomatoes, it was pointed out that we could preserve some of these seasonal delights for enjoyment later in the year. I read recently that because of our local drought, the corn season may end much earlier than usual, and just the thought of any summer bounty being cut short had led me straight to the market to stock up while the getting was still good. We could, it was noted, par-boil the corn and freeze it, or make tomato sauce for the coming dark months of winter. However when it comes to produce, I have the equivalent of in-season ADD. I like to enjoy fruits and vegetables in their immediacy, and after all, there will be winter squash and chestnuts, and come January persimmons will beckon from street-side stands.


However, there was one preserve I could wrap my head around, and that was the idea of preserved peaches, preferably spiked with a nice dose of bourbon. These are my version of that classic Southern concoction known as pickled peaches. If you are skeptical of the idea of a sweet pickle, allow me to explain- in the South, "pickled" is often used to refer to any preserved item, both sweet and savory. Therefore, pickled peaches and pickled watermelon rind are sweet syruppy preserves, though hinted with a touch of tangy-ness. Jars of these peaches are made every summer, then packed away until the winter holidays, when they are pulled out to be served alongside the Thanksgiving turkey and the holiday roast. The peaches' thick sweet syrup is flavored with just enough tangy vinegar to be served alongside an entree, although I think the sweet-sour mix is truly heavenly when paired with vanilla ice cream.


Although I'm not one for preserving, I do know how to can things, and I was enamoured with the idea of making bourbon-preserved peaches, so I headed to the market. For these peaches, you want small under-ripe fruit (small so that they fit whole into the jar, under-ripe so that they don't get too soft). I asked the farmer about smaller peaches, and he let me climb up into the back of his truck and pick out some smaller peaches, and because they were under-ripe he gave them to me for a steal, only $6 for the whole bunch. There's no getting around the fact that these are a bit labor intensive- you've got to poach and peel the peaches, then make the syrup; however, I don't think this is an unpleasant way to spend an afternoon, and after only two hours of labor I had nearly four gorgeous quarts of peaches. The canning process in itself is very short and simple, although if you choose not to can them they still last for four weeks in the fridge.

I add the bourbon in two different places- in the first part the alcohol is cooked off, but a little bit is added at the end of the syrup-making to give the peaches a bit of piquancy. I should say that if bourbon is not to your taste, you can omit it or use another alcohol like brandy or amaretto. The peaches will soften and intensify as they sit, but I will say that we consumed one jar immediately, and they were the most divine version of summer peaches I've ever had, the syrup bathing a creamy homemade brown-sugar-sour-cream sherbert. And although I canned them with the intent of saving them for the doldrums of winter, somehow letting the peaches sit that long just seems too much to bear. It's only the first week of September, but I'm already opening the second jar of peaches and reaching for the ice cream. I may regret it come winter, but by then there will be other produce to enjoy.


Bourbon-Preserved Peaches
These sweet-tart fruits are a spiked cousin of Southern pickled peaches. They are traditionally served alongside roast meats, but their slightly sour note and thick syrup means they are heavenly with vanilla ice cream. The same preparation can be applied using apricots and brandy, and Amaretto also works nicely. If you abstain from alcohol, omit it and increase the vinegar to 2 cups.

6 lbs small, firm peaches
2 lbs (4 cups) sugar
1 1/2 cups cider vinegar
1 cup bourbon, divided use
4 cinnamon sticks
1 pinch cloves
1 tablespoon chopped crystallized ginger
4 wide-mouth quart canning jars

1. Before you begin, assess the size of your peaches to see how many you'll want to cut in half to fit snuggly into the jars. Set a very large pot of water to boil. Sanitize the jars by immersing them and their lids in the boiling water for a minute, remove with tongs and set aside. Leave the water boiling, and prepare a bowl full of ice water.
2. Blanch the peaches. Submerge a few peaches in the boiling water, let boil for 1-2 minutes, then immediately transfer the peaches to the ice water. Let the peaches sit in the ice water for a minute, then remove and immediately peel the skin from the peaches and place in a clean bowl. Repeat until all the peaches are peeled. Working over the bowl to catch any juices, halve and pit as many peaches as necessary (I usually halve about half the peaches).
3. Drain the pot, rinse it, and return it to the stove. Combine sugar, vinegar, 1/2 cup of bourbon, 1 cinnamon stick broken in half, the cloves and ginger. Add any juice from the bowl of peaches. Bring the mixture to a boil, stirring to dissolve the sugar. Turn the heat down and let the syrup simmer for about 15-20 minutes, until the syrup is concentrated and slightly thickened (the syrup will be slightly golden, but it should not darken in color).
4. Add about one third of the peaches to syrup, raise the heat slightly, and poach for about six minutes, turning peaches to coat. (It will seem like you don't have enough syrup, don't worry). Transfer peaches to a jar, packing the whole peaches with the peach halves as closely as possible. Continue poaching the peaches and filling the jars in two more batches. (I usually end up with three full jars plus a half jar, depending on the size of the peaches). Turn the heat off the syrup, let cool slightly, and then stir in the remaining 1/2 cup bourbon. Carefully ladle the syrup into the jars, filling to within 1/2 inch of the rim. Insert a cinnamon stick into each jar. Run a knife or small spatula on the inside of the jars to release any air bubbles, wipe the rims of the jars clean. Place the lids on the jar and screw on caps so that they are finger-tight.
5. If you are canning the jars, prepare a large bot of boiling water again. Submerge the closed cans in the boiling water for 15 minutes. Remove with tongs or rubber mitts, set aside the jars to cool to room temperature. If you don't want to process the jars, the peaches will keep for four weeks in the refrigerator.

06 September 2007

For Summer, Not Quite Gone, Already Missed


It seems another season is slipping away before I’ve had a chance to savour it fully. Summer, with your warm sun, your flip-flops, your sweaty brows, your picnics in the park, your corn and tomatoes, I just need a little more time. Yes, I know that the season lasts another three weeks, but just the word September is enough to send shivers down my spine. September says school and work and back to the daily grind. It’s enough to make me pack up my pencil boxes and Hello Kitty folders and head back to school.

How could it be that as someone who writes about food, I haven’t even gotten around to telling you about the vegetables I grew in pots this summer: the tiny sweet 100 tomatoes almost candy-like in their sweetness, the Brandywines and Mr. Stripeys, the Ichiban eggplants and peppers and purple basil. Oh sure, we ate our fill of corn and crabs and squash, but as the end of August approached, I realized I hadn’t even made my ajo blanco, my white gazpacho. I had talked frequently about this chilled garlic soup, telling friends about how I had to make it every summer, and yet I still hadn’t done it.


If you told someone that this beloved summer dish was a soup made from garlic, almonds, and stale bread, and served with green grapes, they might raise a skeptical eyebrow. However, ajo blanco is a traditional Spanish dish , one of the many varieties of gazpacho, or chilled smooth soups. It is creamy, redolent of garlic and accented by the bright pop of grapes, a combination of tastes and textures that make it one of the most refreshing things I can think of on a hot day. The first time I made it several years ago, I loved it so much I ate it for breakfast the next morning. Unfortunately, the garlic had intensified overnight to nearly dragon-breath strength and I went off to a 3 hour dance rehearsal with a taste in my mouth no mint or gum could mask.


Since my unfortunate garlic-breath incident, I’ve come up with a solution that keeps all my favorite qualities of ajo blanco without the pungency: roasted garlic. Roasting the garlic imbues the dish with a mellow flavor, and enables you to use a lot more: one whole head per serving! In fact, if you make the soup with only roasted garlic, you won’t even taste the garlic at all, so I reserve one raw garlic clove for a bit of accent. And while I obviously think ajo blanco is good any time of day, I do have a favorite way of serving it: for a full menu, pair it with simple shrimp skewers and a green frisee salad.

In fact, it’s this entire meal that says summer to me, pulling the shrimp off the skewers, dipping them into the creamy soup, the pleasant crunch of lettuce. We still have a good few weeks of summer left, my sweet 100 tomato plant is still producing, the sun doesn’t set until after eight. So I’m holding on to what’s left, the last of the tomatoes and plums, a few more dinners with chilled soup and twilight in the background, I’m milking it for all it’s worth.


Ajo Blanco (White Gazpacho)
This chilled soup of almonds and garlic is a summer staple in my house. Don’t be alarmed by the amount of garlic, roasting tames any of it’s pungency. I like to serve ajo blanco with shrimp and a nice frisee salad.

1/4 cup olive oil
4 heads garlic
2 stale crusty rolls or one 5” hunk of baguette
1 cup whole almonds
3 tbl sherry vinegar or white wine vinegar
2 1/2 cups water
pinch salt
1/2 cup green grapes, halved

1. Preheat the oven to 375 F. Cut off the top third of the garlic heads, so the tips of the cloves are exposed. Separate one small garlic clove and set aside. Choose a small baking dish or oven-proof pot and pour in the olive oil, place the garlic heads cut side down and cover the dish tightly with foil. Bake 40-45 minutes, until the garlic is tender. Set aside to cool.
2. Tear the bread into chunks, place in a bowl and cover with cold water to soak. Place the almonds in a food processor and pulse until finely ground (I usually make this soup in my blender, in which case I grind the almonds in a coffee grinder first, then add them to the blender). Take the garlic heads (don’t discard the oil they were in) and squeeze the cloves out into the blender jar. Add the reserved raw garlic clove, squeeze the water from the bread, and add bread to the processor, pulse to combine. Add the vinegar and salt, then drizzle in some of the reserved olive oil and blend until a smooth paste forms. Thin the soup with the water to desired consistency.
3. Chill the soup for in the refrigerator until serving (if it thickens, thin it with more water before serving). Ladle the cold soup into bowls, and sprinkle with the green grapes.

Make a Meal of It: Serve the ajo blanco with shrimp skewers and a green salad. Thread shrimp onto skewers (leftover chopsticks also work) and rub with a little olive oil, salt, and red pepper. Sear the shrimp on a preheated grill/grill pan, until plump and pink. I like to make a frisee with an anchovy dressing on the side.
_________________________________